Powerfix Profi Z16531 Operation And Safety Notes
Hand-held stapler set
Hide thumbs
Also See for Z16531:
- Operating and safety notes (24 pages) ,
- Operation and safety notes (25 pages) ,
- Operation and safety notes (20 pages)
Advertisement
Available languages
Available languages
Quick Links
Hand-Held stapler set
Hand-Held stapler set
Operation and Safety Notes
KéZI tűZőGép
Kezelési és biztonsági utalások
spOnKOvačKa
Pokyny pro obsluhu a bezpečnostní pokyny
HandtaCKer-set
Bedienungs- und Sicherheitshinweise
IAN 107268
ZsZyWaCZ ręCZny - ZestaW
Wskazówki dotyczące obsługi i bezpieczeństwa
KOMplet Z rOčnIM
spenjačeM
Navodila za upravljanje in varnostna opozorila
ZOŠÍvačKa
Pokyny pre obsluhu a bezpečnostné pokyny
Advertisement

Related Manuals for Powerfix Profi Z16531


Summary of Contents for Powerfix Profi Z16531
- Page 1 Hand-Held stapler set Hand-Held stapler set ZsZyWaCZ ręCZny - ZestaW Operation and Safety Notes Wskazówki dotyczące obsługi i bezpieczeństwa KéZI tűZőGép KOMplet Z rOčnIM spenjačeM Kezelési és biztonsági utalások Navodila za upravljanje in varnostna opozorila spOnKOvačKa ZOŠÍvačKa Pokyny pro obsluhu a bezpečnostní pokyny Pokyny pre obsluhu a bezpečnostné...
- Page 2 Operation and Safety Notes Page Wskazówki dotyczące obsługi i bezpieczeństwa Strona Kezelési és biztonsági utalások Oldal Navodila za upravljanje in varnostna opozorila Stran Pokyny pro obsluhu a bezpečnostní pokyny Strana Pokyny pre obsluhu a bezpečnostné pokyny Strana DE / AT / CH Bedienungs- und Sicherheitshinweise Seite...
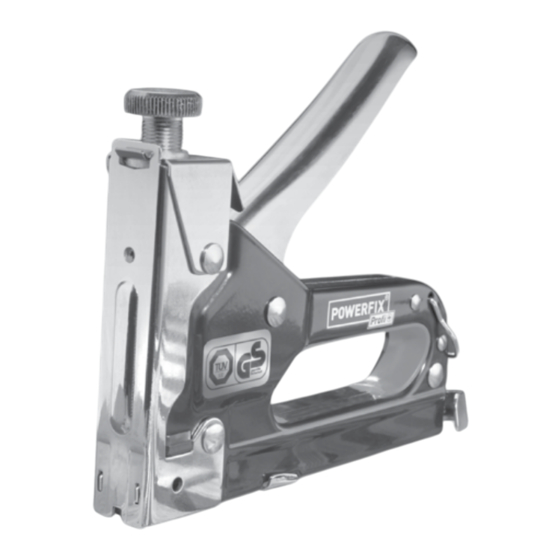
- Page 5 HAND-HELD STAPLER SET Type (mm) (mm) (mm) Round crown 10 - 12 6.2 - 6.5 1.1 - 1.3 Proper Use staples The stapler gun is intended exclusively for stapling cardboard, leather, cloth (textile or natural fibres) or similar lightweight materials on to hardwood, softwood, chipboard or similar plywood-type materials.
- Page 6 Operation Note: Only trigger the device whilst firmly Filling with staples / nails positioned in the area you wish to work on. CAUTION! Use only the staples and nails Examples of use: described in these operating instructions (see “Staples / nails”). Failure to observe this advice The stapler gun is suitable for the following purposes: may result in damage to the device.
- Page 7 Note: Do not use the stapler gun if it shows more serious defects (damage to body etc.). If necessary have your stapler repaired by a qualified specialist. Take note that the manufacturer’s original spare parts only should be used in any repair. Cleaning and care The product must be kept clean, dry and free of oil or lubricants at all times.
-
Page 8: Wskazówki Dotyczące Bezpieczeństwa
ZSZywACZ RęCZNy - ZESTAw (mm) (mm) (mm) Zszywki w 10 - 12 6,2 - 6,5 1,1 - 1,3 Użytkowanie produktu kształcie litery U zgodnie z jego przeznaczeniem Zszywarka ręczna jest przeznaczona wyłącznie do zszywania papy, materiału izolacyjnego, skóry, materiału (z włókna tekstylnego względnie naturalnego) oraz porównywalnego materiału Gwoździki w 10 - 14... - Page 9 Zadbaj o to, żeby podczas transportowania obrabianą powierzchnią, ponieważ w razie lub przy przechowywaniu zszywarki ręcznej ześlizgnięcia się rąk istnieje niebezpieczeństwo nie znajdowały się w niej już żadne zszywki obrażeń ciała. lub gwoździki. Postępuj w następujący sposób: 1. Dociśnij otwór wylotowy do miejsca, w Obsługa którym chcesz zszywać.
- Page 10 Podczas pracy zszywki i gwoździki mogą otrzymać można w urzędzie miejskim lub gminnym. zakleszczyć się w zszywarce ręcznej. Zakleszczone zszywki usuwasz w następujący sposób: 1. Naciśnij suwak zszywek lekko do wewnątrz i pociągnij go przy tym w dół. Następnie wyciągnij suwak zszywek w całości z dolnego magazynku ładunkowego 2.
-
Page 11: Biztonsági Tudnivalók
KéZI TűZőgéP Típus (mm) (mm) (mm) U-kapcsok 10 - 12 6,2 - 6,5 1,1 - 1,3 Rendeltetésszerű használat A kézi tűzőgép kizárólag kartonpapíroknak, szigetelő anyagoknak, bőröknek, szőtteseknek (textil- ill. természetes szálakból készült) és hasonlóan könnyű anyagoknak keményfára, T-szegek 10 - 14 1,6 - 2 1,1 - 1,3 puhafára, forgácslemezekre, vagy rétegelt... - Page 12 szegek. 2. Esetleg igazítsa az ütőerőt az anyagokhoz, kapcsokhoz vagy szegekhez. Kezelés 3. Nyomja erőteljesen a kioldó kart lefelé. Kapcsokkal / szegekkel való Utalás: A készüléket feltöltés csak akkor oldja ki, ha az már szorosan a VIgyÁZAT! Csak az ebben a Kezelési megmunkálandó...
- Page 13 fogva hátrafelé és húzza a kapocstárat felfelé (lásd a E ábrát). 4. Most távolítsa el a beszorult kapcsokat a kapocstárból 5. Nyomja a kapocstárat az oldalszárnyaknál fogva hátrafelé és a kapocstár újonnani rögzítéséhez nyomja azt addig lefelé amíg bepattan. Utalás: Nagyobb zavarok (a ház megkárosodása stb.) előállása esetén helyezze a kézi tűzőgépet üzemen kívül.
-
Page 14: Varnostna Navodila
KOMPLET Z ROčNIM SPENJAčEM (mm) (mm) (mm) U-sponke 10 - 12 6,2 - 6,5 1,1 - 1,3 Uporaba v skladu z določili Ročni spenjalnik je primeren izključno za pripenjanje lepenke, izolacijskega materiala, usnja, blaga (iz tekstilnih oz. naravnih vlaken) in primerljivih materialov na trd ali mehek les, iverne plošče ali T-žeblji 10 - 14... - Page 15 Uporaba Opozorilo: Napravo vključite šele takrat, ko ste Polnjenje s sponkami / z žeblji jo položili na mesto za obdelavo. POZOR! Uporabljajte samo sponke in žeblje, Primeri uporabe: ki so opisani v tem navodilu za uporabo (glejte “Sponke / žeblji”). V nasprotnem primeru grozi Ročni spenjalnik je med drugim primeren za nevarnost, da se bo naprava poškodovala.
- Page 16 primite za stranski krili in ga potisnite nazaj ter ga pri tem pritisnite navzdol, dokler se spodnji magazin ne zaskoči. Opozorilo: Ročni spenjalnik v primeru večjih motenj (poškodbe na ohišju itn.) vzemite iz uporabe. Ročni spenjalnik dajte eventualno v popravilo strokovnjaku.
- Page 17 SPONKOVAčKA (mm) (mm) (mm) Spony U 10 - 12 6,2 - 6,5 1,1 - 1,3 Použití ke stanovenému účelu Ruční sešívačka se výhradně hodí k sešívání lepenky, izolačního materiálu, kůže, látky (textilní, popř. přírodní vlákna) a srovnatelných lehkých materiálů na tvrdé dřevo, měkké dřevo, třískové desky nebo Hřebíky T 10 - 14 1,6 - 2...
- Page 18 Obsluha Upozornění: Zařízení uveďte do provozu pouze Naplnění spon / hřebíků tehdy, když je pevně přiloženo k místu POZOR! Použijte jen v tomto návodu popsané zpracování. spony a hřebíky (viz „Spony / hřebíky“). Jinak Příklady použití: hrozí poškození zařízení. Ruční sešívačka se hodí mezi jiným pro následující Postupujte následujícím způsoben: použití: 1.
- Page 19 křídlech dozadu a stiskněte jej dolů až zapadne, aby se podkládací zásobník znovu zafixoval. Upozornění: Při větších poruchách vyřaďte ruční sešívačku (poškození na pouzdru atd.) z provozu. Ruční sešívačku nechejte případně opravit kvalifikovaným odborníkem. Dbejte na to, aby se při eventuálních opravách používaly jen originální náhradní...
- Page 20 ZOŠÍVAčKA (mm) (mm) (mm) Spony tvaru U 10 - 12 6,2 - 6,5 1,1 - 1,3 Použite na určený účel Sponkovačka je určená výlučne na pripevnenie lepenky, izolačných materiálov, kože, látok (textilné príp. prírodné vlákna) a porovnateľne ľahkého materiálu na tvrdé drevo, mäkké drevo, Klince tvaru T 10 - 14 1,6 - 2...
- Page 21 Obsluha Pokyn: Prístroj spustite iba vtedy, keď pevne Naplnenie spôn / klincov prilieha na opracovávanom mieste. POZOR! Používajte iba spony a klince (pozri Príklady použitia: „Spony / klince“) popísané v tomto návode na obsluhu. V opačnom prípade hrozí poškodenie Ručná sponkovačka je vhodná okrem iného na prístroja.
- Page 22 na kryte atď.) prestaňte sponkovačku používať. Nechajte sponkovačku prípadne opraviť kvalifikovanému odborníkovi. Dbajte pri tom na to, aby sa pri opravách používali iba originálne náhradné diely. čistenie a údržba Výrobok musí byť vždy čistý, suchý a očistený od oleja alebo mazacích tukov. Na čistenie používajte jemne navlhčenú...
-
Page 23: Bestimmungsgemäße Verwendung
HANDTACKER-SET (mm) (mm) (mm) Bestimmungsgemäße U-Klammern 10 - 12 6,2 - 6,5 1,1 - 1,3 Verwendung Der Tacker ist ausschließlich zum Heften von Pappe, Leder, Stoff (Textil- bzw. Naturfaser) und vergleichbarem, leichtem Material auf Hartholz, Weichholz, Spanplatten oder sperrholzähnlichem T-Nägel 10 - 14 1,6 - 2 1,1 - 1,3... - Page 24 Bedienung gehen Sie wie folgt vor: 1. Pressen Sie die Ausschussöffnung auf die Klammern / Nägel auffüllen Stelle, die Sie heften wollen. 2. Passen Sie ggf. die Schlagkraft den Materialien, VORSICHT! Verwenden Sie nur die in dieser Klammern oder Nägeln an. Bedienungsanleitung beschriebenen Klammern und 3.
- Page 25 nach innen und ziehen Sie ihn dabei nach unten. Ziehen Sie den Klammerschieber anschließend komplett aus dem Unterlade- magazin heraus. 2. Drehen Sie den Tacker um, so dass das Unterlademagazin nach oben zeigt. 3. Drücken Sie das Unterlademagazin an den Seitenflügeln nach hinten und ziehen Sie das Unterlademagazin...
- Page 26 OWIM GmbH & Co. KG Stiftsbergstraße 1 D-74167 Neckarsulm Model No.: Z16531 Version: 03/2015 IAN 107268...
Need help?
Do you have a question about the Z16531 and is the answer not in the manual?
Questions and answers
Model no:Z16531 stapler instruction
The instructions for the Powerfix Profi model Z16531 stapler include:
1. Proper Use: The stapler is designed only for stapling lightweight materials like cardboard, leather, and cloth onto hardwood, softwood, chipboard, or plywood.
2. Staple Types:
- Round crown staples: 10–12 mm length, 6.2–6.5 mm width, 1.1–1.3 mm thickness.
- T-nails: 10–14 mm length, 1.6–2 mm width, 1.1–1.3 mm thickness.
3. Stapling Procedure:
- Press the staple eject opening on the desired spot.
- Adjust the impact force based on materials and staples.
- Firmly press the operating lever.
4. Removing Jammed Staples:
- Slightly press and pull down the staple pusher to remove it.
- Turn the stapler so the magazine faces up.
- Press the side wings of the magazine and pull it upward.
- Remove jammed staples.
- Reinsert the magazine by pressing the wings and pushing it down until it locks.
5. Safety:
- Never place hands near the gun or workpiece surface.
- Do not use the stapler if damaged.
- Repairs should use only original spare parts.
6. Cleaning and Care:
- Keep it clean, dry, and free from oil.
- Clean with a slightly damp, lint-free cloth.
7. Disposal:
- Packaging is recyclable.
- Dispose of old units through local recycling services.
This answer is automatically generated