TP-Link VIGI Installation Manual
Hide thumbs
Also See for VIGI:
- Installation manual (92 pages) ,
- Quick start manual (75 pages) ,
- Quick installation manual (2 pages)
Table of Contents
Advertisement
Quick Links
Advertisement
Table of Contents

Related Manuals for TP-Link VIGI


Summary of Contents for TP-Link VIGI
- Page 1 Installation Guide Network Video Recorder...
-
Page 2: Table Of Contents
Contents Chapter 1 Appearance ——————————— 1 Front Panel ..............1 Rear Panel ...............1 Chapter 2 Installation ——————————— 3 Package Contents ..........3 Safety Precautions ..........3 Installation Tools ...........6 Hard Drive Installation ........6 Product Installation ..........9 Chapter 3 Hardware Connection —————— 11 Chapter 4 Configuration —————————— 12 Appendix FAQ ———————————————... -
Page 3: Chapter 1 Appearance
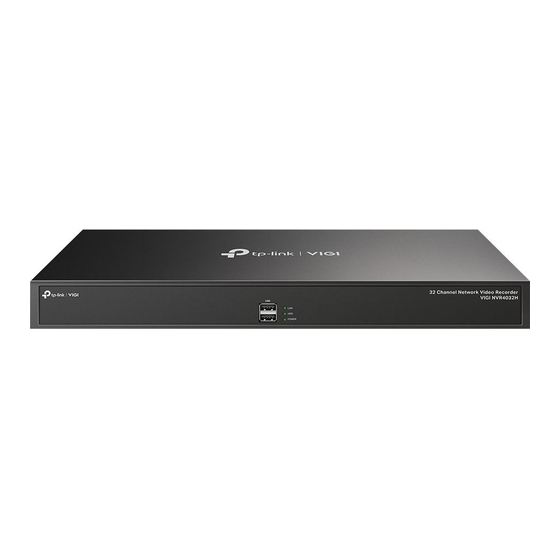
Front Panel The figure is for demonstration purposes only. Your device may differ in appearance from the depicted. 32 Channel Network Video Recorder VIGI NVR4032H Indication On: Network is working properly. Flashing: Data is being transmitted or received. Off: Network is malfunctioning. - Page 4 NVR through the PE (Protecting Earth) cable of AC cord or with Ground Cable. For detailed lightning protection measures, go to https://www.tp-link.com/support, search the model number of your NVR and go to the product Support web page, refer to the Lightning Protection Guide from the Related Documents: https://www.tp-link.com/us/configuration-guides/lightning_protection_...
-
Page 5: Chapter 2 Installation
Power Cord, HDD Power Mouse Cables, HDD Data Cables, Terminal Blocks 32 Channel Network Video Recorder VIGI NVR4032H Mounting Brackets, Screws Installation Guide and Rubber Feet Safety Precautions To avoid any device damage and bodily injury caused by improper use, you should observe the following rules. - Page 6 ■ Temperature/Humidity 32 Channel Network Video Recorder VIGI NVR4032H Keep the equipment room at an appropriate level of temperature and humidity. Too much or too little humidity may lead to bad insulation, leakage of electricity, mechanical property changes, and corrosion.
- Page 7 Use the signal SPD (Surge Protective Device) when wiring outdoor. ■ Note: For detailed lightning protection measures, go to https://www.tp-link.com/ support, search the model number of your product and go to the product Support web page, refer to the Lightning Protection Guide from the Related Documents:...
-
Page 8: Installation Tools
Installation Site 32 Channel Network Video Recorder VIGI NVR4032H When installing the device on a rack or a flat workbench, attach much importance to the following items: The rack or workbench is flat, stable, and sturdy enough to support the ■... - Page 9 2. Remove the fixing screws to detach the HDD bracket. 3. Match the screws on the HDD with the holes on the NVR. Up to 4 HDDs can be mounted at a time.
- Page 10 4. Install the HDD bracket back to the NVR. 5. Connect the power cables and data cables. 6. Replace the cover and fasten the screws of the NVR.
-
Page 11: Product Installation
Product Installation Desktop Installation ■ To install the device on the desktop, follow the steps: 1. Set the device on a flat surface which is strong enough to support the entire weight of the device with all fittings. 2. Remove the adhesive backing papers from the rubber feet. 3. - Page 12 3. After the brackets are attached to the device, use suitable screws (not provided) to secure the brackets to the rack, as illustrated in the following figure.
-
Page 13: Chapter 3 Hardware Connection
Chapter 3 Hardware Connection Follow the steps below to complete the hardware connection. Mouse Network Device (e.g. Router, Switch) Monitor 1. Connect your monitor to the HDMI or VGA port according to the connection port it supports. 2. Connect your monitor to a power source and turn it on. 3. -
Page 14: Chapter 4 Configuration
Chapter 4 Configuration NVR can add and manage cameras in batches. * Here we use TP-Link cameras as an example. For other camera brands, please refer to their User Manuals to add the cameras. Step 1. Connect your cameras to the same network as your NVR. - Page 15 Remotely view live video, manage NVR, and get instant alerts. 1. Download and install the latest TP-Link VIGI app. 2. Open the app and log in with your TP-Link ID. If you don’t have an account, sign up first. 3. Tap the + button on the top right and follow the app instructions to add your NVR.
- Page 16 Method 3: Via the VIGI Security Manager (Windows only) ■ View live video and modify NVR settings on your computer. 1. Download the VIGI Security Manager on your computer at https:// www.tp-link.com/support/download/vigi-security-manager/. 2. Install the VIGI Security Manager and open it.
- Page 17 2. Make sure your NVR is in the same network segment as your network devices, or select Auto as the mode to configure the NVR to obtain a dynamic IP address. For more details, please refer to the NVR’s User Guide. If you have more questions, please visit https://www.tp-link.com/support/ faq/2850/.
- Page 18 EU Declaration of Conformity TP-Link hereby declares that the device is in compliance with the essential requirements and other relevant provisions of directives 2014/30/EU, 2014/35/EU, 2009/125/EC, 2011/65/EU and...
- Page 19 The original EU Declaration of Conformity may be found at https://www.tp-link.com/en/support/ UK Declaration of Conformity TP-Link hereby declares that the device is in compliance with the essential requirements and other relevant provisions of the Electromagnetic Compatibility Regulations 2016 and Electrical Equipment (Safety) Regulations 2016.
- Page 20 The terms HDMI, HDMI High-Definition Multimedia Interface, and the HDMI Logo are trademarks or registered trademarks of HDMI Licensing Administrator, Inc. To ask questions, find answers, and communicate with TP-Link users or engineers, please visit https://community.tp-link.com to join TP-Link Community.
Need help?
Do you have a question about the VIGI and is the answer not in the manual?
Questions and answers