Advertisement
Quick Links
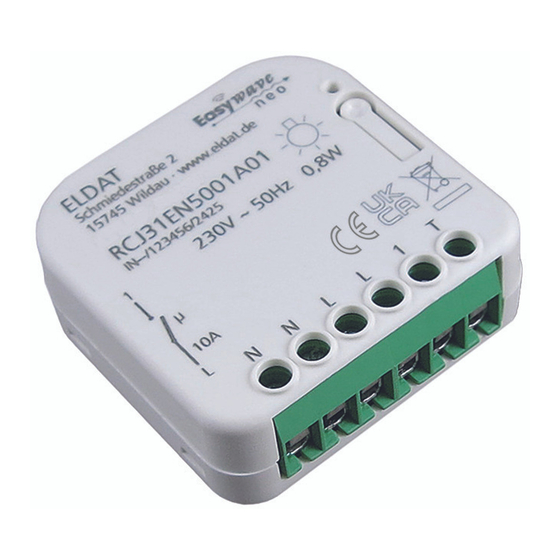
RCJ33 Flush-mounted receiver
EN
Models
LED red|green
12-24V AC/DC max. 1W
RCJ33EN5001A01
Wiring diagram
12-24V
AC/DC
Wire cross-sections
Only wires with a cable cross-section of 0.5 mm²
to 2.5 mm² shall be connected.
Technical Details
Frequency:
868.30 MHz
Modulation:
FSK
Coding:
Easywave neo,
POTA
Device type:
switch
Power supply:
12-24 V AC/DC
Input:
1 external button
Output:
1 potential-free relay
contact (changeover)
Power consumption:
0.2 W standby
1.0 W max. w/o load
Max. contact rating:
- AC
60 V / 1 A / 60 VA
- DC
30 V / 1 A / 30 VA
Operating temperature: -20 °C to +45 °C
Dimensions (H/W/D):
43,0 / 42,0 / 17,5 mm
Weight:
approx. 31 g
Scope of Delivery
Flush mounted receiver RCJ33,
operating manual, quick start guide
Intended Use
The device may only be used indoors as a radio
receiver in connection with low voltage devices. It
is operated using Easywave radio transmitters or
an external button.
The manufacturer will not be liable for damage
caused by improper or inappropriate use.
Safety Advice
Programming
Before installing the device, carefully
read through this operating manual! Fai-
Button P
ling to observe these instructions may
result in fire or other hazards.
-
During installation, care must be taken to
ensure that the maximum output load is
observed. If this cannot be ensured, the
electrical circuit must be secured on the
installation side in accordance with the
applicable regulations.
-
The electrical installation may
only be performed by an autho-
rised and qualified electrician.
-
We will not accept any liability for personal
injury or damage to property caused by
failure to observe the operating instructions
and in particular the safety advice!
-
Observe the applicable laws, standards and
regulations as well as the manufacturer's
instructions for the devices to be operated!
-
Have faulty units checked by the manufactu-
rer!
-
Do not open the unit housing!
-
Do not make any unauthorized alterations or
modifications to the unit!
Function
The RCJ33 flush-mounted receiver is used to al-
ternately switch an electrical device ON and OFF
using a radio transmitter or an external button.
The operating modes ON/OFF, LOGIC, DEAD
MAN and TIMER are available (see section "Ope-
rating modes").
32 transmission codes can be programmed into
the receiver.
The integrated POTA (Programming Over The
Air) remote programming function can be used to
reprogram an already-installed and no longer ac-
cessible receiver. A detailed POTA programming
manual is available on our website:
https://www.eldat.de/pota_en.pdf
or you can request support from our customer
service.
Push-button input T
The RCJ33 has a push-button input (T), which
has to be wired with the positive terminal (+) of
the supply voltage.
When in factory mode, the push-button input
works in the ON/OFF 1-button operation mode
(see operating modes).
The external button can be programmed in other
operating modes or deleted at any time. This is
done in the same way as programming Easywave
transmitters.
If the external button is deleted from memory, it
returns to the ON/OFF 1-button operation mode.
The push-button input works like a transmitter
button with the button code B and should always
be used in 1-button operation.
If the push-button input is programmed in the ON/
OFF 2-button operation mode, it can lock the out-
put. As long as the push-button input is closed,
the switching output remains switched off. Radio
transmitters are ignored during this time.
If the push-button input is programmed in DEAD-
MAN operating mode, it switches the output ON
as long as it is closed. However, radio transmit-
ters can switch the output OFF again at any time.
It is not possible to use the push-button input in
the LOGIC operating mode!
Operation
Briefly press button P to begin programming
mode for the required operation type. Any Easy-
wave transmitter can then be programmed under
this operation type.
A separate operation type can be assigned to
each transmitter / transmitter button. For local
operation, one external button can be connected.
When in 2-button operation (2-TB), transmitter
buttons A and C switch ON. Transmitter buttons
B and D switch OFF. Only one transmitter button
must be programmed, as the code of the second
button is automatically assigned.
In 1-button operation (1-TB), each function is
triggered with just one transmitter button. Each
button must be programmed individually into the
receiver, there is no automatic assignment.
Timeout
(1)
If no button is pressed within 30 seconds, the
RCJ33 automatically switches to operation mode.
The settings are not saved.
Operating modes
2-button operation
ON/OFF
Transmission code A or C switches ON.
Transmission code B or D switches OFF.
LOGIC
All programmed transmission codes are linked in
accordance with an AND/OR logic.
OR linkage
If one of the programmed transmitters trans-
mits an ON telegram (A/C), the receiver swit-
ches ON.
AND linkage
If all programmed transmitters which have pre-
viously transmitted an ON telegram (A/C) have
transmitted an OFF telegram (B/D), the recei-
ver switches OFF.
This operating mode is subordinate to all other
operation types! This means that any command
from a transmitter under another operation type
will reset this operation type!
1-button operation
ON/OFF
Each transmitter code A/B/C/D can switch ON
and OFF alternately.
If the transmitter button is pressed for longer than
2 seconds, the output is switched OFF, regardless
of its current state (status of switching is synchro-
nized).
DEAD MAN
The output switches as long as the transmitter
button is pressed, but for a maximum of 36 se-
conds (unlimited, when using external button).
TIMER
adjustable, retriggerable
The receiver switches ON and automatically OFF
again after the set time (factory setting: 7 minu-
tes). Any transmission code A/B/C/D can be used.
Pressing the transmission button again before the
timer finishes extends the switching time again to
the set time. The TIMER function can be set by
the user in a range from 1 second to 30 hours
(see "Set TIMER").
Advertisement

Related Manuals for Eldat Easywave neo


Summary of Contents for Eldat Easywave neo
- Page 1 This means that any command Push-button input T Modulation: from a transmitter under another operation type Coding: Easywave neo, The RCJ33 has a push-button input (T), which will reset this operation type! POTA has to be wired with the positive terminal (+) of...
- Page 2 SETTING UP THE RECEIVER The receiver must be installed and commissioned by a qualified electrician in a com- Make sure there is no interference with the mercially available flush-mounted installation box (min. diameter 68 mm). wireless connection! Do not mount the device in a distribution box, 1. Switch off the power supply. 3. Transfer the coding of the transmitter buttons in metal casings and in direct proximity to lar- to the receiver (see „Program transmitters“).
- Page 3 PROGRAMMING Set TIMER The user can set individual switching times for the TIMER function. Doing so, the base time measured during setting of the TIMER is multiplied by the selected multiplier. The maximum base time is 30 se- conds, the measurement stops automatically after this. The programmed switching time applies to all transmitters programmed in the TIMER operation mode, even if they have already been programmed before the setting of the TIMER.
- Page 4 Program the server into the receiver according to the instructions in the respective server application by adding an ELDAT actuator as an „Easywave neo“ device. After it is programmed, the server receives feedback about each switching operation performed, even if this is triggered by another transmitter or manually via the external button on the RCJ33.
Need help?
Do you have a question about the Easywave neo and is the answer not in the manual?
Questions and answers