Advertisement
Quick Links
SETUP & OPERATION MANUAL
Excalibur "T" Fence system with:
• 30" rails (EXF-30S-R30)
• 50" rails (EXF-30S-F50)
FITS ON:
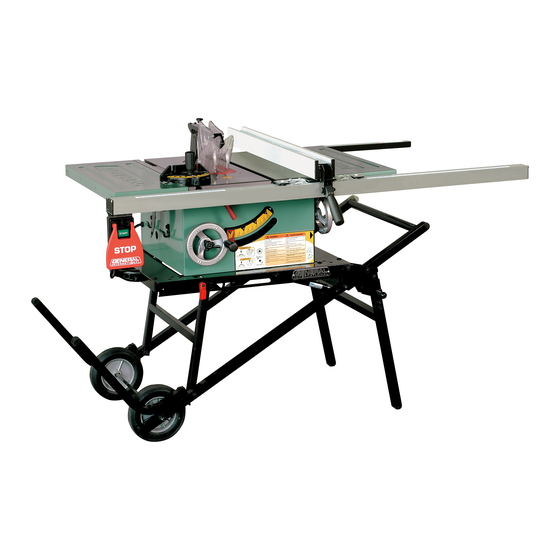
50-090RK
50-090RC
50-200R
50-275R
50-225R
50-220R
Version
1, Revision #3 - November 2014
#
© Copyright General International
EXCALIBUR "T" FENCE SYSTEM
Rip fence system only - table saw sold separately
MODELS
EXF-30S-R30
#
EXF-30S-R50
#
Advertisement

Related Manuals for General International Excalibur EXF-30S-R30


Summary of Contents for General International Excalibur EXF-30S-R30
- Page 1 Excalibur “T” Fence system with: • 30” rails (EXF-30S-R30) • 50” rails (EXF-30S-F50) FITS ON: 50-090RK 50-090RC 50-200R 50-275R 50-225R Rip fence system only - table saw sold separately MODELS 50-220R EXF-30S-R30 EXF-30S-R50 Version 1, Revision #3 - November 2014 © Copyright General International...
- Page 2 GENERAL® INTERNATIONAL 8360 Champ-d’Eau, Montreal (Quebec) Canada H1P 1Y3 Telephone (514) 326-1161 • Fax (514) 326-5555 • www.general.ca THANK YOU for choosing this Excalibur by General International model ® Excalibur «T» Fence System. This fence system has been carefully tested and inspected before shipment and if properly used and maintained, will provide you with years of reliable service.
- Page 3 Rules for Safe Operation To help ensure safe operation, please take a moment to learn the machine’s applications and limita- tions, as well as potential hazards. General® International disclaims any real or implied warranty and hold itself harmless for any injury that may result from the improper use of it’s equipment. 1.
- Page 4 50-090RC / 50-090RK UNPACK FENCE & RAILS A: FRONT RAIL MOUNTING HARDWARE B: REAR RAIL MOUNTING HARDWARE FENCES & RAILS ATTACH THE FRONT FENCE RAIL TO YOUR SAW (50-090RK / 50-090RC) TABLE Loosely thread the six square head bolts to the front of the table as shown in A. Assemble the fasteners in the order shown in B.
-
Page 5: Mount The Switch
ATTACH THE BACK FENCE RAIL TO YOUR SAW (50-090RK / 50-090RC) Use 6 cap screws with lock washers and nuts A to assemble the rear rails to the rear of the saw as shown B. Make sure that the intersection C between the two rear rails is leveled D. MOUNT THE SWITCH (50-090RK / 50-090RC) 4»... - Page 6 50-200R / 50-275R UNPACK FENCE & RAILS A: FRONT RAIL MOUNTING HARDWARE B: REAR RAIL MOUNTING HARDWARE FENCES & RAILS ATTACH THE FRONT FENCE RAIL TO YOUR SAW (50-200R / 50-275R) Loosely thread the 2 square head bolts to the front of the table. Assemble the fasteners in the order shown above.
- Page 7 ATTACH THE BACK FENCE RAIL TO YOUR SAW (50-200R / 50-275R) Use two cap screws with lock washers and flat washers to attach the rear rails to the table A. Use two cap screws with lock washers, flat washers and nuts to attach the rails to the extension wings B. Make sure that the intersection C between the two rear rails is leveled D.
- Page 8 50-220R / 50-225R UNPACK FENCE & RAILS A: FRONT RAIL MOUNTING HARDWARE B: REAR RAIL MOUNTING HARDWARE FENCES & RAILS ATTACH THE FRONT FENCE RAIL TO YOUR SAW (50-220R / 50-225R) TABLE Loosely thread the six square head bolts to the front of the table as shown in A. Assemble the fasteners in the order shown in B.
- Page 9 ATTACH THE BACK FENCE RAIL TO YOUR SAW (50-220R / 50-225R) Use six cap screws with lock washers and nuts A to assemble the rear rails to the rear of the saw as shown B. Make sure that the intersection C between the two rear rails is leveled D. MOUNT THE SWITCH (50-220R / 50-225R) 12”...
- Page 10 ALIGN AND LEVEL THE RIP FENCE THE RIP FENCE MUST BE PARALLEL TO THE BLADE DURING OPERATION. FAILURE TO SET THE RIP FENCE PARALLEL TO THE BLADE CAN RESULT IN KICKBACK AND POSSIBLE SERIOUS INJURY. To make satisfactory rip cuts, your fence must be aligned perfectly parallel with the saw blade.
-
Page 11: Parts List
PARTS LIST REF. # PART # REF. # PART # DESCRIPTION SPECIFICATIONS DESCRIPTION SPECIFICATIONS 50221-55 SLIDE PLATE 50221-34 FENCE ASSEMBLY 50221-56 LOCK NUT M10X1.5P(17BX12H) 50221-35 END CAP 50221-57 LOCK NUT M6X1.0P(10BX7H) 50221-36 CONNECTION PLATE 50221-58 SET SCREW M8X1.25PX8 50221-37 HEX HEAD BOLT M6X1.0PX50 30S260-01 FRONT RAIL ASSEMBLY 50221-38... - Page 12 EXCALIBUR T-FENCE SYSTEM EXF-30S-R30/R50 8360 Champ-d’Eau, Montreal (Quebec) Canada H1P 1Y3 Tel.: (514) 326-1161 Fax: (514) 326-5565 - Fax: (514) 326-5555 - Parts & Service / Order Desk orderdesk@general.ca www.general.ca IMPORTANT When ordering replacement parts, always give the model number, serial number of the machine and part number.
Need help?
Do you have a question about the Excalibur EXF-30S-R30 and is the answer not in the manual?
Questions and answers