Advertisement
Quick Links
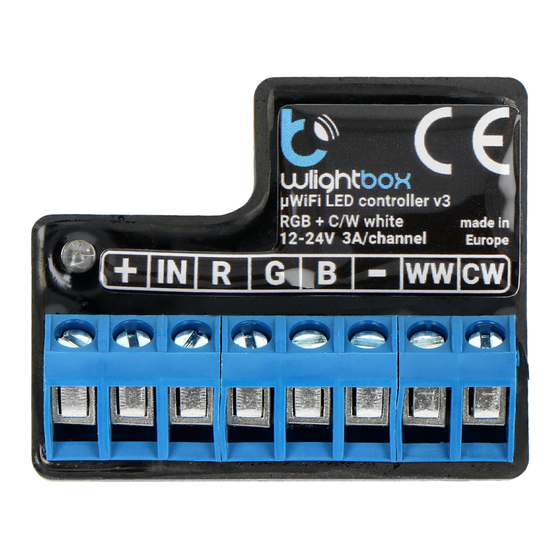
wlightbox
control with μWiFi technology
from any place in the World
WIRELESS WIFI LED CONTROLLER - 5 CHANNELS -
RGB/RGBW/RGBWW/CCT/2 x CCT/5
ability to control by voice commands with
Amazon Alexa i Google Home
SAFETY RULES
Do not connect loads with more than permissible power.
Connect only in accordance with the diagram presented in the
manual. Improper connections may be dangerous, it can damage
the controller, and loss of the warranty.
DANGER! Risk of electric shock! Even with the device turned off,
the outputs may be live. All assembly work should be ALWAYS
performed with the disconnected power circuit.
Connecting the device to a power supply that does not meet
the quality requirements specified in EN 50081-1, EN 50082-1,
UL508, EN 60950 will invalidate the warranty.
1
Disconnect the installation supply voltage before installing the controller.
Remember that any mounting works should be carried out when the mains
voltage is disconnected (switch off the mains fuse or disconnect the power
cord from the mains socket).
The controller should be installed in a place protected against adverse
environmental conditions, protected from third party access - in the flush
wLightBox v3 + RGB 3-channel strip:
v3
MONO
x
INSTALATION
LED STRIP
RGB 9A
(optional)
button
box or inside the enclosure of the controlled device. It is recommended that
the device be mounted in a stable and fixed position.
Familiarize yourself with the diagram and then proceed with the installation
of the controller. Pay special attention to the designation of the controller
connectors. Start by connecting the power wires: (+) (red or black with a
white dotted line) and (-) (black).
Connect the LED strip paying attention to the polarity and markings on the
diagrams. Depending on the application, it is possible to connect:
If you wish to control locally by using a wall push-button, please connect the
monostable push-button according to the diagram. To control only by using
the smartphone or tablet, the connection of the push-button is not required
After making sure that the device is connected in accordance with the
diagram and that there are no metal components near the controller which
may accidentally cause short-circuit, start the device by turning on the power
(turning on the mains fuse or connecting the power cord to the power outlet).
CONNECTION DIAGRAMS
wLightBox v3 + RGBW 4-channel LED strip:
A
user manual
– single RGB strip (scheme A)
– single RGBW strip (scheme B)
– single RGBWW / RGBCCT strip (scheme C)
– single RGB strip + single white strip (scheme D)
– single CCT strip (CT, CW/WW) (diagram E)
– two CCT strips (CT, CW/WW) (scheme F)
– single RGB + single CCT strip (scheme G)
– five monochrome (single color) strips (scheme H)
B
LED STRIP
RGBW max 12A
(optional)
button
Advertisement

Related Manuals for BleBox wLightBox v3


Summary of Contents for BleBox wLightBox v3
- Page 1 (turning on the mains fuse or connecting the power cord to the power outlet). environmental conditions, protected from third party access - in the flush CONNECTION DIAGRAMS wLightBox v3 + RGB 3-channel strip: wLightBox v3 + RGBW 4-channel LED strip: LED STRIP LED STRIP RGBW max 12A...
- Page 2 + RGBWW (RGBCCT) 5-channel strip: wLightBox v3 + RGB strip + single white strip: LED STRIP LED STRIP RGBCCT / RGBWW RGB 9A LED STRIP max 3A (optional) button button (optional) wLightBox v3 + single 2-channel CCT strip (CW/WW, CT):...
- Page 3 + RGB strip + CCT strip (CW/WW, CT): wLightBox v3 + 5-single-channel strips: LED STRIP max 3A LED STRIP LED STRIP max 3A RGM max 9A LED STRIP max 3A LED STRIP LED STRIP max 3A CT max 6A...
- Page 4 43 x 37 x 22mm for more information visit our website protection level IP20 www.blebox.eu controller operating temperature from -20°C to +50°C or send us an email to: info@blebox.eu protection inverted polarization, ESD support is available at support@blebox.eu open made in Europe communication standard μWiFi, compatible with WiFi, 802.11g...
Need help?
Do you have a question about the wLightBox v3 and is the answer not in the manual?
Questions and answers