Sign In
Upload
Download
Table of Contents
Contents
Add to my manuals
Delete from my manuals
Share
URL of this page:
HTML Link:
Bookmark this page
Add
Manual will be automatically added to "My Manuals"
Print this page
×
Bookmark added
×
Added to my manuals
Manuals
Brands
Flexim Manuals
Measuring Instruments
FLUXUS G601
User manual
Flexim FLUXUS G601 User Manual
Ultrasonic flowmeter for gas
Hide thumbs
1
2
3
4
Table Of Contents
5
6
7
8
9
10
11
12
13
14
15
16
17
18
19
20
21
22
23
24
25
26
27
28
29
30
31
32
33
34
35
36
37
38
39
40
41
42
43
44
45
46
47
48
49
50
51
52
53
54
55
56
57
58
59
60
61
62
63
64
65
66
67
68
69
70
71
72
73
74
75
76
77
78
79
80
81
82
83
84
85
86
87
88
89
90
91
92
93
94
95
96
97
98
99
100
101
102
103
104
105
106
107
108
109
110
111
112
113
114
115
116
117
118
119
120
121
122
123
124
125
126
127
128
129
130
131
132
133
134
135
136
137
138
139
140
141
142
143
144
145
146
147
148
149
150
151
152
153
154
155
156
157
158
159
160
161
162
163
164
165
166
167
168
169
170
171
172
173
174
175
176
177
178
179
180
181
182
183
184
185
186
187
188
189
190
191
192
193
194
195
196
197
198
199
200
201
202
203
204
205
206
207
208
209
210
211
212
213
214
215
216
217
218
219
220
221
222
223
224
225
226
227
228
229
230
231
232
233
234
235
236
237
238
239
240
241
242
243
244
page
of
244
Go
/
244
Contents
Table of Contents
Troubleshooting
Bookmarks
Table of Contents
Table of Contents
Introduction
Regarding this Manual
Safety Instructions
Warranty
Handling
First Inspection
General Precautions
Cleaning
Storage
Measurement Principle
Measurement System
Determination of the Volumetric Flow Rate
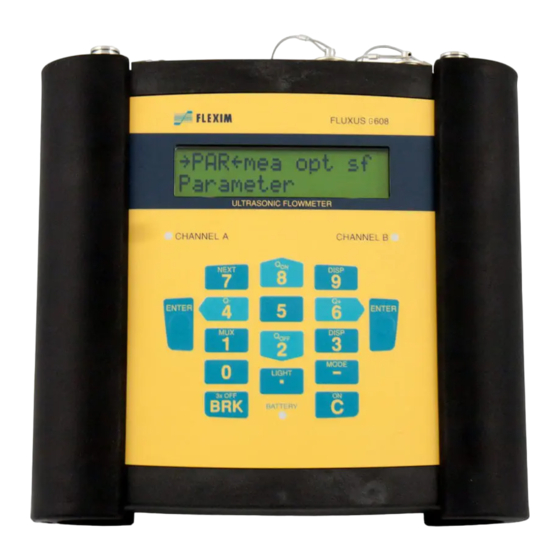
Transmitter
Design
Status Indication
Serial Number
Keyboard
Selection of the Measuring Point
Acoustic Penetration
Undisturbed Flow Profile
Influence of Noise
Selection of the Measuring Point Taking into Account the Flow Profile and the Influence of Noise
Installation of FLUXUS G601
Location
Installation of the Transmitter
Connection of the Transducers
Power Supply
Connection of the Outputs
Connection of the Inputs
Connection of the Serial Interface
Installation of FLUXUS G608
Location
Installation of the Transmitter
Connection of the Transducers
Power Supply
Connection of the Outputs (Optional)
Connection of the Inputs (Optional)
Connection of the Serial Interface
Mounting the Transducers
Preparation of the Pipe Surface
Mounting of the Damping Mats
Positioning of the Transducers
Installation of the Temperature Probe (Optional)
Cleaning of the Pipe Surface
Installation of the Temperature Probe (Response Time 50 S)
Installation of the Temperature Probe (Response Time 8 S)
Connection of the Temperature Probe
Start-Up
Switching On/Off
Displays
Hotcodes
Language Selection
Basic Measurement
Input of the Pipe Parameters
Input of the Medium Parameters
Other Parameters
Selection of the Channels
Defining the Number of Sound Paths
Transducer Distance
Start of the Measurement
Detection of the Flow Direction
Stopping the Measurement
Displaying the Measured Values
Selection of the Physical Quantity and of the Unit of Measurement
Toggling between the Channels
Adjustment of the Display
Status Line
Transducer Distance
Advanced Measuring Functions
Damping Factor
Totalizers
Upper Limit of the Flow Velocity
Cut-Off Flow
Uncorrected Flow Velocity
Measurement of Highly Dynamic Flows (Fastfood Mode)
Calculation Channels
Change of the Limit for the Inner Pipe Diameter
Data Logger and Transmission of Data
Data Logger
Transmission of Data
Working with Parameter Records
Introduction
Storing of a Parameter Record
Loading of a Parameter Record
Deleting Parameter Records
Libraries
Partitioning of the Coefficient Memory
Input of Material/Medium Properties Without the Extended Library
Extended Library
Deleting a User Defined Material/Medium
Arrangement of the Material/Medium Scroll List
Settings
Time and Date
Dialogs and Menus
Measurement Settings
Settings of the Standard Conditions for the Gas Measurement
Setting the Contrast
Instrument Information
Superuser Mode
Activation/Deactivation
Transducer Parameters
Defining the Flow Parameters
Limit of the Signal Amplification
Upper Limit of the Sound Speed
Number of Decimal Places of the Totalizers
Manual Reset of the Totalizers
Display of the Sum of the Totalizers
Display During the Measurement
Wall Thickness Measurement (Optional)
Activation of the Wall Thickness Measurement
Parameter Input
Measurement
Inputs
Assigning the Temperature Inputs to the Measuring Channels
Selection of the Temperature Probe
Assignment of Other Inputs to the Measuring Channels
Activation of the Inputs
Temperature Correction
Outputs
Installation of an Output
Error Value Delay
Activation of an Analog Output
Configuration of a Frequency Output as a Pulse Output
Activation of a Binary Output as a Pulse Output
Activation of a Binary Output as an Alarm Output
Behavior of the Alarm Outputs
Deactivation of the Outputs
Troubleshooting
Problems with the Measurement
Selection of the Measuring Point
Maximum Acoustic Contact
Application Specific Problems
Large Deviations of the Measured Values
Problems with the Totalizers
Data Transmission
A Menu Structure
B Technical Data
C Reference
D Certificates
Advertisement
Quick Links
1
Measurement Principle
Download this manual
User Manual
UMFLUXUS_G6V4-2EN
Ultrasonic Flowmeter for Gas
FLUXUS G601
FLUXUS G608
Firmware V5.xx
Table of
Contents
Previous
Page
Next
Page
1
2
3
4
5
Advertisement
Table of Contents
Need help?
Do you have a question about the FLUXUS G601 and is the answer not in the manual?
Ask a question
Questions and answers
Related Manuals for Flexim FLUXUS G601
Measuring Instruments Flexim FLUXUS G704 User Manual
Ultrasonic flowmeter for gas (257 pages)
Measuring Instruments Flexim FLUXUS G809 Operating Instruction
(181 pages)
Measuring Instruments Flexim FLUXUS G801 Operating Instruction
(177 pages)
Measuring Instruments Flexim FLUXUS G800 User Manual
Ultrasonic flowmeter for in explosive atmospheres (161 pages)
Measuring Instruments Flexim FLUXUS G831ST-HT Operating Instruction
(158 pages)
Measuring Instruments Flexim FLUXUS G608 User Manual
Ultrasonic flowmeter for gas (244 pages)
Measuring Instruments Flexim FLUXUS F704**-NN Series User Manual
Ultrasonic flowmeter for liquids (192 pages)
Measuring Instruments Flexim FLUXUS ADM 5 07 Series Supplement To User’s Manual
(87 pages)
Measuring Instruments Flexim FLUXUS F808 A1 Series User Manual
Ultrasonic flowmeter for liquids in explosive atmospheres (186 pages)
Measuring Instruments Flexim FLUXUS WD200 User Manual
Ultrasonic flowmeter for water (106 pages)
Measuring Instruments Flexim FLUXUS WW User Manual
Ultrasonic flowmeter for water and wastewater (146 pages)
Measuring Instruments flexim FLUXUS F60 Series Operating Instruction
Portable multi-functional flowmeter (244 pages)
Measuring Instruments Flexim FLUXUS WD Operating Instruction
(174 pages)
Measuring Instruments Flexim FLUXUS F808 Operating Instruction
Ultrasonic flowmeter (171 pages)
Measuring Instruments Flexim FLUXUS F401 Operating Instruction
(160 pages)
Measuring Instruments Flexim FLUXUS H721 Operating Instruction
(229 pages)
This manual is also suitable for:
Fluxus g608
Table of Contents
Save PDF
Print
Rename the bookmark
Delete bookmark?
Delete from my manuals?
Login
Sign In
OR
Sign in with Facebook
Sign in with Google
Upload manual
Upload from disk
Upload from URL


Need help?
Do you have a question about the FLUXUS G601 and is the answer not in the manual?
Questions and answers