Table of Contents
Advertisement
CAUTION:
Please use four alkaline batteries for the best performance.
A. Please change programming code before operating this lockset.
CARE and MAINTENANCE
The following instructions should be followed to protect and maintain
your lockset:
A. Do not use any chemical products containing alcohol, benzene,
hydrochloric acid or nitric acid, and avoid using sharp or abrasive
objects to clean this lockset.
B. Periodically clean with mild soap and a soft cloth only.
Pre-installation - Tools Required / Hardware Included
Optional
Optional
INSTALLATION INSTRUCTIONS FOR
KEYPAD ENTRY MODEL: BC40107
Optional
Optional
Parts List ..................................................................... 2
INSTALLATION INSTRUCTIONS .................................... 3
Door Preparation ......................................................... 3
Door Jamb Preparation ............................................. 3
Select the Proper Latch Backset................................. 4
Install the Latch ......................................................... 4
Preparation for Installation.......................................... 5
Setting the Exterior Spindle (Right Hand Door) ......... 6
Setting the Interior Spindle (Right Hand Door) ............ 6
Setting the Exterior Spindle (Left Hand Door) ............ 7
Setting the Interior Spindle (Left Hand Door) ............ 7
Installing the Exterior Assembly ................................. 8
Installing the Interior Assembly ................................. 8
Locking & Unlocking ................................................... 10
Programming ............................................................ 11
Restoring to Factory Settings .................................... 12
Troubleshooting ......................................................... 13
APPENDICES
Removing Levers for Rekeying or Re-Handing ......... 15
Removing & Replacing the Cylinder and Collar ......... 16
To view these instructions
online or for a Spanish
version, scan this QR code.
Optional
Table of Contents
999-00823
PAGE 1
Advertisement
Table of Contents

Related Manuals for BRINKS BC40107


Summary of Contents for BRINKS BC40107
-
Page 1: Table Of Contents
INSTALLATION INSTRUCTIONS FOR KEYPAD ENTRY MODEL: BC40107 999-00823 Table of Contents Parts List ..............2 INSTALLATION INSTRUCTIONS ........3 Step 1 Door Preparation ............3 Step 2 Door Jamb Preparation ..........3 Step 3 Select the Proper Latch Backset......... 4 Step 4 Install the Latch ............ -
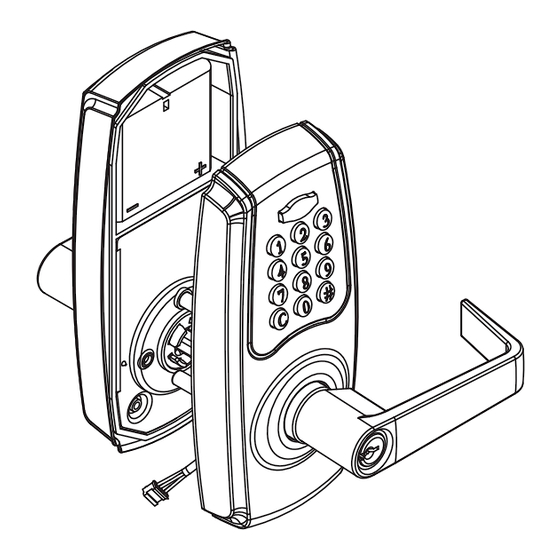
Page 2: Parts List
BB — 1-1/4" (32mm) Mounting Plate Screws [Qty: 2] Part Description Quantity Part Description Quantity Decorative Cover Cylinder Battery Cover DD — 5/16" (8mm) Battery Compartment Screws [Qty: 2] Lever Exterior Assembly Power Cable Strike Plate EE — 3/4" (19mm) Latch & Strike Plate Screws [Qty: 4] Dust Box Latch Round Corner Faceplate... -
Page 3: Installation Instructions
Door Preparation NOTE: If your door is pre-drilled, check the hole sizes to make sure they are the proper size. If they are the proper size, skip to Step 3. Use the included template to mark the door and drill holes, and the latch (E) to chisel out the mortise. Centerline 2-1/8"... -
Page 4: Step 3 Select The Proper Latch Backset
Select the Proper Latch Backset Latch (E) Right CAUTION: Be sure the latch cam is upright before making any backset adjustment. Wrong Sleeve / 4 " 2 - 3 / 8 " 2 - 3 2-3/4" (70 mm) 2-3/8" (60 mm) a. -
Page 5: Step 5 Preparation For Installation
Preparation for Installation CAUTION: DO NOT PROCEED WITH INSTALLATION WITHOUT SETTING THE EXTERIOR & INTERIOR SPINDLES FOR THE HAND OF YOUR DOOR! 5A. Determine the Handing of the Door A1. As you stand outside the room looking at the exterior Left Hand Door Right Hand Door face of the door:... -
Page 6: Step 6A Setting The Exterior Spindle (Right Hand Door)
Setting the Exterior Spindle — (Right Hand Door) Note: If you have a left hand door skip to page 7. After installation, the exterior lever will Right Hand Hinges point towards the hinges of the door. Door A1. Rotate the exterior spindle clockwise A2. -
Page 7: Step 6C Setting The Exterior Spindle (Left Hand Door)
Setting the Exterior Spindle — (Left Hand Door) After installation, the exterior lever will Left Hand Hinges point towards the hinges of the door. Door C1. Rotate the exterior spindle counter-clockwise C2. Align the exterior lever assembly with the spindle. 90 degrees until it clicks into place. -
Page 8: Step 7 Installing The Exterior Assembly
Setting the Interior Spindle — (continued) (Left Hand Door) 3. Remove the decorative cover (H) from the interior 4. Separate the decorative cover and set it aside with assembly by pressing on the interior turn switch the battery cover. Decorative with your thumbs and Cover (H) separating the cover... - Page 9 Installing the Interior Assembly A. Insert power cable (D) rmly into the connector port B. Insert two battery compartment screws (DD) and on the interior assembly (G). Secure the cable in the tighten rmly. cable guard. Align the square hole in the interior assembly with the square drive spindle of the exterior assembly and press the interior assembly against the interior door face.
-
Page 10: Step 9 Locking & Unlocking
How to Lock / Unlock / Program the Lockset AUTO-LOCK / PASSAGE MODE Use a at tool to turn the slotted interior turn switch clockwise as shown from vertical position to horizontal position to deactivate auto-locking mode. The device then serves as a passage lever and is in programming mode. Auto-lock After programming, turn the interior turn switch back to vertical to exit programming mode and record programming changes. -
Page 11: Step 10 Programming
Programming BASIC SETTINGS Change • Programming Code can be Programming Programming used to program or unlock Code Code the lockset. (6 digits) • The default Programming Code is “123456”. Programming Code (6 digits) Add a User • User Code can be used Programming Code(s) to unlock the lockset. -
Page 12: Step 11 Restoring To Factory Settings
Programming (continued) ADVANCED SETTINGS Vacation Mode • Start vacation mode to Programming (Start/End) temporarily disable ALL Code User Codes. (6 digits) • Redo the following steps to end vacation mode and recover User Code access. Volume Control • Turn on / off door lock Programming operation volume. -
Page 13: Step 12 Troubleshooting
Troubleshooting INSTALLATION PROBLEM CORRECTIVE ACTION A. The latch does not 1. Make sure the backset on the latch is set to the proper length and that the operate correctly after bevelled surface of the bolt faces the strike plate and door jamb. installation. - Page 14 Troubleshooting (continued) OPERATION PROBLEM CORRECTIVE ACTION E. Cannot delete all user 1. Make sure the whole code entering process is completed within 10 seconds, codes. otherwise the unit will time out. 2. Make sure the programming code has been entered correctly. F.
-
Page 15: Appendix A Removing Levers For Rekeying Or Re-Handing
Appendix A: Removing Levers for Rekeying or Re-Handing The example below shows the removal of the exterior lever and re-handing from a Right Hand door installation to a Left Hand door installation. In some cases, the exterior lever will need to be removed, usually for two reasons (1) rekeying the cylinder or (2) re-handing the lockset for installation on a door with opposite handing. -
Page 16: Appendix B Removing & Replacing The Cylinder And Collar
Appendix A: (continued) M. Place the lever onto the spindle and push N. The lever lockset has been re-installed on a door of the until it clicks into place on the lever catch. opposite handing. See the User Guide for programming. Appendix B: Removing &...
Need help?
Do you have a question about the BC40107 and is the answer not in the manual?
Questions and answers