
Subscribe to Our Youtube Channel
Related Manuals for SNAIGE MD40DC


Summary of Contents for SNAIGE MD40DC
- Page 1 MEDICININIS ŠALDYTUVAS Naudojimo instrukcija MEDICAL REFRIGERATOR Instruction for use MD40DC MD40DF...
-
Page 2: Bendrieji Saugos Reikalavimai
GERBIAMIEJI! ATIDŽIAI PERSKAITYKITE NAUDOJIMOSI INSTRUKCIJĄ! Nepaisant instrukcijoje išvardintų nurodymų, išlieka galimybė susižeisti, sugadinti šaldymo prietaisą ir prarasti teisę į nemokamą garantinį aptarnavimą. Gamintojas ir prietaiso pardavėjas neatsako už sužalojimus ir žalą, patirtą dėl netinkamo prietaiso įrengimo ir naudojimo. Saugokite naudojimosi instrukciją visą šaldymo prietaiso eksploatacijos laikotarpį. Parduodami prietaisą, perduokite naudojimosi instrukciją... - Page 3 Šis šaldymo prietaisas nėra skirtas sprogstamųjų medžiagų, pavyzdžiui, – aerozolių su degiomis dujomis, laikymui. Draudžiama šalia šaldymo prietaiso laikyti benziną ar kitus degius skysčius. – Šaldymo prietaisas neskirtas naudotis vaikams iki 8 metų amžiaus ir – jaunesniems, asmenims su susilpnėjusia atmintimi ar protiniais sugebėjimas, neturintiems patyrimo ar žinių, nebent, kaip naudotis prietaisu, juos supažindino asmuo, atsakingas už...
- Page 4 TIK SERVISO ATSTOVAS GALI PAŠALINTI VISUS TECHNINIUS AR KONSTRUKCINIUS PAŽEIDIMUS. Reikalavimai saugiam naudojimui: Kiekvieną kartą, kai atliekami šaldytuvo priežiūros darbai, būtina ištraukti – kištuką iš tinklo lizdo. Norėdami išjungti prietaisą, netraukite už elektros tiekimo laido. Visada traukite tvirtai paėmę už elektros kištuko. Išjungus šaldymo prietaisą...
- Page 5 Šaldymo prietaisas turi stovėti ant lygaus paviršiaus. Jei reikia, prietaiso aukštį • reguliuokite sukdami kojeles. Sukant pagal laikrodžio rodyklę prietaiso priekis kyla į viršų, sukant prieš laikrodžio rodyklę – liežiasi žemyn. Jei šaldymo prietaisas stovės vos pasviręs atgal – šaldymo prietaiso durys pačios užsidarys. Jei šaldymo prietaisą...
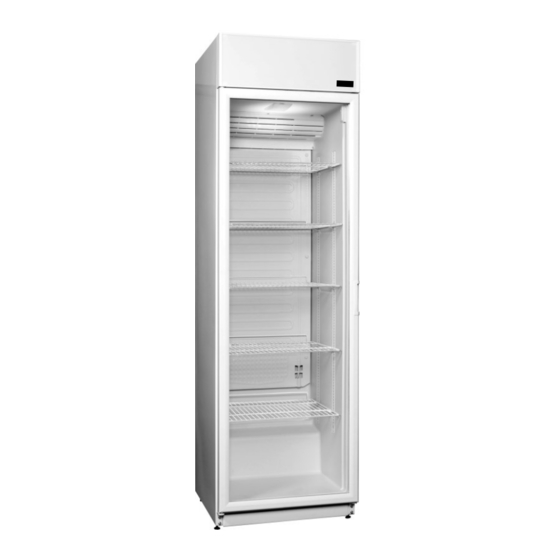
- Page 6 PRIETAISO APRAŠYMAS, PAGRINDINĖS DALYS Elektroninio valdiklio ekranas Lentynos Vidaus apšvietimo įjungimo / išjungimo ir Tirpsmo vandens kanalo reklaminio skydelio apšvietimo valytuvas įjungimo/išjungimo mygtukai* Reklaminis skydas Kondensatorius Vidaus apšvietimo blokas Kompresorius Vonelė tirpsmo vandens Ventiliatorius** subėgimui * Vidaus reklaminio skydelio apšvietimas įjungiamas ar išjungiamas, paspaudus mygtukus.
- Page 7 šaldymo prietaiso valdymui. T.y. valdiklyje rodoma faktinė vidutinė temperatūra, todėl laikant temperatūros pokyčiams jautrius produktus, optimaliam temperatūros režimo parinkimui, rekomenduojama naudoti papildomus temperatūros matavimo prietaisus (išdėstant juos skirtingame prietaiso aukštyje). ELEKTRONINIS VALDIKLIS MD40DC 2 – Šaldymo prietaiso įjungimo /išjungimo mygtukas. Nuspauskite ir palaikykite mygtuką...
- Page 8 ELEKTRONINIS VALDIKLIS MD40DF Elektroninis valdiklis turi sekančias funkcijas : Maksimalios leistinos temperatūros ribos keitimą (kreiptis į serviso tarnybą); Minimalios leistinos temperatūros keitimą (kreiptis į serviso tarnybą); Gedimų ir pavojaus signalų vaizdinę indikaciją ir garsinį signalą (klaidų kodai aprašyti Elektroninio valdiklio indikacijos reikšmės) „SET“...
- Page 9 Pirmą kartą šaldymo prietaisą įjungus į elektros tinklą, elektroninis valdiklis rodys tuo metu esančią temperatūrą prietaiso viduje (toliau vadinama FAKTINE temperatūra). Datos, laiko parametrų nustatymas, realaus laiko meniu. PASTABA: ne visuose valdikliuose yra laikrodis. Jeigu nėra - šį žingsnį praleisti. Įjungti programavimo meniu –...
-
Page 10: Valymas Ir Priežiūra
Patikrinti šaldytuvo veikimą, aplinkos „HA“ Aukšta temperatūra temperatūrą ir ar sandariai uždarytos durys. „LA“ Žema temperatūra Kreipkitės į Snaigės Servisą „ " Atidarytų durų aliarmas Gerai uždarykite duris. „CA" Sunkus aliarmas Kreipkitės į Snaigės Servisą „EA“ Išorinis aliarmas Kreipkitės į Snaigės Servisą Nėra kontakto tarp... - Page 11 NEGALIMA valymui naudoti šluosčių ar kempinių šiurkščiais, šveitimui skirtai paviršiais. NEGALIMA naudoti purškiamų ledo tirpiklių. Negalima valyti suspaustu oru/garu. Jei šaldymo prietaisas paliekamas tuščias ilgam laikui, išjunkite, atitirpinkite, išvalykite, • išdžiovinkite ir palikite dureles atviras, kad prietaiso viduje neatsirastų pelėsio. DURELIŲ...
- Page 12 7. Užkabinkite duris ant kairėje pusėje prisukto kronšteino 10, prieš tai apsukus jas 180° kampu. 8. Į duris įstatykite viršutinį kronšteiną 15, po to prisukite du sraigtus 14 kairėje pusėje. Valdymo skydą surinkite atbuline tvarka, pagal trečią punktą. 9. Esant būtinumui, atreguliuokite durų tolygų pastatymą ir prigludimą: tolygų...
- Page 13 Techniniais klausimais galima konsultuotis tel. (8 315) 56 277 arba el. paštu kvs@snaige.lt Remonto klausimais kreipkitės į SNAIGĖS SERVISĄ tel. 8 700 55080 Darbo laiku*: pirmadieniais, antradieniais, trečiadieniais, ketvirtadieniais nuo 8:00 iki 16.30 val., penktadieniais nuo 8:00 iki 14.00 val.
- Page 14 Garantinė priežiūra nutraukiama: Dėl įsigyto šaldymo prietaiso mechaninių korpuso ar kitokių pažeidimų, atsiradusių dėl • pirkėjo kaltės transportuojant šaldymo prietaisą. Ginčytinu atveju privaloma pateikti šaldymo prietaiso įpakavimą. Dėl gedimų, detalių sulaužymo, kvapų, atsiradusių dėl neteisingo gaminio naudojimo, • pastatymo, įjungimo į elektros tinklą ar transportavimą nesilaikant gamintojo nurodymų, aprašytų...
-
Page 15: General Information
DEAR CUSTOMER! CAREFULLY READ THE INSTRUCTION MANUAL. If instructions are not followed, there is a risk of injury, damage of the appliance and loss of the right to free warranty service. The Manufacturer shall not be held liable for damage arising from the failure to observe the instructions contained in this manual. - Page 16 It is prohibited to store petrol and other flammable liquids near the appliance. – Do not allow children to play with the packaging material from the appliance. – Do not allow children to play with the appliance – This appliance can be used by children aged from 8 years and above and persons –...
- Page 17 When positioning the appliance, be careful that the electrical cord isn’t squeezed – in order to avoid damaging it. Do not store heavy objects such as cooling devices or other devices next the appliance in such a way that they could squeeze and damage the electrical cord.
-
Page 18: Installation And Operating Conditions
INSTALLATION AND OPERATING CONDITIONS Positioning: This appliance can be installed in a dry, well ventilated indoor location where the • ambient temperature corresponds to the climate class indicated on the rating plate of the appliance. CAUTION! Do not install this appliance in areas that are too humid or too cold. Place the appliance away from heat sources such as kitchen stove/oven, radiators, or direct sunlight. -
Page 19: First Use
First use: Before using the appliance for the first time, the interior and all internal accessories • should be washed with lukewarm water and some neutral soap to remove the typical smell of a brand-new product, then dried thoroughly. Once the unit has been positioned, wait for about 30 minutes before it is connected •... - Page 20 (arranged at different device heights) for optimal temperature selection. ELECTRONIC CONTROLLER MD40DC 2 - Refrigerator on / off button. • Press and hold button 2 until “off”...
- Page 21 ELECTRONIC CONTROL MD40DF Electronic controller has the following functions: 1. Changing the maximum permissible temperature limit (contact service); 2. Changing the minimum allowable temperature (contact service); 3. Visual indication and audible signal of faults and alarms (error codes are described in the values of the electronic controller indication) „SET“...
- Page 22 1. Enter the Programming Mode pressing both „SET+DOWN“ keys for 3sec. BEGIN 2. Use the „UP“ or „DOWN“ button till the „CLO“ menu is displayed Display Press SET to enter the settings menu 1. HUr =hour → press „SET“ to modify/confirm. „UP/DOWN“ – to modify the parameter.
-
Page 23: Cleaning And Care
„LA“ Low temperature Contact Service „ " Open door alarm Close the door tightly „CA" Severe alarm Contact Service „EA“ External alarm Contact Service There is no contact between the motherboard and the Contact Service screen Aliarmo pranešimas rodomas tol, kol pavojaus būklė bus panaikinta. Visi aliarmo pranešimai rodomi pakaitomis su vidaus temperatūra, išskyrus „P1“, kuris mirksi. -
Page 24: Changing The Opening Direction Of The Doors
If the appliance is to be left switched off for an extended period switch off the mains • voltage, disconnect the battery using the On/Off switch, clean, dry it out and leave its doors open to avoid mould. Only disinfect the device with ethyl alcohol-based products. CHANGING THE OPENING DIRECTION OF THE DOORS We recommend that you change the direction of the refrigerator door opening with an assistant. - Page 25 5. Loosen the two screws 7 and remove the bracket 5 with the gasket 6. 6. Attach the lower bracket 10 with the set of washers and gaskets on the opposite side of the cabinet. Screw the bracket 5 with the gasket 6 on the opposite side of the cabinet.
-
Page 26: Environmental Protection Information
ENVIRONMENTAL PROTECTION INFORMATION Important Note: This appliance is marked according to the European directive 2002/96/EC on Waste Electrical and Electronic Equipment (WEEE). By ensuring this product is disposed of correctly, you will help prevent potential negative consequences for the environment and human health, which could otherwise be caused by inappropriate waste handling of this product. - Page 27 Warranty period: • Medical refrigerators are provided with a 12 month warranty. Prerequisites for warranty repairs: • It is necessary to have the original warranty card and the cash register receipt or other document confirming the purchase and sale of the appliance from the seller with the date of slafe of the refrigeration appliance and the store stamp.
Need help?
Do you have a question about the MD40DC and is the answer not in the manual?
Questions and answers