Advertisement
Quick Links
Advertisement

Related Manuals for Ryobi R18XTRP10


Summary of Contents for Ryobi R18XTRP10
- Page 1 R18XTRP10...
-
Page 2: Intended Use
■ Exercise caution to avoid slipping or falling. IMPORTANT! ■ Avoid inserting hands into the inlets/outlets It is essential that you read the instructions of the product while it is turned on. in this manual before assembling, operating, and maintaining the product. ■... -
Page 3: Transportation And Storage
■ Under abusive conditions, liquid may be ADDITIONAL BATTERY SAFETY ejected from the battery. Avoid contact. WARNINGS If contact accidentally occurs, flush with water. If liquid contacts eyes, additionally To reduce the risk of fire, personal injury, seek medical help. Liquid ejected from the and product damage due to a short circuit, battery may cause irritation or burns. -
Page 4: Symbols On The Product
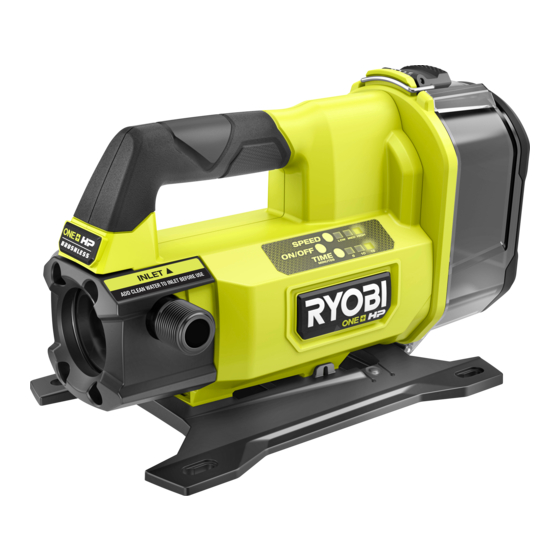
■ Periodically inspect the pump, hoses, and Do not dispose of waste water inlet. Ensure that the hoses and water batteries, waste electrical inlet are free from mud, sand, and debris. and electronic equipment as unsorted municipal waste. Waste ■ After each use, clean the product with a batteries and waste electrical soft, dry cloth. - Page 5 R18XTRP10 On/off button Flow control button Timer button Battery cover latch Latch connector Battery cover Handle Outlet port Inlet port Viewing window Feet housing Operator's manual Filter Suction hose Battery pack Charger Know your product...
- Page 6 Always wear eye protection while Install the product to the feet housing. Slide the feet housing backward to operating product. Wear secure it. Install the screw and turn it appropriate respiratory mask. clockwise to tighten. Flip up the latch and remove the latch Open the battery cover.
- Page 7 Attach the suction hose to the outlet Attach the suction hose to the inlet port. Attach the filter to the other end of the port. Turn the coupling of the suction Turn the coupling of the suction hose suction hose. hose clockwise to tighten.
- Page 8 Operating the product Cleaning the p.11 product Storing the product p.13...
- Page 9 OPERATING THE PRODUCT 1. Flip up the latch and remove the latch connector from the groove to unlock the battery cover. Open the battery cover. 2. Install the battery pack. Make sure that the latches on the battery pack click into place.
- Page 10 NOTE: Press the flow control button to adjust the suction speed. Each press of the flow control button cycles through the low, medium, and high speed settings. NOTE: Press the timer button to set a timer. Each press of the timer button sets the timer to 5 minutes and the succeeding press adds another 5 minutes.
- Page 11 CLEANING THE PRODUCT 1. Flip up the latch and remove the latch connector from the groove to unlock the battery cover. Open the battery cover. 2. Press the latches on the battery pack and remove it from the product. 3. Close the battery cover. Hook the latch connector on the groove and flip down the latch to lock the battery cover.
- Page 12 6. Clean the product with a soft, dry cloth. WARNING: Do not use water to clean the product. Maintenance...
- Page 13 STORING THE PRODUCT 1. Flip up the latch and remove the latch connector from the groove to unlock the battery cover. Open the battery cover. 2. Press the latches on the battery pack and remove it from the product. 3. Close the battery cover. Hook the latch connector on the groove and flip down the latch to lock the battery cover.
- Page 14 6. Turn the screw counterclockwise and remove it. NOTE: There is a button on the feet housing. 7. Press the button and remove the feet housing. 8. Store the product in a dry, well-ventilated area that is inaccessible to children. Keep the product away from corrosive agents, such as garden chemicals and de-icing salts.
- Page 15 RB18L20, RB18L20A, RB18L25, RB18L25A, RB18L40, RB18L40A, RB18L50, RB18L50A, RB18L13, RB18L60A, RB18L90A, RB1815C, RB1820C, RB1825C, RB1840C, RB1840X, RB1850C, RB1850X, RB1860X ACCESSORIES Suction hose 5131041965 Filter 5131041966 NOTE: Visit your local special orders desk or contact RYOBI customer service for replacement parts.
- Page 16 Techtronic Industries Australia Pty Ltd 31 Gilby Road, Mount Waverley, VIC 3149 Melbourne, Australia Techtronic Industries N.Z. Limited Unit C, 70 Business Parade South, Highbrook, Auckland 2013, New Zealand RYOBI is a trade mark of Ryobi Limited, and is used under license. 961479084-01...
Need help?
Do you have a question about the R18XTRP10 and is the answer not in the manual?
Questions and answers