Table of Contents
Advertisement
Advertisement
Table of Contents

Related Manuals for Ryobi RCPP900


Summary of Contents for Ryobi RCPP900
- Page 1 RCPP900 CONSTANT PRESSURE PUMP...
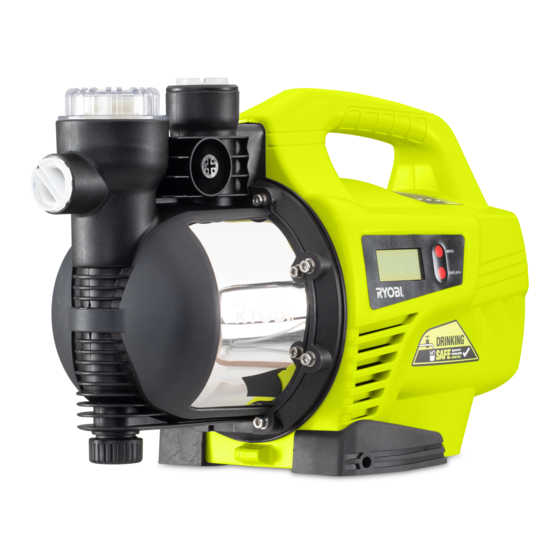
- Page 2 DESCRIPTION Components List 1. 25mm Water inlet 2. Pre-Filter 3. 25mm Water outlet 4. Drain plug 5. Pump Head 6. LCD Display screen 7. Carry Handle 8. 900W Induction motor with thermal overload 9. Spanner 10. Thread seal tape...
- Page 3 DESCRIPTION CHECK CHECK Fig. 1 Fig. 2 CHECK CHECK Fig. 3 Fig. 4 CHECK CHECK Fig. 5 Fig. 6 TIME NOW TIME 12 : 00 12 : 00 CHECK CHECK Fig. 7 Fig. 8...
- Page 4 DESCRIPTION TIME 12 : 00 CHECK Fig. 9 Fig. 10 Fig. 11 Fig. 12 Fig. 13 Fig. 14 Fig. 15 Fig. 16...
- Page 5 DESCRIPTION Fig. 17 Fig. 18 Fig. 19...
- Page 6 Important! It is essential that you read the instructions in this manual before assembling, operating and maintaining the product. Subject to technical modification.
- Page 7 ■ Keep handles and grasping surfaces dry, clean GENERAL SAFETY WARNINGS and free from oil and grease. Slippery handles ■ Read all safety warnings and all instructions. and grasping surfaces do not allow for safe handling Failure to follow the warnings and instructions and control of the tool in unexpected situations.
- Page 8 power when installing. 3. Tap the filter and non-return valve on a flat surface gently. For stubborn dirt, simply rinse with water. ■ Do not install or operate the water pump in an explosive environment or near flammable material. NOTE: Do not use abrasive cleaning agents to clean ■...
- Page 9 2. Bottom valve is vertical and installed above water running and the LCD display 15m (fig. 4): “SET” bottom 30cm to avoid sucking silt. represents “+” and “CHECK” represents “-”. When setting is done, press “SET “ for a short period will 3.
- Page 10 SPECIFICATIONS WARNING Do not start pump until pump chamber is primed Rated Power 900W with water. Max Head Install inlet water pipes before using pumps and Max. Suction Lift unscrew transparent pump cover with wrench to Max. Water Flow 3,600L/hr Max.
- Page 11 COMMON FAILURES AND TREATMENT Failures Causes Measures Turn off pump and refill pump chamber with Water pump is not filled with water water No water output Water level lowers bottom valve Adjust water inlet pipeline to submerge bottom from pump valve Leakage of suction pipes Examine joints sealing of all suction pipes...
- Page 12 Imported by: Techtronic Industries Australia Pty Ltd 31 Gilby Road, Mount Waverley, VIC 3149 Melbourne, Australia Techtronic Industries N.Z. Limited Unit C 70 Business Parade South Highbrook Auckland 2013 New Zealand...
Need help?
Do you have a question about the RCPP900 and is the answer not in the manual?
Questions and answers
pump operates for approx 10 minutes then stops
The Ryobi RCPP900 pump could operate for approximately 10 minutes and then stop if the outlet valve is closed. The pump is designed to stop 10 seconds after the outlet valve is closed to prevent damage and minimize pressure. Additionally, if the water pressure does not reach normal levels for an extended time, the pump enters a frequency checking mode and may stop after repeated start/stop cycles. Another possible cause is motor overload, which triggers the built-in thermal protection, stopping the pump until it cools down.
This answer is automatically generated
@Mr. Anderson outlet valve not closed pump stops after say 10 min operating - I cannot see or read the pump lcd settings as the panel is unreadable - is it possible to by pass the lcd