Table of Contents
Advertisement
Quick Links
Advertisement
Table of Contents

Related Manuals for Molecular Devices DispenCell


Summary of Contents for Molecular Devices DispenCell
- Page 1 DispenCell Single Cell Dispenser User Guide 5306400 A February 2023...
- Page 2 For research use only. Not for use in diagnostic procedures. The trademarks mentioned herein are the property of Molecular Devices, LLC or their respective owners. These trademarks may not be used in any type of promotion or advertising without the prior written permission of Molecular Devices, LLC.
-
Page 3: Table Of Contents
Signal Generation Equipment and Reagents Description Chapter 2: Installation Procedures Site Requirements Unpacking DispenCell and Mini-PC (NUC) Installation Chapter 3: Running Samples on the DispenCell DispenCell and DispenCell-Driver Startup Setting Up for the Dispense Cell Sample Preparation Loading Wash Starting and Monitoring the Cell Dispense... - Page 4 DispenCell User Guide Chapter 6: Maintenance Chapter 7: Disinfection and Placement Under Biosafety Cabinet Chapter 8: Troubleshooting Chapter 9: Technical Specifications Size and Weight Stage Capacity Power Supply and Connectors Chapter 10: Warranty and Liability Obtaining Support 5306400 A...
-
Page 5: About This Guide
Obtaining Support on page While using the DispenCell driver software, click on the tab on the right side of the Feedback window to report any issue or feedback you might have. If additional assistance is required, contact your authorized Molecular Devices service provider or the Molecular Devices technical support at support.moleculardevices.com/. - Page 6 DispenCell User Guide 5306400 A...
-
Page 7: Chapter 1: General Information
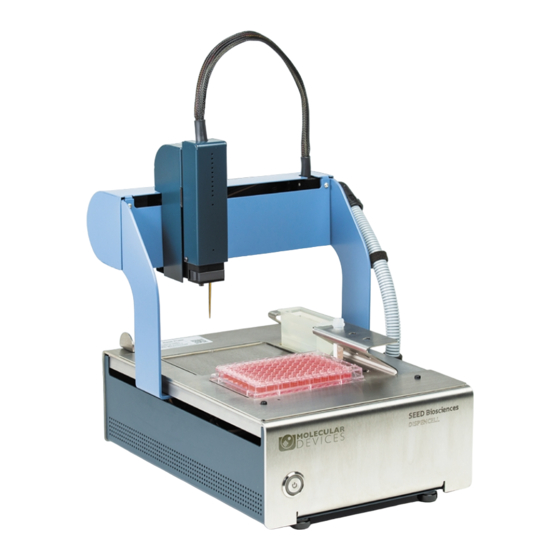
Compact and flexible, the DispenCell easily integrates in an existing workflow and is designed to be operated on a simple bench or under a biosafety cabinet. The DispenCell can hold two multiwell plates on its base plate and supports all multiwell plate models and formats. -
Page 8: Equipment And Reagents Description
Note: The software is installed on the provided computer. 1 x Hub USB 4x type A Troubleshooting toolkit Note: Molecular Devices does not provide or support the screen, display cable, keyboard, and mouse. DispenKit Content The DispenKit package contains the following: 1 x DispenTip, the single-use sensing tip Note: DispenTip is packaged in a plastic holder packed in a sterile pouch. -
Page 9: Chapter 2: Installation Procedures
Before you operate the DispenCell for the first time, carefully read this user guide and contact a Molecular Devices representative for training. DispenCell is to be used only with the provided power supply and main supply cord in order to guarantee safe operation. -
Page 10: Unpacking
3. You can use the DispenCell on a bench or in a biosafety cabinet. Leave enough space next to the DispenCell for the mini PC (NUC). If you place the instrument in a biosafety cabinet, you can use a trolley for the mini PC (NUC). - Page 11 Figure 2-3: Placement of the Base Plate on Top of the DispenCell (left) Clipping of the Base Plate (right) 7. Place the mini PC (NUC) close to the DispenCell so that you can connect the USB cables afterward. 8. Place a screen, keyboard, and mouse next to the mini PC (NUC).
-
Page 12: Dispencell And Mini-Pc (Nuc) Installation
3. Plug the mini PC (NUC) into the power outlet, connect the HDMI cable from the screen to the NUC and connect the USB B and USB Z cables from the DispenCell to the NUC using the port located on the rear panel of the NUC. -
Page 13: Chapter 3: Running Samples On The Dispencell
1. Verify that all cables are connected. See DispenCell and Mini-PC (NUC) Installation on page 2. To turn on the DispenCell, push the ON button on the front left side of the instrument. You will hear the hum of the pumps. 3. Switch on the mini-computer (NUC) and the screen. -
Page 14: Setting Up For The Dispense
This video tutorial is also available in the DispenCell driver software by clicking on the camera icon located at the top-right of the window. At this point, the pipetting head of the DispenCell moves to the front left side of the instrument to help you to position the DispenTip more easily. - Page 15 Chapter 3: Running Samples on the DispenCell 4. Use a finger to press the lever on the left lower part of the robot head to open the connecting piece before you insert the DispenTip (Figure 3.3). Note: Do not apply strength on the sheath that links the pipetting head to the instrument.
- Page 16 DispenCell User Guide 7. Place the robot head back on the instrument magnetic support (Figure 3-6) and click Done. 8. Check the orientation of the DispenTip. If the golden strip of the DispenTip does not face the front side of the instrument, click Previous and repeat the previous steps.
- Page 17 Chapter 3: Running Samples on the DispenCell DispenTip Alignment The DispenCell pipetting head moves close to the alignment pin. To align the DispenTip: 1. Use the Back, Front, Right, and Left arrows on the screen to align the DispenTip on top of the alignment pin.
- Page 18 2. Place the washing unit on the tray as indicated. 3. Click Next. Choose the Multiwell Plate Type The default base plate of the DispenCell can accommodate two multiwell plates. Contact us at support.moleculardevices.com/ to add your multiwell plates to the drop-down list.
- Page 19 Chapter 3: Running Samples on the DispenCell Multiwell Plate Placement To place multiple plates: 1. Control the labeling of the multiwell plate to ensure the traceability. 2. Fill the wells of the multiwell plate with the liquid medium (e.g., 200 μL in each well of 96 multiwell plates or 50 μL in each well of 384 multiwell plates).
-
Page 20: Cell Sample Preparation
Note: Make sure to go through every step of the protocol. Cell filtration and sample mixing are critical steps for correct cell dispensing. Molecular Devices provides a kit named DispenSTAR to help you train with a calibrated sample that contains beads that mimic a cell sample. You can run the experiment with your precious cells without stress when you feel ready. -
Page 21: Loading
Chapter 3: Running Samples on the DispenCell 5. Use the wide bore 200 μL tip (furnished in box of 96), to mix the cells into the viscous buffer by pipetting up and down 30 times. Note: Avoid the generation of air bubbles. Bubbles interfere with the impedance measurement. - Page 22 DispenCell User Guide Note: Do not load the sample in the DispenTip for more than 120 seconds. If you need to dispense more volume, first dispense the totality of the sample loaded in the DispenTip and then reload. 5. Wait for the histogram generation (activated by default) to perform a 30 second analysis of the sample to generate some preliminary values of the signal distribution in the sample.
-
Page 23: Wash
Chapter 3: Running Samples on the DispenCell Wash A washing step in the washing unit filled with PBS 1x is required to clean the external surface of the DispenTip from the viscous solution. Click Wash to initiate the washing of the external surface of the DispenTip. -
Page 24: End Of Dispense
Note: Control “Live values”, the pressure should be between 10 and 20 mbar. Right-click on the well already dispensed to check the impedance signal. The software saves the data in the folder /home/seed_biosciences/dispencell/data. Note: If DispenTip is left at rest for several minutes in between dispensing, go back to the Wash step and do a cycle of wash before you resume the dispense. - Page 25 2. Close the cell sample tube you used for the loading and remove it from the loading cart. 3. Remove the washing unit carefully to avoid any liquid spill on the DispenCell. 4. With one hand, release the robot pipetting head from the magnetic support. Press the lever on the left lower part of the pipetting head to open the connecting piece and pull on the top part of the DispenTip to remove the DispenTip.
- Page 26 DispenCell User Guide 5306400 A...
-
Page 27: Chapter 4: Analysis
Click the following link for information regarding the analysis of your results using the analysis software: Results Visualization To visualize the results of the experiments, open the dedicated DispenCell-analyzer on the mini-computer (NUC) or your personal computer. 1. Click on the upper left side of the screen to open the DispenCell-analyzer software. -
Page 28: Automatic Analysis
Note: When you perform a routine experiment, you should control the automatic analysis that the DispenCell-analyzer software performs. Thresholding The analysis of the seeded plate by the DispenCell-analyzer software uses a threshold on the acquired impedance signals to distinguish cell debris from cells and a threshold to distinguish cells from aggregates. -
Page 29: Reporting
Reporting The DispenCell-analyzer report provides immediate and traceable proof of clonality. Analyze the impedance signal in each well to control the automatic analysis. You can create a monoclonality report for each experiment. Click Actions in the upper right corner to export the data in .pdf files or .csv files. - Page 30 DispenCell User Guide 5306400 A...
-
Page 31: Chapter 5: Important Safety Information
Chapter 5: Important Safety Information Symbols on the Instrument Each safety label on the instrument contains an alert symbol that indicates a type of potential safety hazard. Symbol Indication Consult the product documentation. Read and understand user guide before you use this equipment Potential electrical-shock hazard from a high-voltage source. -
Page 32: Warnings And Precautions
DispenCell User Guide Warnings and Precautions The instrument is designed for safe use when installed correctly and operated by trained personnel following general safety practices and the instructions in this user manual. Any use of the instrument other than that described in this manual may result in danger to the user. The guidelines in this section explain the potential risk associated with using this instrument and provide important supplemental safety information to minimize the risks. -
Page 33: Electrical Shock And Fire Hazard
Do not use any other cables than provided with DispenCell. In case of failure and for emergency stop, the mains power supply plug shall be unplugged. -
Page 34: Chemicals
Servicing and repair must be performed by qualified service personnel. Using unauthorized parts can cause malfunctions of the instrument and impair results. Molecular Devices does not honor any warranty or accept any responsibility for instrument failure or damages resulting from the use of inappropriate parts. -
Page 35: Chapter 6: Maintenance
Do not service the equipment yourself. Service shall be carried out only by trained experts authorized by Molecular Devices. An improperly serviced instrument may lead to severe personal injury or death by exposure to mechanical hazards, and the risk of electric shock. - Page 36 DispenCell User Guide 5306400 A...
-
Page 37: Chapter 7: Disinfection And Placement Under Biosafety Cabinet
5. Place the DispenCell under the biosafety cabinet, ideally on the right side. Placement on the left might require a USB type A extension. Do not cover the front grid of the biosafety cabinet with the DispenCell and leave a minimum distance of 15 cm / 5.9 inches from the front window. - Page 38 DispenCell User Guide 5306400 A...
-
Page 39: Chapter 8: Troubleshooting
DispenSoft, but the self-test does not execute When starting the The DispenCell Turn off the DispenCell and gently bring the X/Y/Z axes in software, the DispenCell was locked in a the central position by hand. begins moving and the... - Page 40 DispenCell User Guide 5306400 A...
-
Page 41: Chapter 9: Technical Specifications
Chapter 9: Technical Specifications Size and Weight The DispenCell exhibits a footprint that can conveniently fit in a biosafety cabinet or on any lab bench. Its weight and dimensions also allow transport in airway checked baggage. Weight = 11 kg (24.3 lb.) - Page 42 DispenCell User Guide 5306400 A...
-
Page 43: Chapter 10: Warranty And Liability
Our Support website—support.moleculardevices.com/—describes the support options offered by Molecular Devices, including service plans and professional services. It also has a link to the Molecular Devices Knowledge Base, which contains documentation, technical notes, software upgrades, safety data sheets, and other resources. - Page 44 DispenCell User Guide 5306400 A...
- Page 45 The trademarks used herein are the property of Molecular Devices, LLC or their respective owners. ©2023 Molecular Devices, LLC. Specifications subject to change without notice. Patents: www.moleculardevices.com/patents All rights reserved. FOR RESEARCH USE ONLY. NOT FOR USE IN DIAGNOSTIC PROCEDURES...
Need help?
Do you have a question about the DispenCell and is the answer not in the manual?
Questions and answers