Advertisement
Quick Links
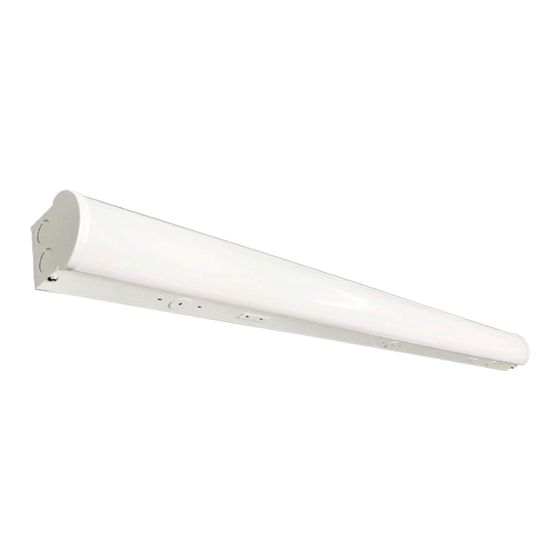
STRIP LIGHT SERIES
4'/8' HIGH OUTPUT STRIP LIGHT
PRODUCT PARAMETER
INPUT VOLTAGE
100 - 277V
DIMMING
0 - 10V
MATERIAL
STEEL
PRE - INSTALLATION
•Carefully remove the fixture from the carton.
•Before beginning assembly, installation, or operation of product, make sure all parts
are present. Compare parts with package contents list and diagram on previous page.
If any part is missing or damaged, do not attempt to assemble, install or operate the
product. Contact customer service for replacement parts.
• Tools required for assembly (Not Included): screwdriver, phillips screwdriver, pliers,
electrical tape, wire cutters, safety glasses, ladder, wire stripper.
CHAIN INSTALLATION *METHOD 1 (Caution: Before beginning installation turn off the circuit breaker and light switch)
STEP 1
Insert a chain on each
hook and insert hooks into
the installation holes.
www.spitzerlighting.com
I N S T A L L A T I O N M A N U A L
STEP 2
STEP 4
Wrap the wires with the
metal materials.
702 Interchange Blvd., Newark, DE 19711
SAFETY INFORMATION
BE SURE THE POWER IS OFF! RISK OF ELECTRICAL SHOCK: Always use the switch to power off. Do not perform
any operations while this unit is powered on. The electrical system you want to connect the device to must be
grounded. Read the instructions before using or powering this device. The safety instructions must remain with
the unit in case of transfer. Any damage to the device linked to an inappropriate use is excluded from support by
the warranty. Before connecting, make sure that the current and voltage are compatible with this device. We highly
recommend that all installations are made by QUALIFIED ELECTRICIAN. We are NOT responsible by any means for
the use or misuse of the following information. We are NOT responsible in whole or part for any harm or damage
that may or may not be caused. We reserve the right to revise the components of any product, due to part availability
or change ETL, CUL, UL standards without assuming any obligation or liability to modify any products previously
manufactured and without notice. These instructions do not cover all details of variations in equipment, nor do they
provide every possible contingency to be met. Turn off / unplug power when installing or service device.
WARNING: Read all safety precautions and installation instructions carefully before installing or servicing this
fixture. Failure to comply with these instructions could result in a potentially fatal electric shock, fire, and/or
property damage.
• Risk of Fire or electric shock. Fixture Installation requires knowledge of luminaires electrical systems. If not
qualified, do not attempt installation. Contact a qualified electrician
• Suitable for damp locations. Always turn off the power supply before installation
• Suitable for non-insulated surface and frame. Do not cover fixture with insulation liner or similar material
• Do not install fixture on unstable, loose or easily breakable surface. Do not exert force on the surface of the fixture
WARNING: Changes or modifications to this unit not expressly approved by the party responsible for compliance
could void the user authority to operate the equipment.
NOTES: This equipment has been tested and found to comply with the limits for a Class B digital device, pursuant to
Part 15 of the FCC Rules. These limits are designed to provide reasonable protection against harmful interference in
a residential installation. This equipment generates, uses and can radiate radio frequency energy and, if not installed
and used in accordance with the instructions, may cause harmful interference to radio communications.
However, there is no guarantee that interference will not occur in a particular installation. If this equipment does
cause harmful interference to radio or television reception, which can be determined by turning the equipment off
and on, the user is encouraged to try to correct the interference by one or more of the following measures:
•Reorient or relocate the receiving antenna.
•Increase the separation between the equipment and receiver.
•Connect the equipment into an outlet on a circuit different from that to which the receiver is connected.
•Consult the dealer or an experienced radio/TV technician for help.
Attach the chains to the
ceiling and adjust till
balanced and secured.
STEP 5
WARNING
FCC WARNING
STEP 3
Optional seamless infinite
splicing.
Specification is subject to change without notice
Take wires from the
shielded cables, connect
AC wires and dimming
wires, if needed.
1/2
Advertisement

Subscribe to Our Youtube Channel
Related Manuals for Spitzer LIGHTING STRIP LIGHT Series


Summary of Contents for Spitzer LIGHTING STRIP LIGHT Series
- Page 1 STRIP LIGHT SERIES 4’/8’ HIGH OUTPUT STRIP LIGHT I N S T A L L A T I O N M A N U A L PRODUCT PARAMETER SAFETY INFORMATION INPUT VOLTAGE 100 - 277V BE SURE THE POWER IS OFF! RISK OF ELECTRICAL SHOCK: Always use the switch to power off. Do not perform...
- Page 2 STRIP LIGHT SERIES 4’/8’ HIGH OUTPUT STRIP LIGHT I N S T A L L A T I O N M A N U A L CHAIN INSTALLATION *METHOD 2 (Caution: Before beginning installation turn off the circuit breaker and light switch)
Need help?
Do you have a question about the STRIP LIGHT Series and is the answer not in the manual?
Questions and answers