Table of Contents
Advertisement
Advertisement
Table of Contents

Related Manuals for Bercomac 700300-1


Summary of Contents for Bercomac 700300-1
- Page 1 OWNER’S MANUAL MODEL NUMBER 700300-1 BERCO TWO STAGE 48" Snowblower TRACTORS WITH 2000 R.P.M. P.T.O. DRIVE * ASSEMBLY * REPAIR PARTS * OPERATION * MAINTENANCE CAUTION: READ & FOLLOW ALL SAFETY RULES & INSTRUCTIONS BEFORE OPERATING YOUR EQUIPMENT 103391 C-09...
- Page 2 LIMITED ONE YEAR ON BERCO TRACTOR ATTACHMENTS For one year from date of purchase, Bercomac Limitée will repair or replace free of charge at Bercomac's option, any parts which are defective as a result of defective materials or faulty workmanship.
-
Page 3: Table Of Contents
TABLE OF CONTENTS PAGE INTRODUCTION ..............................SAFETY PRECAUTIONS ............................SAFETY DECALS ..............................ASSEMBLY Step 1: Snowblower Preparation ......................Step 2: Snowblower Installation ....................... OPERATION Controls ............................... Operating the Snowblower ........................Removing Snow ............................Snow Removal Methods ........................... MAINTENANCE Maintenance ............................... Lubrication .............................. -
Page 4: Introduction
INTRODUCTION TO THE PURCHASER This new attachment was carefully designed to give years of dependable service. This manual has been provided to assist in the safe operation and servicing of your attachment. NOTE: All photographs and illustrations in the manual may not necessarily depict the actual models or attachment, but are intended for reference only and are based on the latest product information available at the time of publication. -
Page 5: Safety Precautions
SAFETY PRECAUTIONS Careful operation is your best insurance against an accident. Read this section carefully before operating the tractor and snowblower. All operators, no matter how experienced they may be, should read this and other manuals related to the tractor and snowblower before operating. It is the owner's legal obligation to instruct all operators in safe operation. - Page 6 SAFETY PRECAUTIONS 8. Do not run the engine indoors, except when MAINTENANCE AND STORAGE starting the engine and for transporting the snowblower in or out of the building. Do not 1. Check shear bolts, engine mounting bolts, and operate or let motor run in a storage area without other bolts at frequent intervals for proper ventilation because...
-
Page 7: Safety Decals
SAFETY DECALS REPLACE IF DECALS ARE DAMAGED SEE PARTS BREAKDOWN FOR DECAL LOCATION #102113 #102124 #102125 #102126 #102127... -
Page 8: Assembly
ASSEMBLY STEP 1 SNOWBLOWER PREPARATION: IMPORTANT: TORQUE ALL BOLTS ACCORDING TO TORQUE SPECIFICATION TABLE (SEE TABLE OF CONTENTS), WHEN STATED: TIGHTEN FIRMLY. Install the hand guard (item 1) on the chute (item 2) as shown with the top portion inside and the bottom portion outside. - Page 9 ASSEMBLY Remove the reduction cover ( item 4). Install the snowblower male hitch (item 1) in the back of the snowblower and secure in place using four 7/16 x 1 1/4’’ bolts (item 2). Install one bolt, flat washer, over the slot (item 3) lock washer and nylon insert locknut.
-
Page 10: Step 2: Snowblower Installation
ASSEMBLY STEP 2 SNOWBLOWER INSTALLATION: WARNING TO PREVENT INJURIES: Stop the motor. Apply parking brakes. Remove the ignition key. Disconnect the wire from the spark plug(s) and keep away from spark plug(s) to prevent accidental starting. Install the tractor’s section of driveline into the snowblower’s driveline by aligning the stamped marks (item 2) (located between the splines at the end of the shaft) with the large groove (item 1) in the hollow tube... - Page 11 ASSEMBLY DANGER ROTATING DRIVELINE Contact can cause death. KEEP AWAY Do not operate without: All driveline, tractor & equipment shields in place. Driveline securely attached at both ends. VERIFY SKID SHOE ADJUSTMENT: LEVEL PAVED SURFACE: Adjust skid shoes to allow 3/16 to 1/4" clearance (A) between cutting edge and surface.
-
Page 12: Operation
OPERATION OPERATING THE SNOWBLOWER WARNING a) Make sure the snowblower is clear of snow before engaging the snowblower. Do not attempt to clear plugged chute, auger or fan of snow while tractor engine is running. b) Make sure that the auger and impeller operate -Disengage snowblower. -
Page 13: Snow Removal Methods
OPERATION SNOW REMOVAL METHODS A definite pattern of operation is required to thoroughly clear the snow area. These patterns will avoid blowing snow in unwanted places as well as eliminating a second removal of snow. Where it is possible to throw the snow to the left and If the snow can only be thrown to one side of the right (see above), as in a long driveway, it is driveway or sidewalk (see above), start on the opposite... -
Page 14: Maintenance
MAINTENANCE SHEAR BOLT REPLACEMENT: WARNING Fan Shear Bolt Replacement: TO PREVENT INJURIES: The fan is protected by a shear bolt (for identification Stop the motor. see parts list (Snowblower head, item 20). If a foreign Apply parking brakes. object is hit, the snowblower is designed so the shear Remove the ignition key. -
Page 15: Maintenance & Dismounting
MAINTENANCE & DISMOUNTING DISMOUNTING END OF SEASON STORAGE SNOWBLOWER DISMOUNTING a) Clean snowblower and subframe thoroughly and repair all parts from which paint has worn. a) Select a level surface, set parking brake, stop the engine, remove the ignition key and remove wire b) List the replacement parts that will be needed before from the spark plug(s) and keep away from spark using again. -
Page 16: Rotation System With Chute
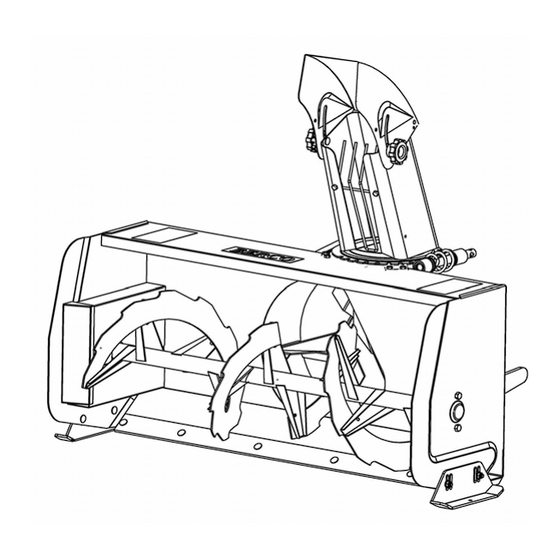
PARTS BREAKDOWN / NOMENCLATURE DES PIÈCES ROTATION SYSTEM WITH CHUTE / SYSTÈME DE ROTATION AVEC GOULOTTE... - Page 17 PARTS LIST / LISTE DES PIÈCES Ref. Qty. Part # English description Description française 1 Chute Goulotte 102058 2 Knob Bouton 102020 3 Nylon flat washer 11/32" Rondelle plate de nylon 11/32" 102009 4 Nylon flat washer 7/16" Rondelle plate de nylon 7/16" 102011 5 Carriage bolt 5/16"...
-
Page 18: Snowblower
PARTS BREAKDOWN / NOMENCLATURE DES PIÈCES SNOWBLOWER / SOUFFLEUSE À NEIGE... - Page 19 PARTS LIST / LISTE DES PIÈCES Ref. Qty. Part # English description Description française 1 Frame 48" Chassis 48" 103330 2 Gear box Boite d'engrenage 102091 3 Hex. bolt 3/8" n.c. x 4" Boulon hex. 3/8" n.c. x 4" 4 Flange nut 3/8" n.c. Écrou à...
- Page 20 PARTS LIST / LISTE DES PIÈCES Ref. Qty. Part # English description Description française 36 Sprocket w/set screw Pignon a/vis à pression 102917 37 Flangette Flangette 102213 38 Reduction box Boite de réduction 103186 39 Half teles. driveline w/set screw Demi arbre a cardan a/vis à...
-
Page 21: Torque Specification Table
TORQUE SPECIFICATION TABLE GENERAL TORQUE SPECIFICATION TABLE USE THE FOLLOWING TORQUES WHEN SPECIAL TORQUES ARE NOT GIVEN NOTE: These values apply to fasteners as received from supplier, dry or when lubricated with normal oil. They do not apply if special graphited or moly disulphide greases or other extreme pressure lubricants are used. This applies to both UNF and UNC threads. -
Page 22: Troubleshooting
TROUBLESHOOTING PROBLEM POSSIBLE CAUSES CORRECTIVE ACTION Snowblower is noisy. New chain and new sprocket. Lubricate the roller chains. Note: Pl eas e not e th is Note: When snowblower is new it is snowblower may appear to be louder, the noise will decrease over loud. - Page 23 TROUBLESHOOTING PROBLEM POSSIBLE CAUSES CORRECTIVE ACTION The chute plugs easily. Tractor engine R.P.M. is too slow. Always have tractor engine at full R.P.M. when using the snowblower. A d v a n c i n g t o o q u i c k l y w i t h Reduce speed.
-
Page 24: Options & Accessoires
OPTIONS & ATTACHMENTS ROTARY BROOM #700286 with nylon brush COUNTERWEIGHT /#700316 with polypropylene brush. #700240 Universal rear weights Fits same subframe UTILITY BLADE #700266 #700246 Rear weights Electrolux snowblower or utility blade. Required for safety and traction. Requires adaptor. Debris Mounts on the same subframe as the C o u n t e r - b a l a n c e s w e i g h t...
Need help?
Do you have a question about the 700300-1 and is the answer not in the manual?
Questions and answers
Where can I buy the shear bolt for the sprocket item 20 on page 19. I live in ontario canada