
Related Manuals for activTek SelectPURE


Summary of Contents for activTek SelectPURE
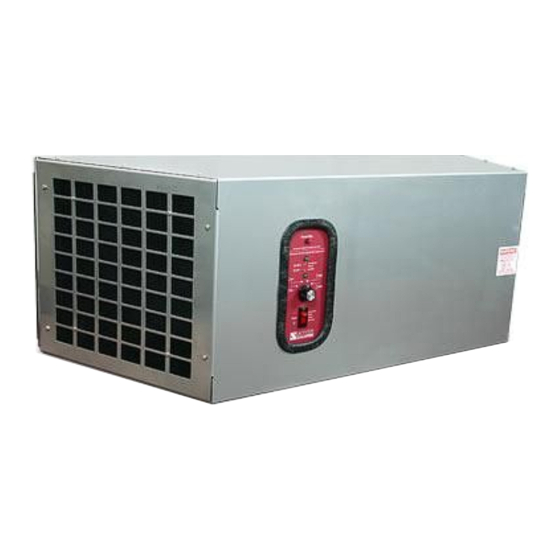
- Page 1 HEAVY-DUTY ACTIVEPURE® AIR SYSTEM OWNER’S MANUAL • INSTALLATION & MAINTENANCE GUIDE CAUTION: Read manual carefully for proper procedures and operation.
-
Page 2: Table Of Contents
Please record the name and phone of your activTek Distributor: Name ______________________________________________________________ Phone _____________________________________________________________ Please record the serial number of your SelectPURE by activTek: Serial # _____________________________________________________________ WARNING! - UV Lamp operation. Do not operate unless the unit is completely and correctly assembled. -
Page 3: Features
• Height: 13"; Width: 37"; Depth: 13" (H: 33cm W: 94cm D: 33cm) • Weight: 58 pounds (W: 26 .308 kg) Ozone Output: • Low level O3 production Warranty: • See page 15 This owner’s manual is also available online at: http://www.activTek.net... -
Page 4: Principals Of Operation
PRINCIPLES OF OPERATION The ActivePure® Cell (Advanced Oxidation System) is designed to reduce odors, air pollutants, and other contaminants with the added benefit of producing safe, low levels of ozone as a by-product of the Advanced Oxidation Process . This low level ozone further cleanses the air as it travels through the unit . INSPECTION 1 . -
Page 5: Panel Controls
. RECOMMENDED POSITIONING • The SelectPURE unit should be installed within 7 feet of a standard 120 volt outlet to accommodate the power cord . • The SelectPURE unit should be secured into wall studs if possible . Mounting holes are on 16 inch centers to accommodate installation to be secured into wall studs (See mounting holes indicated in illustration on page 4 .) . -
Page 6: Opening The Grills
OPENING THE GRILLS 1 . Remove the ten (10) screws in the 2 . (a) Lift cover SelectPURE grills from both ends . (b) Slide toward back of unit to remove . (c) Repeat for other grill . INSTALLING THE UNIT 1 . -
Page 7: Changing The Filter & Cartridge
4 . Remove filter from chassis . 5 . Remove cartridge from chassis . 6 . Discard and replace old cartridges See SelectPURE parts list on page 15 for a and filters . Reverse steps to install complete list of cartridges and filters . -
Page 8: Removing The Activepure® Plate
REMOVING THE ACTIVEPURE® PLATE 1 . Remove right side grill (furthest from control panel) . See Opening the Grills, page 6. 2 . Remove the two (2) phillips head screws located in the flange of the ActivePure® plate . 3 . Slide ActivePure® plate forward over the adjustment tube and tilt outward . -
Page 9: Removing The Activepure® Cells
4 . Remove the second (small) cell from mounting bracket in the same manner . • To remove the ballasts, continue to next page . • To reassemble, continue to page 12 . See SelectPURE parts list on page 16 to reference the ActivePure® Cells . -
Page 10: Removing The Ballasts
5 . Remove the screws (2) from the second ballast . 6 . Dispose of ballasts, mounting brackets and wire assembly . • To reassemble, continue to next page See SelectPURE parts list on page 16 to reference the ActivePure® Cells . -
Page 11: Installing The Ballasts
INSTALLING THE BALLASTS 1 . Stretch out and organize the replacement ballasts, mounting brackets and wiring assembly . 2 . Line up ballasts and wiring with appropriate positions on ActivePure® plate . 3 . Replace screws (2) connecting ballast to the ActivePure®... -
Page 12: Installing The Activepure® Cells
INSTALLING THE ACTIVEPURE® CELLS 1 . Insert small ActivePure® Cell and secure to the mounting brackets by replacing screws (2) . 2 . Repeat step 1 for large ActivePure® Cell . INSTALLING THE ACTIVEPURE® PLATE 1 . Slide plate back into unit . Re- insert the power coupling . -
Page 13: Adjusting The Pressure Switch
Before 3 . Insert a flat headed screwdriver, 7 inch Servicing minimum screwdriver shaft, into the Adjustment Tube . It will line up with the SelectPURE Adjustment Screw . Adjustment Tube Pressure Switch Adjustment Screw • Continued on page 14... - Page 14 Counter clockwise rotation of screwdriver will decrease the setting of the switch . 5 . For specific questions on this adjustment process, contact activTek Customer Service at 866.736.0503. 6 . Reinstall grills reversing steps 1 & 2, Opening the Grills, page 6 .
-
Page 15: Warranty
The only approved Internet presence province to province . Some provinces This warranty is expressly conditioned for activTek products is www . a ctivTek . and territories do not allow limitations upon proper installation, operation, net . To confirm warranty coverage... -
Page 16: Replacement Parts List
Multi Cartridge (1 inch) US70711 FOG – Grease Cartridge (1 inch) US70712 VOC Cartridge (1 inch) US70713 Mercury Cartridge (1 inch) US70714 DBG Group Investments, LLC • dba activTek Environmental 5420 LBJ Freeway, Suite 1010 Dallas, TX 75240 *P65-00374* 65-00374 SP_OM_65-00374_VA-00145_0710...
Need help?
Do you have a question about the SelectPURE and is the answer not in the manual?
Questions and answers