
Related Manuals for Walker Edison DT41


Summary of Contents for Walker Edison DT41
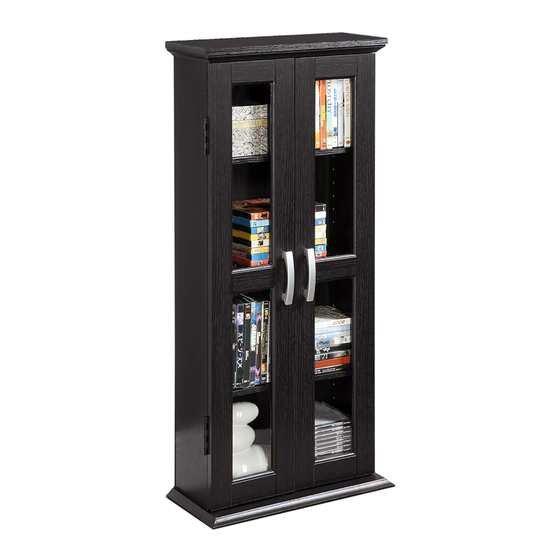
- Page 1 DT41 DT41 Ítem N.°: Artikel# : DT41 DT41 Revised 21/06/2021 (L) © Copyright 2010, by Walker Edison Furniture Co., LLC. All rights reserved.
-
Page 2: General Assembly Guidelines
A Phillips head screwdriver is required for the assembly of this product . VII. Power tools should not be used to assemble this product. VIII. Drill may be needed for securing product to wall. (EN) © Copyright 2010, by Walker Edison Furniture Co., LLC. All rights reserved. - Page 3 Un tournevis cruciforme est requis pour le montage de ce produit. Des outils électriques ne doivent pas être utilisés pour monter ce produit. VII. Une perceuse peut être nécessaire pour fixer le produit au mur. VIII. (FR) © Copyright 2010, by Walker Edison Furniture Co., LLC. All rights reserved.
- Page 4 No se deberán usar herramientas eléctricas en el ensamblaje de este producto. VII. Es probable que se necesite un taladro para asegurar el producto a la pared. VIII. (ESP) © Copyright 2010, by Walker Edison Furniture Co., LLC. All rights reserved.
- Page 5 Zur Montage dieses Produkts wird ein Phillips Schlitzschraubenzieher benötigt. Es dürfen keine Elektrowerkzeuge zur Montage dieses Produkts verwendet werden. VII. Möglicherweise wird ein Bohrer benötigt, um das Produkt an der Wand zu befestigen. VIII. (DE) © Copyright 2010, by Walker Edison Furniture Co., LLC. All rights reserved.
- Page 6 Lista de piezas © Copyright 2010, by Walker Edison Furniture Co., LLC. All rights reserved.
-
Page 7: Liste Du Matériel
Small screw Petite vis Pequeño tornillo Kleiner schraube Ø6x50mm Large screw Gros boulons Pernos grandes Großen Bolzen Ø4mm Wrench Clé hexagonale Llave hexagonal Sechskantschlüssel Ø1.4x15mm Nail Clous Clavos Nägel © Copyright 2010, by Walker Edison Furniture Co., LLC. All rights reserved. - Page 8 Senkschrauben Ø13x5x8 Small bolt Petites boulon Perno pequeño Kleinen Bolzen Nylon strap Sangle en nylon Correa de nylon Nylonband Ø3x12 Small screw Petite vis Pequeño tornillo Kleiner schraube © Copyright 2010, by Walker Edison Furniture Co., LLC. All rights reserved.
- Page 9 (no incluido) Für die Montage benötigen Sie einen Kreuzschlitzschraubenzieher (nicht enthalten) The hardware quantities listed above are required for proper assembly.Some extra hardware may also have been included. © Copyright 2010, by Walker Edison Furniture Co., LLC. All rights reserved.
- Page 10 Version A (Select Colors) Version B (Select Colors) © Copyright 2010, by Walker Edison Furniture Co., LLC. All rights reserved. P.10...
- Page 11 Regal (7) ein. Befestigen Sie den Türstopper (D) an die obere Platte (1) mit kleiner Schraube(E). Befestigen Sie das Nylonband (P) an die obere Platte (1) mit kleiner Schraube (Q). © Copyright 2010, by Walker Edison Furniture Co., LLC. All rights reserved. P.11...
- Page 12 Atornille los pernos de leva (B) en los paneles laterales(3,4).Inserte las clavijas (A) en los paneles laterales(3,4). (DE) Schrauben Sie die Zylinderschrauben (B) in die Seitenplatten (3,4) ein.Stecken Sie die Dübel (A) in die Seitenplatten (3,4). © Copyright 2010, by Walker Edison Furniture Co., LLC. All rights reserved. P.12...
- Page 13 Befestigen Sie die Seitenplatten (3,4) an das Regal (7) mit den Zylinderschrauben und Dübeln gemäß der Anleitung . Stecken Sie die Zylindermutter (C) in das Regal (7) ein und ziehen Sie sie mit einem Schraubendreher fest. © Copyright 2010, by Walker Edison Furniture Co., LLC. All rights reserved. P.13...
- Page 14 Fije el panel inferior (2) al conjunto desde el paso 3 con pernos grandes (F) y la llave hexagonal (G). (DE) Befestigen Sie die Bodenplatte (2) an der Baugruppe aus Schritt 3 mit großen Bolzen (F) durch den Inbusschlüssel (G) . © Copyright 2010, by Walker Edison Furniture Co., LLC. All rights reserved. P.14...
- Page 15 Befestigen Sie die obere Platte (1) an die Baugruppe ab Schritt 4 mit den Zylinderschrauben und Dübeln gemäß der Anleitung. Stecken Sie die Zylindermutter (C) in die obere Platte (1) ein und ziehen Sie sie mit einem Schraubendreher fest. © Copyright 2010, by Walker Edison Furniture Co., LLC. All rights reserved. P.15...
- Page 16 Befestigen Sie die Rückplatte (9) an die Baugruppe ab Schritt 5, indem Sie die Nägel (H) in die Baugruppe an den oben gezeigten Stellen vorsichtig einschlagen. Beachten Sie, dass das Nylonband (P) an der Rückseite der Baugruppe heraushängen sollte. © Copyright 2010, by Walker Edison Furniture Co., LLC. All rights reserved. P.16...
- Page 17 Stecken Sie die Regalstützstifte (I) in die Ständerbaugruppe in den gewünschten Regalhöhen ein. Platzieren Sie die Fächer (8) vorsichtig auf die Regalstützstifte (I). Beachten Sie, dass sich zwei Regalstützstifte an beiden Enden jedes Faches befinden. © Copyright 2010, by Walker Edison Furniture Co., LLC. All rights reserved. P.17...
- Page 18 Befestigen Sie die Griffe (J) an die Türen (5,6) mit mittleren Schrauben (K). Befestigen Sie das Scharnier (L) an die Türen(5,6) mit der Senkschraube (M). Schrauben Sie die kleinen Bolzen (N) in die Türen (5,6). © Copyright 2010, by Walker Edison Furniture Co., LLC. All rights reserved. P.18...
- Page 19 Befestigen Sie die Knöpfe (J) an die Türen (5,6) mit mittleren Schrauben (V) . Befestigen Sie das Scharnier (L) an die Türen(5,6) mit der Senkschraube (M). Schrauben Sie die kleinen Bolzen (N) in die Türen (5,6). © Copyright 2010, by Walker Edison Furniture Co., LLC. All rights reserved. P.19...
- Page 20 Fije las puertas (5,6) al conjunto desde el paso 7 utilizando el tornillo de cabeza plana(M) en las bisagras (L). (DE) Befestigen Sie die Türen (5,6) an die Baugruppe ab Schritt 7 mit Senkschrauben (M) an den Scharnieren (L) . © Copyright 2010, by Walker Edison Furniture Co., LLC. All rights reserved. P.20...
-
Page 21: Final Assembly
Produkt enthalten. Bitte stellen Sie vor der Installation sicher, dass die Hardware für Ihre Wände geeignet ist, da für unterschiedliche Wandmaterialien möglicherweise unterschiedliche Arten von Ankern erforderlich sind. WALL Final Assembly © Copyright 2010, by Walker Edison Furniture Co., LLC. All rights reserved. P.21...
Need help?
Do you have a question about the DT41 and is the answer not in the manual?
Questions and answers