Table of Contents
Advertisement
Quick Links
Advertisement
Table of Contents

Related Manuals for ICS Schneider Messtechnik Snap 41


Summary of Contents for ICS Schneider Messtechnik Snap 41
- Page 2 Instruction Manual and Safety Information Snap 41 Portable Alcohol Meter instrument software version: from 1.0 (Original Instructions)
- Page 3 Disclaimer This document may contain errors and omissions. If you discover any such errors, or if you would like to see more information in this document, please contact us at our address below. Anton Paar assumes no liability for any errors or omissions in this document.
-
Page 4: Table Of Contents
Contents 1 Safety Instructions ................5 2 Snap 41 – An Overview ................. 8 2.1 Measuring Principle ................. 9 3 Checking the Supplied Parts ............. 10 4 View of Snap 41 ................... 13 5 Putting Snap 41 into Operation ............15 5.1 Connecting the Filling Tube ............ - Page 5 11.3 Cleaning the Housing and the Display ........30 11.4 Storing the Instrument ..............31 11.5 Exchanging the Batteries ............31 11.6 Exchanging the Pump Lever ............32 11.7 Software Update ................. 33 11.8 System Information ..............33 12 Maintenance and Repair ..............34 12.1 Maintenance Performed by an Authorized Anton Paar Service Engineer ................
-
Page 6: Safety Instructions
Download Anton Paar documents for free from the Anton Paar website: https://www.anton-paar.com 1 Safety Instructions • Read the documentation before using the instrument. • Follow all hints and instructions in the documentation to ensure the correct use and safe functioning of the instrument. •... - Page 7 • Ensure that all operators have been trained beforehand to use the instrument safely and correctly. • Ensure that the instrument is sufficiently supervised during operation. • In case of damage or malfunction, do not continue operating the instru- ment. Do not operate the instrument under conditions which could result in damage to goods or injuries or loss of life.
- Page 8 Battery Handling • Never open the battery compartment in hazardous areas. Exchange the batteries only outside hazardous areas. 1.3 Service and Repairs • Service and repair procedures may be carried out only by authorized persons or by Anton Paar GmbH. 1.4 Disposal •...
-
Page 9: Snap 41 - An Overview
2 Snap 41 – An Overview Snap 41 is a portable alcohol meter for the determination of the alcohol concentration in distilled spirits that can be considered to be binary mixtures of ethanol and water. The concentration determination is based on density measurement by the oscillating U-tube method. -
Page 10: Measuring Principle
2.1 Measuring Principle Definition of density The density (ρ) of a sample is defined as its mass (m) divided by its volume (V): ---- - As the volume changes with temperature, density is a temperature-depen- dent measuring unit. The oscillating U-tube method The sample is introduced into a U-shaped borosilicate glass tube that is being excited to vibrate at its characteristic frequency. -
Page 11: Checking The Supplied Parts
3 Checking the Supplied Parts Snap 41 has been tested and packed carefully before shipment. However, damage may occur during transportation. 1. Keep the packaging material (box, foam pieces, transport protection) for possible returns or for questions from the transportation or the insurance company. - Page 12 Table 1: Supplied parts (cont.) Qty. Article description Mat. no. Pump lever with lock function 165216 Rubber housing measuring cell 165214 Instruction manual English 185360 Filling tube 180 mm 172214 Adapter Luer ¼" UNF 172211 Syringes 2 mL Luer (10 pcs) 58802 Allen key 3 mm DIN 911 58264...
- Page 13 Spare wristband for portable instruments 92477 Set carrying strap DMA 35/Snap 177301 Bluetooth USB adapter 99180 Carrying case DMA 35/Snap 41 177345 Alkaline battery 1.5 V LR06 mignon AA 82610 Density standard ultra-pure water 5x10 mL 96044 Wall bracket for DMA 35, DMA 35 Ampere, DMA 35 Ex /...
-
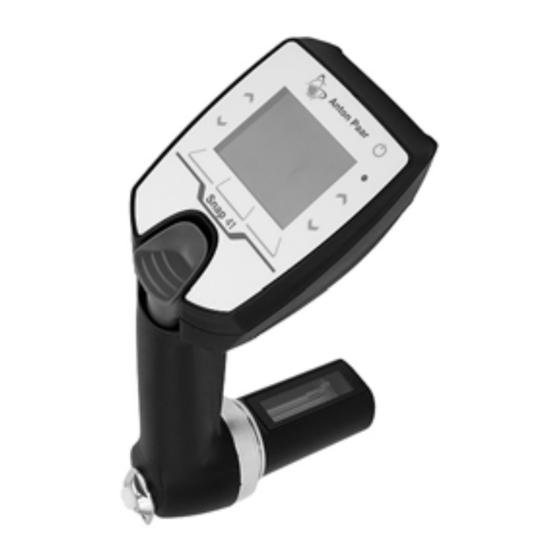
Page 14: View Of Snap 41
4 View of Snap 41 Fig. 1: Front view of the instrument 1 Arrow keys 5 Filling tube 2 Function keys 6 Measuring cell 3 Filling pump 7 Power ON/OFF key 4 Screw plug 8 LC display Keys on the front... - Page 15 Fig. 2: Rear view of the instrument 1 Type plate with serial number 2 Screw of the battery compartment E28IB004EN-G...
-
Page 16: Putting Snap 41 Into Operation
Tighten with your fingers only, do not use any tools. 5.3 Switching the Instrument On/Off • To switch Snap 41 on, tap and hold the key until the display lights up. • To switch Snap 41 off, tap and hold the key until the instrument is switched off. -
Page 17: Operating The Instrument
6 Operating the Instrument 6.1 Main Screen Fig. 4: Example main screen 1 Key functions 5 Battery charge status symbol 2 Status bar 6 Quick access area 3 Output field 4 Header Symbols in the header Symbol Description The battery charge status symbol informs you about the battery charge status. -
Page 18: Key Functions
6.2 Key Functions The key functions correspond to the function keys below/above the display (the assignment of keys adapts to the active selection). The following key functions are available: Function Description Back Leaves the menu and goes to the next higher menu level. Cancel Aborts an operation. -
Page 19: Quick Access Area
6.3 Quick Access Area Use the arrow keys to select a quick access function. Activate the function with the right function key. The following quick access functions are available: Icon Function “Status” function Use it to check the measurement status. The status indicator can assume 3 states: •... -
Page 20: Operation By Gestures
6.6 Operation by Gestures You can start or abort a measurement by gestures instead of key operation. To be able to do so, enable gesture control in the setup menu (see section 7.4). To start a measurement • Turn the instrument to the right as shown in fig. 5, and hold the position until the measurement starts. -
Page 21: Instrument Settings
7 Instrument Settings 7.1 Setting the Language 1. Tap <Menu> and select Setup > Language. 2. Tap <Edit>. 3. Select the preferred language: - English - Deutsch /Japanese / Chinese 4. Tap <Back> repeatedly to return to the main screen. 7.2 Display Settings In this menu you can activate/deactivate the automatic display rotation. -
Page 22: Sound Settings
To set the display dimming 1. Tap <Menu> and select Setup > Display Settings. 2. Select “Display Dimming” and tap <Edit>. 3. Select one of three dimming options: - 30 Seconds - 60 Seconds - Off (no dimming) 4. Tap <Back> repeatedly to return to the main screen. 7.3 Sound Settings When sound is enabled, the instrument beeps whenever a key is tapped. -
Page 23: Setting The Measuring Units
8 Setting the Measuring Units The two output fields on the main screen always show the two measurement parameters – the alcohol content of the sample and the measuring temperature. You can set one of three options for the corresponding measuring units: - Alcohol % v/v @ 20 °C - Alcohol % v/v @ 15 °C... -
Page 24: Performing A Water Adjustment
6. After the procedure has finished, the check result is displayed. If the deviation from the target value exceeds defined limits, you will see a recommendation to perform a water adjustment. Tap <OK>. 7. Tap <Back> repeatedly to return to the main screen. 9.2 Performing a Water Adjustment Use freshly degassed ultra-pure water. -
Page 25: Measuring
TIP: The pump lever with lock function (supplied with the instrument) is suited for any filling method. However, when you fill with the filling tube, the pump lever without lock function is more convenient. This is why Snap 41 comes with this pump lever already mounted. -
Page 26: Filling With The Filling Tube
10.1.1 Filling with the Filling Tube 1. Press down the pump lever as far as it will go (see fig. 7). 2. Sink the filling tube into the sample. 3. Slowly release the pump lever. Fig. 7: Filling sample with the filling tube 10.1.2 Filling with a Syringe WARNING If you remove the pump while filling with a syringe, or if you remove the... -
Page 27: Performing A Measurement
3. Lead the filling tube into a suitable waste vessel. 4. Fill the syringe with the sample. 5. Connect the syringe to the syringe adapter and fill the measuring cell (see fig. 8). Fig. 8: Filling sample with a syringe 10.2 Performing a Measurement 1. -
Page 28: Upkeep And Cleaning
11 Upkeep and Cleaning NOTICE • Make sure the solvent that you use for cleaning is suitable. For details on recommended cleaning agents, see section 11.1.4. • Do not use any mechanical action for cleaning the measuring cell. 11.1 Cleaning the Measuring Cell 1. -
Page 29: Cleaning At The End Of A Measurement Series
11.1.2 Cleaning at the End of a Measurement Series At the end of your measurement series, clean your Snap 41 thoroughly before you store it. You need not dry the measuring cell (provided that the cleaning liquid will not freeze in the measuring cell). You can leave deionized water in the measuring cell when you store the instrument for a day. -
Page 30: Cleaning The Filling Pump
11.2 Cleaning the Filling Pump Clean the filling pump regularly. Intervals depend on your application. Dismounting the pump Fig. 9: Dismounting the pump 1. Push the pump lever upwards with both thumbs (see fig. 9). 2. Release the pump by a quarter turn counterclockwise. 3. -
Page 31: Cleaning The Housing And The Display
Remounting the pump Fig. 10: A: Releasing a locked pump | B: Remounting the pump 1. If the pump shaft has been locked, release the lock (see fig. 10, A): a. Press on the marks on the front and rear of the pump shaft. b. -
Page 32: Storing The Instrument
11.4 Storing the Instrument Before you store the instrument for a longer period, clean the measuring cell as described in section 11.1. For storage lasting less than one day, fill the measuring cell with ultra-pure water. If you have filled the liquid with the plastic syringe, leave the syringe in the adapter to keep the liquid from running out. -
Page 33: Exchanging The Pump Lever
1. With the supplied Allen key, unscrew the screw fixing the battery compartment to the rear of the instrument’s display (see fig. 11). 2. Lift off the battery compartment. The screw stays loosely attached to the battery compartment so that it cannot get lost. -
Page 34: Software Update
11.7 Software Update Your Anton Paar representative will inform you when a new software update for your Snap 41 is available. After you have received the update file, you can import it into the instrument via Bluetooth. 1. Save the update file (file extension “.afp”) on a Bluetooth-enabled PC. -
Page 35: Maintenance And Repair
12 Maintenance and Repair 12.1 Maintenance Performed by an Authorized Anton Paar Service Engineer The instrument requires no periodical maintenance. However, optional ser- vices are available from your local Anton Paar representative upon request. Following parts are generally excluded from the warranty (wear and tear parts) •... -
Page 36: Appendix A: Technical Data
Appendix A: Technical Data A.1: Specifications Alcohol Measuring range 0 % v/v to 100 % v/v (0 °Proof to 200 °Proof) Accuracy 0.2 % v/v Repeatability, s.d. 0.1 % v/v Reproducibility, s.d. 0.15 % v/v Resolution 0.01 % v/v Temperature Measuring range 5 °C to 30 °C (41 °F to 86 °F) Accuracy... -
Page 37: A.3: Wetted Parts
A.3: Wetted Parts The following materials are in contact with the samples and cleaning agents: Material Part Borosilicate glass measuring cell, filling pump Kalrez flat seal between connection block and measuring cell PP (polypropylene) housing PTFE filling tube (polytetrafluoroethylene) PVDF connection block, screw plug, adapter Luer, (polyvinylidene fluoride) pump lever... -
Page 38: Appendix B: Declarations Of Conformity
Appendix B: Declarations of Conformity E28IB004EN-G... - Page 39 E28IB004EN-G...
-
Page 40: Appendix C: Menu Tree
Appendix C: Menu Tree Setup Water Adjustment Factory Adjustment Display Settings Gesture Control Sound Language Software Update System Information...
Need help?
Do you have a question about the Snap 41 and is the answer not in the manual?
Questions and answers