
Related Manuals for ICS Schneider Messtechnik Anton Paar DMA 501


Summary of Contents for ICS Schneider Messtechnik Anton Paar DMA 501
- Page 1 Instruction Manual and Safety Information DMA 501 | DMA 1001 Density Meter instrument software version: from 4.1.0 (Original Instructions)
- Page 2 Disclaimer This document may contain errors and omissions. If you discover any such errors, or if you would like to see more information in this document, please contact us at our address below. Anton Paar assumes no liability for any errors or omissions in this document. Changes, copyright, trademarks, etc.
-
Page 3: Table Of Contents
Contents Contents 1 Safety Instructions ..........................5 2 DMA 501 / DMA 1001 – An Overview ....................7 2.1 Intended Use of the Instrument ....................... 7 2.2 Functional Components ........................8 3 Installing the Instrument ........................9 3.1 Installation Requirements ....................... 9 3.2 Installation ............................ - Page 4 Contents 10 Maintenance and Repair ........................25 10.1 Maintenance Performed by an Authorized Anton Paar Service Engineer ........25 10.2 Repair Performed by an Authorized Anton Paar Representative ..........25 Appendix A: Technical Data ........................26 A.1: Specifications ..........................26 A.2: Instrument Data and Operating Conditions .................
-
Page 5: Safety Instructions
1 Safety Instructions See the reference guide for a comprehensive description of the instrument. Download Anton Paar documents for free from the Anton Paar website: https://www.anton-paar.com 1 Safety Instructions • Read the documentation before using the instru- • Use only accessories, consumables, or spare ment. - Page 6 1 Safety Instructions 1.3 Service and Repairs • Before you start a measurement or cleaning procedure, check the injection adapters for leak tightness. • Service and repair procedures may be carried • Take measures that spilled liquids cannot get out only by authorized persons or by Anton Paar into plug connections or venting slots of electri- GmbH.
-
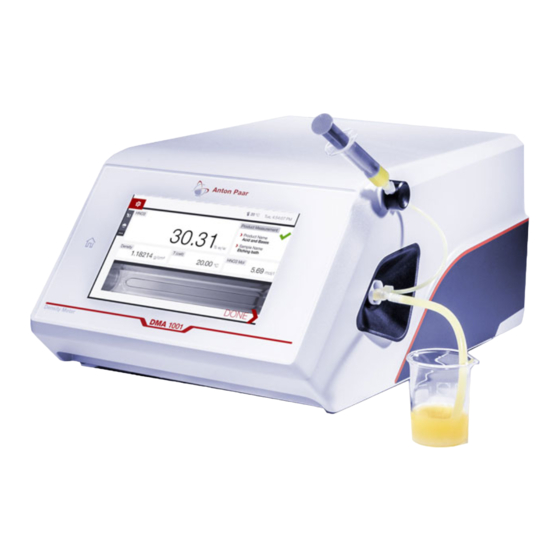
Page 7: Dma 501 / Dma 1001 - An Overview
2 DMA 501 / DMA 1001 – An Overview 2 DMA 501 / DMA 1001 – An Overview Data export/printouts The compact DMA 501 / DMA 1001 density meter measures the density of liquid samples by use of the You can export all measured data as a PDF or CSV oscillating U-tube method that has been first intro- file onto any connected storage device. -
Page 8: Functional Components
2 DMA 501 / DMA 1001 – An Overview 2.2 Functional Components Fig. 1: Views of the instrument Front Rear 1 Home button 7 DC power jack 2 Touchscreen 8 On/Off switch 3 Grip for transportation 9 Safety temperature limiter (A) and reset button (B) 10 Type plate with serial number (P/N = mat. -
Page 9: Installing The Instrument
3 Installing the Instrument 3 Installing the Instrument 3.1 Installation Requirements 3.2 Installation To achieve best measurement results, operate the instrument under typical laboratory conditions: WARNING - 23 ±2 °C (73.4 ±3.6 °F) ambient temperature, - < 60 % relative humidity, Risk of electric shock Connect only voltages that comply with PELV - no direct sunlight. -
Page 10: Leak Tightness Test
3 Installing the Instrument 3.2.2 Leak Tightness Test 3.2.4 Air Pump Hose 1. Cut a piece of approx. 60 cm/23 in length from the supplied silicone hose, mat. no. 57024. CAUTION 2. Attach an adapter Luer cone, mat. no. 63863, to one end of the air pump hose. -
Page 11: Performing First Checks
4 Operating the Instrument 3.4 Performing First Checks Verification of software integrity During the startup of the instrument the integrity of After installation set the instrument settings, see the instrument’s program code is verified by the cal- section 5. culation and comparison of a hash value. Conclude initial setup with an air check and a water The hash value of your specific software version can check (see section 8.1) to verify that your instrument... -
Page 12: Instrument Settings
5 Instrument Settings 5 Instrument Settings See the reference guide for a comprehensive - If you have set up an automatic network description of all instrument settings. configuration, you can leave the Time servers input field empty. For the configuration of installed options, see the - If you have set up a manual network instructions that come with the option. -
Page 13: Measurement Settings - Products
6 Measurement Settings – Products 6 Measurement Settings – Products 6.1 Products 6.2.2 Reports Measurement results are presented as reports, You can individually define the measurement set- which you can access in the data explorer. See the tings for each of your products or sample varieties, reference guide for details on configuring reports. -
Page 14: Check Density Stability
6 Measurement Settings – Products 6.3.6 FillingCheck™ Indicator Measurement performance Example: The measurement perfor- FillingCheck™ is an automatic bubble detection mance Precise has been set (white based on an advanced analysis of the U-tube’s squares). Currently the measurement oscillation pattern. reaches measurement performance If applicable, a filling warning will be shown in the Standard (green squares). -
Page 15: Performing A Measurement
7 Performing a Measurement 7 Performing a Measurement Table 1: Steps of a typical measurement cycle Step Check that the measurement system is properly installed and in good working section 3.1, order, and that all conditions for a good measurement are met. below Perform a water check to verify the instrument’s accuracy before you start your section 8.1... -
Page 16: Filling Sample
7 Performing a Measurement 7.2 Filling Sample To achieve highly accurate measuring results, fill the sample into the measuring cell steadily and without bubbles. TIP: Sample containing dissolved CO will cause WARNING bubbles in the measuring cell, which render the measurement results invalid. -
Page 17: Filling With A Syringe (Luer Tip)
7 Performing a Measurement 7.3 Measurement Procedure 7.2.1 Filling with a Syringe (Luer Tip) WARNING WARNING Risk of fire and poisonous substances Risk of injuries by dangerous liquids leaking In the very rare case of a malfunction of the or spurting out temperature control, the measuring cell could If you push the plunger of the syringe too hard, heat up to 150 °C (302 °F). -
Page 18: Data Management
7 Performing a Measurement Boiling the sample - DONE to close the results and finish or - REMEASURE to perform another measurement with the same settings. WARNING 7.4 Data Management Health risk with toxic components Samples containing toxic volatile components Saved data can be accessed in the data explorer: can cause irritation and serious injuries to your - Measurements... -
Page 19: Checks, Adjustments, Calibrations
8 Checks, Adjustments, Calibrations 8 Checks, Adjustments, Calibrations 8.1 Checks If the water check has failed We recommend taking corrective actions until the 1. Select Checks in the menu, then select one check is valid again: of the already defined checks (or define a new one by tapping •... -
Page 20: Calibrations
8 Checks, Adjustments, Calibrations Performing an adjustment IMPORTANT: We strongly recommend to adjust the instrument at the temperature at which you will For the air/water adjustment, the adjustment media perform your measurements (±5 °C/±9 °F). are dry air and freshly degassed ultra-pure water. c. -
Page 21: Upkeep And Cleaning
9 Upkeep and Cleaning 9 Upkeep and Cleaning Cleaning and drying procedure To ensure a constant and high accuracy of your measurements, employ a regular and effective cleaning routine, and store the instrument under the recommended conditions. WARNING 9.1 Cleaning and Drying the Risk of injuries and fire by liquids leaking Before you fill any sample or cleaning liquid, in Measuring Cell... -
Page 22: Cleaning The Instrument Housing And The Touchscreen
9 Upkeep and Cleaning ture of the measuring cell (ethanol at 20 °C: NOTICE approx. 5 min, acetone at 20 °C: approx. 3 min). Corrosion due to unsuited means of cleaning 9. Tap STOP to stop the air pump. Using substances for cleaning that are not suit- TIP: You can also set the air pump to turn off auto- able causes corrosion of the instrument housing. -
Page 23: Maintenance And Repair
10 Maintenance and Repair 10 Maintenance and Repair 10.1 Maintenance Performed by an 10.2 Repair Performed by an Autho- Authorized Anton Paar Service rized Anton Paar Representative Engineer In case your instrument needs repair, contact your local Anton Paar representative, who will take care The instrument requires no periodical maintenance. -
Page 24: Appendix A: Technical Data
Appendix A: Technical Data Appendix A: Technical Data A.1: Specifications DMA 501 DMA 1001 Density Measuring range 0–3 g/cm Repeatability s.d. 0.0002 g/cm 0.00005 g/cm Reproducibility s.d. 0.0004 g/cm 0.00007 g/cm Accuracy 0.001 g/cm 0.0001 g/cm Temperature Measuring range 15 °C to 40 °C (59 °F to 104 °F) 15 °C to 60 °C (59 °F to 140 °F) Repeatability s.d. -
Page 25: A.2: Instrument Data And Operating Conditions
Appendix A: Technical Data A.2: Instrument Data and Operating Conditions Environmental conditions indoor use only (EN 61010) Ambient temperature +5 °C to +35 °C (+41 °F to +95 °F) permissible operating temperature Air humidity 10 % to 90 % relative humidity, non-condensing Altitude max. -
Page 26: Appendix B: Eu Declaration Of Conformity
Appendix B: EU Declaration of Conformity Appendix B: EU Declaration of Conformity...
Need help?
Do you have a question about the Anton Paar DMA 501 and is the answer not in the manual?
Questions and answers
Have a problem with my DMA 1001, after reading distilled water fir rincing i no longer have 0.00 value as brix and the density of distilled water higner than normal
If the Anton Paar DMA 501 shows a Brix value higher than 0.00 and an abnormal density reading after rinsing with distilled water, possible causes include:
1. Residual Contamination: The measuring cell may still contain residues from the previous sample, affecting the reading.
2. Air Bubbles: Air bubbles in the measuring cell can interfere with the measurement and cause incorrect density readings.
3. Improper Rinsing: If distilled water is not properly degassed or if the cell is not thoroughly rinsed, impurities or trapped gases may affect the measurement.
4. Incomplete Drying: If the measuring cell has not fully dried after rinsing, remaining liquid can dilute the sample and alter the reading.
5. Adjustment Issues: If the device was not properly adjusted using dry air and freshly degassed ultra-pure water, the measurements may be inaccurate.
To resolve this, ensure proper rinsing, use degassed water, dry the cell completely, and verify calibration adjustments.
This answer is automatically generated
what if after clean and measurement of distilled water desity it show a density higher than normal
If the Anton Paar DMA 501 shows a density higher than normal after measuring distilled water, follow these steps:
1. Perform a Density Adjustment: If a check has failed and corrective actions have not helped, conduct a density adjustment.
2. Use Freshly Degassed Ultra-Pure Water: Ensure that the calibration or check is done with the correct medium.
3. Check the Measuring Cell: Use the built-in camera to confirm that the measuring cell is clean and free of bubbles.
4. Perform an Air/Water Density Adjustment: If the instrument has been relocated to a place with a temperature difference of more than 10°C, an air/water adjustment is recommended.
If the issue persists, further troubleshooting or contacting an Anton Paar representative may be necessary.
This answer is automatically generated