
Related Manuals for Extech Instruments HDV7C-P28-30


Summary of Contents for Extech Instruments HDV7C-P28-30
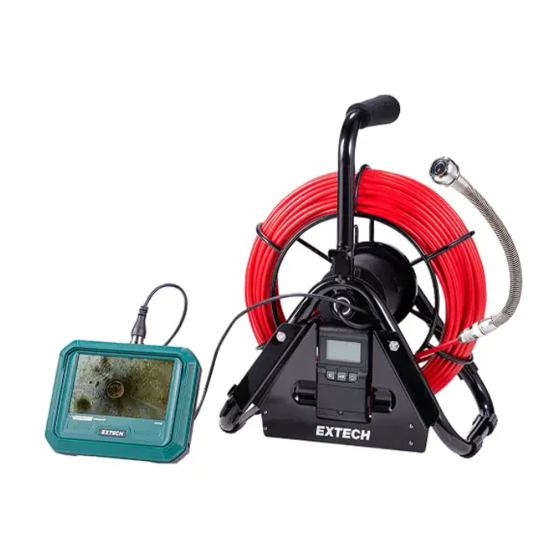
- Page 1 User Manual Pipe Inspection Probe Model HDV7C-P28–30. For use with HDV700 VideoScope.
-
Page 2: Product Description
Introduction Thank you for selecting the Extech pipe inspection probe. The probe includes a digital camera with a coiled 98.4 ft. (30 m) probe spool, a brush accessory, and a digital distance gauge. The probe is intended for use with the HDV700 VideoScope. See the HDV700 manual for complete instructions covering image and video management, split-screen mode, and other features. - Page 3 Safety Safety Note Please read and understand all safety cautions before use. CAUTION Do not insert the probe into flammable liquid or gas. This product is designed for industrial use only. It is not intended for use in hu- man or other biological inspection. CAUTION To clean the probe, wipe with a soft cloth dampened with a mild detergent and clean water.
-
Page 4: Connect The Probe
Connect the Probe The steps below explain how to safely connect the HDV700 Video- Scope with the probe. Always switch the HDV700 power off when making connections. Attach the HDV700 to the reel. Connect the probe to the HDV700 by first aligning the white dot on the probe connector with the white dot on the HDV700 connector and then pushing the probe into the HDV700 cavity until it seats... - Page 5 Uncoiling the Probe Loosen the wheel stopper. Uncoil the probe horizontally from the camera head stopper. Do not pull probe up over a 45° angle. After uncoiling the desired probe length, fasten the wheel stopper. Recoiling the Probe Carefully coil the probe back onto the wheel horizontally.
- Page 6 Brush Accessory The probe includes a brush accessory that assists the probe as it moves through the pipe under inspection. The brush can clear de- bris that may impede the probe. The brush diameter is 4 in. (100 mm). To attach the brush, follow the instructions below. Position the mounting ring so that it aligns with the screw holes.
- Page 7 Powering the Distance Gauge The distance gauge is switched ON or OFF by pressing the power button (2) for three seconds. After one hour, the gauge will auto- matically switch off, to conserve battery energy. The battery status icon (7) shows the current battery power. To re- place the batteries, follow the steps below: 1.
-
Page 8: Measurement Considerations
Measurement Considerations • Ensure that the camera lens cap is removed before inserting the probe into the pipe. • Store the lens cap safely while it is removed. • For protection, attach the lens cap when storing the camera. • After connecting the probe to the HDV700, verify that a clear camera image is displayed. -
Page 9: Specifications
Specifications Camera Specifications Camera image resolution 640 x 480 pixels Frame rate 30 frames per second (fps) Probe head and body 1.1 in. (28 mm) diameter Probe length and diameter 98.4 ft. (30 m) length; 0.2 in. (6 mm) diameter Probe head material Stainless steel Reel frame diameter... -
Page 10: Two Year Warranty
Distance Gauge Specifications Display type Backlit LCD Display digits 3 digits with 0.1 resolution (99.9) Unit of measure Meters (m) and feet (ft); selectable Accuracy 1.3 ft (0.4 m) Control buttons Power/reset, unit of measure, and display backlight Power Two (2) AAA batteries, included ≥... - Page 12 User Manual last page Website http://www.flir.com Customer support http://support.flir.com Copyright © 2022, FLIR Systems, Inc. All rights reserved worldwide. Disclaimer Specifications subject to change without further notice. Models and accessories subject to regional market considerations. License procedures may apply. Products described herein may be subject to US Export Regulations. Please refer to exportquestions@flir.com with any questions.
Need help?
Do you have a question about the HDV7C-P28-30 and is the answer not in the manual?
Questions and answers