Advertisement
Model HDV‐WTX2L
Wireless Articulating Semi‐Rigid Probe
For use with the HDV600 Borescope only
Thank you for purchasing this professional camera probe. This sheet covers the warning and
Specifications for the probe only. Instructions regarding the usage of the HDV600 Borescope are
provided in the Borescope User Guide.
Note: The camera LEDs become warm when set to maximum intensity
CAUTION: For the Articulating Probe, do not operate the articulation knob with the
probe in a coiled configuration. This will damage the articulation controls!
CAUTION: Always return the articulation and tension knobs to the neutral position
before removing the probe from the inspection area.
The label on the probe provides the Serial Number and Part Number in the format
shown below. Please do not remove this label; otherwise the warranty will be invalid.
Warnings
Do not bend to a smaller diameter than 10cm (4")
Warranty is invalid if stickers, tags, or labels are removed
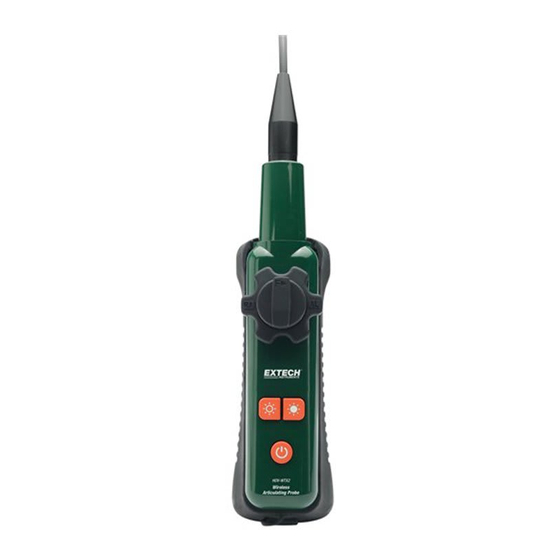
Articulating Probe Description
1. Articulation knob
2. Articulation tension knob
3. Articulating camera
4. Light intensity buttons
5. Power button
6. AC Adaptor jack, charging LED, & extension cable socket
7. Carrying strap
800.561.8187
Part No.WTX2L F/M/R (flex/macro/rigid) Serial No: HDV110001
www.
Product sheet
1
information@itm.com
.com
2
3
4
5
7
HDV‐WTX2L‐en‐GB_V1.1 2/16
6
Advertisement
Table of Contents

Related Manuals for Extech Instruments HDV-WTX2L


Summary of Contents for Extech Instruments HDV-WTX2L
- Page 1 Product sheet Model HDV‐WTX2L Wireless Articulating Semi‐Rigid Probe For use with the HDV600 Borescope only Thank you for purchasing this professional camera probe. This sheet covers the warning and specifications for the probe only. Instructions regarding the usage of the HDV600 Borescope are provided in the Borescope User Guide. Note: The camera LEDs become warm when set to maximum intensity CAUTION: For the Articulating Probe, do not operate the articulation knob with the probe in a coiled configuration. This will damage the articulation controls! CAUTION: Always return the articulation and tension knobs to the neutral position before removing the probe from the inspection area. The label on the probe provides the Serial Number and Part Number in the format shown below. Please do not remove this label; otherwise the warranty will be invalid. Part No.WTX2L F/M/R (flex/macro/rigid) Serial No: HDV110001 Warnings Do not bend to a smaller diameter than 10cm (4”) Warranty is invalid if stickers, tags, or labels are removed Articulating Probe Description 1. Articulation knob 2. Articulation tension knob 3. Articulating camera 4. Light intensity buttons 5. Power button 6.
- Page 2 Articulation Setup and Orientation The articulation direction and orientation may change if the probe is twisted and coiled during use or when stored. To re‐orient the probe: Place the extended probe on a flat surface Set the tension “F” knob to the left or released position. Set the articulation knob to the center position with the R Δ and Δ L labels in the horizontal position. Manually adjust the probe and camera to the zero degree position. Rotate the articulation knob clockwise for a 90° bend. If necessary, manually adjust the probe so that the camera lays flat on RΔ ΔL the surface with a 90° articulation Rotate the articulation knob counter‐clockwise and confirm proper orientation. Charging the Probe Battery The probe battery can be charged in two ways: Charge the probe with its own charging cable. The AC charger port and charging status LED are located in the bottom access compartment. Connect the charger to the probe and observe the color of the LED: Red indicates charging; Green indicates fully charged. Charge the probe through the camera. Connect the camera to the probe via the extension cable (bottom access compartment jack). Make sure that the charging cable is disconnected from the probe and then connect a charging cable to the camera. Now while the camera is charging, the probe will charge at the same time. Note: The rechargeable battery is not user replaceable. Specifications Resolution 640 x 480 pixels Length 2m (6.6’) Outer diameter (O.D.) 6mm (0.24”) Battery 3.7V rechargeable Li‐Polymer ∞ ∞ Focus distance ...
Need help?
Do you have a question about the HDV-WTX2L and is the answer not in the manual?
Questions and answers