Table of Contents
Advertisement
Available languages
Available languages
Quick Links
Advertisement
Table of Contents

Related Manuals for Hoover HI642CTTWIFI


Summary of Contents for Hoover HI642CTTWIFI
- Page 1 Instruction Manual For Induction Hob ENGLISH Bedienungsanleitung für Induktionskochfeld DEUTSCH HI642CTTWIFI Thank you for purchasing the HOOVER induction hob. Please read this instruction manual carefully before using the hob and keep it in a safe place for future reference...
-
Page 2: Safety Warnings
Hereby, Candy Hoover Group Srl declares that the radio equipment is in compliance with Directive 2014/53/EU and with the relevant Statutory Requirements (for the UKCA market). The full text of the declaration of conformity is available at the following internet address: www.candy group.com... -
Page 3: Important Safety Instructions
Important safety instructions • Read these instructions carefully before installing or using this appliance. • No combustible material or products should be placed on this appliance at any time. • Please make this information available to the person responsible for installing the appliance as it could reduce your installation costs. -
Page 4: Health Hazard
• Failure to follow this advice may result in electrical shock or death. Health Hazard • This appliance complies with electromagnetic safety standards. • However, persons with cardiac pacemakers or other electrical implants (such as insulin pumps) must consult with their doctor or implant manufacturer before using this appliance to make sure that their implants will not be affected by the electromagnetic field. - Page 5 with extreme care and always store safely and out of reach of children. • Failure to use caution could result in injury or cuts. Important safety instructions • Never leave the appliance unattended when in use. Boilover causes smoking and greasy spillovers that may ignite.
- Page 6 • Do not leave children alone or unattended in the area where the appliance is in use. • Children or persons with a disability which limits their ability to use the appliance should have a responsible and competent person to instruct them in its use.
- Page 7 type environments; -bed and breakfast type environments. WARNING: The appliance and its accessible • parts become hot during use. Care should be taken to avoid touching heating elements. Children less than 8 years of age shall be kept away unless continuously supervised. This appliance can be used by children aged •...
- Page 8 A steam cleaner is not to be used. • The appliance is not intended to be operated by • means of an external timer or separate remote-control system. CAUTION: The cooking process has to be supervised. A short term cooking process has to be supervised continuously.
-
Page 9: Product Overview
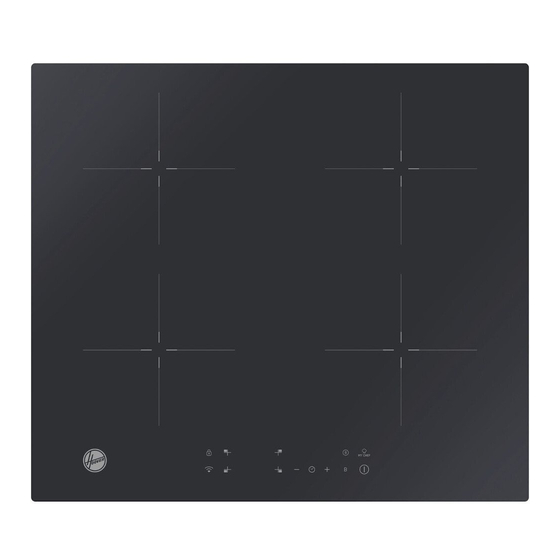
Product Overview Top View 1.2000 W zone, boost to 2600W 2.1500 W zone, boost to 2000W 3.2000 W zone, boost to 2600W 4.1500 W zone, boost to 2000W 5. Glass plate 6. Control panel Control Panel 1. Heating zone selection controls 2. -
Page 10: A Word On Induction Cooking
A Word on Induction Cooking Induction cooking is a safe, advanced, efficient, and economical cooking technology. It works by electromagnetic vibrations generating heat directly in the pan, rather than indirectly through heating the glass surface. The glass becomes hot only because the pan eventually warms it up. iron pot magnetic circuit ceramic glass plate... -
Page 11: Choosing The Right Cookware
Choosing the right Cookware • Only use cookware with a base suitable for induction cooking. Look for the induction symbol on the packaging or on the bottom of the pan. • You can check whether your cookware is suitable by carrying out a magnet test. -
Page 12: Using Your Induction Hob
please place the pan in the centre of the cooking zone. The base diameter of induction cookware Cooking zone Minimum (mm) 1, 2 , 3, 4(180mm) The above may vary according to the quality of the pan used. Using your Induction Hob To start cooking 1. -
Page 13: When You Have Finished Cooking
setting This means that: • you have not placed a pan on the correct cooking zone or, • the pan you’re using is not suitable for induction cooking or, • the pan is too small or not properly centred on the cooking zone. No heating takes place unless there is a suitable pan on the cooking zone. - Page 14 Using the Power Management Using power management you can set the total power to 2.5kW/ 3.0kW/ 4.5kW/ 6.5kW and 7.4kW. The default total power setting is the maximum power level. Setting the total power level to fit your requirement 1. Make sure the cooktop is turned off. Note: you can only set power management when the cooktop is turned off.
- Page 15 Power management Rules Using power management you can set the total power to 2.5kW/ 3.0kW/ 4.5kW/ 6.5kW and 7.4kW. The default total power setting is the maximum power level. If you increase it by touching ‘+’, the cooktop will beep 3 times and indicator will show a flashing ‘Pn’.
- Page 16 a. WIRELESS PARAMETERS Technology Wi-Fi Standard 802.11 b/g/n v4.2 BR/EDR &BLE Frequency Band(s) [MHz] 2400 ~ 2500 2400 ~ 2500 Maximum Power [mW] b. PRODUCT INFORMATION FOR NETWORKED EQUIPMENT Product information for networked equipment power consumption of the product in networked standby if all wired network ports are connected and all wireless network ports are activated:...
-
Page 17: Restrictions When Using
Using the Boost Boost is the function that one zone rising to a larger power in one second and lasting for 5 minutes. Thus you can get a more powerful and faster cooking. Using the Boost to get larger power Touch the heating zone selection button that you wish to boost, an indicator next to the key will flash. -
Page 18: Using The Pause Function
Using the Pause function Pause function can be used at any time during cooking. It allows to stop the induction cooktop and come back to it. 1. Make sure the cook zone is working. 2. Touch the button , the cooking zone indicator will show “ll”. And then the operation of the induction cooktop will be deactivate within the scope of all cooking zones, except the Pause function, on/off and lock keys. -
Page 19: Over Temperature Protection
Touch the keylock control. The timer indicator will show “ Lo “ To unlock the controls 1. Make sure the Induction hob is turned on. 2. Touch and hold the keylock control for a while 3. You can now start using your Induction hob. When the hob is in the lock mode, all the controls are disable except the ON/OFF you can always turn the induction hob off with the ON/OFF control in an emergency, but you shall unlock the hob first in the next operation. -
Page 20: Using The Timer As A Minute Minder
Using the Timer You can use the timer in two different ways: • You can use it as a minute minder. In this case, the timer will not turn any cooking zone off when the set time is up. • You can set it to turn one cooking zone off after the set time is up. •... - Page 21 Cooking zones set for this feature will: 1. Touching the heating zone selection control that you want to set the timer for. (e.g. zone 1#) 2. Touch timer control , The minder indicator will start flashing and “30” will show in the timer display.
- Page 22 Other cooking zone will keep operating if they are turned on previously. Setting the timer to turn more than one cooking zone 1. If use this function to more than one heating zone, the timer indicator will show the shortest time. (e.g.
-
Page 23: Care And Cleaning
Care and Cleaning What? How? Important! Everyday soiling on 1. Switch the power to the • When the power to the cooktop is glass (fingerprints, cooktop off. switched off, there will be no ‘hot 2. Apply a cooktop cleaner marks, stains left by surface’... -
Page 24: Hints And Tips
Hints and Tips Problem Possible causes What to do The induction hob No power. Make sure the induction hob is cannot be turned on. connected to the power supply and that it is switched on. Check whether there is a power outage in your home or area. -
Page 25: Failure Display And Inspection
The induction hob or a Technical fault. Please note down the error cooking zone has letters and numbers, switch turned itself off the power to the induction hob unexpectedly, a tone off at the wall, and contact a sounds and an error qualified technician. -
Page 26: Technical Specification
Technical Specification Cooking Hob HI642CTTWIFI Cooking Zones 4 Zones Supply Voltage 220-240V~, 50-60Hz Installed Electric Power 2.5kw:2250-2750W or 3.0 kw:2700-3300W or 4.5kw:4050-4950W or 6.5kw:5850-7150W or 7.4kw:6600-7400W Product Size 590X520X60 L×W×H(mm) Building-in Dimensions 560X490 A×B (mm) Weight and Dimensions are approximate. Because we continually strive to improve our products we may change specifications and designs without prior notice. - Page 27 L(mm) W(mm) H(mm) D(mm) A(mm) B(mm) X(mm) 50 mini Under any circumstances, make sure the Induction cooker hob is well ventilated and the air inlet and outlet are not blocked. Ensure the Induction cooker hob is in good work state. As shown below Note: The safety distance between the hotplate and the cupboard above the hotplate should be at least 760mm.
-
Page 28: Before Locating The Fixing Brackets
• a suitable isolating switch providing full disconnection from the mains power supply is incorporated in the permanent wiring, mounted and positioned to comply with the local wiring rules and regulations. The isolating switch must be of an approved type and provide a 3 mm air gap contact separation in all poles (or in all active [phase] conductors if the local wiring rules allow for this variation of the requirements) •... -
Page 29: Connecting The Hob To The Mains Power Supply
Cautions 1. The induction hotplate must be installed by qualified personnel or technicians. We have professionals at your service. Please never conduct the operation by yourself. 2. The hob will not be installed directly above a dishwasher, fridge, freezer, washing machine or clothes dryer, as the humidity may damage the hob electronics 3. - Page 30 The power supply should be connected in compliance with the relevant standard, or a single-pole circuit breaker. The method of connection is shown below. 220-240V~ 220-240V~ 220-240V~ Input 400V~ 220-240V~ Input 400V~ Input Input 220-240V~ L1 L2 N1 N2 L1 L2 N Power Cord Power Cord Power Cord...
- Page 31 Product Information for Domestic Electric Hobs Compliant to Commission Regulation (EU) No 66/2014 Position Symbol Value Unit Model identification HI642CTTWIFI Type of hob: Electric Hob Number of zones cooking zones areas and/or areas Induction Heating cooking zones technology (induction Induction...
- Page 32 Central central Central right Front left Front central Front right ECelectric Rear left 193,5 Wh/kg cooking Rear ECelectric Wh/kg central cooking ECelectric Rear right 197,2 Wh/kg cooking ECelectric Central left Wh/kg cooking Energy consumption for cooking Central ECelectric Wh/kg zone or area calculated per kg central cooking Central...
- Page 33 Hiermit erklärt die Candy Hoover Group Srl, dass die Funkausstattung der Richtlinie 2014/53/EU und den einschlägigen gesetzlichen Anforderungen (für den UKCA-Markt) entspricht. Der vollständige Text der Konformitätserklärung ist unter der folgenden Internet- Adresse verfügbar: www.candy-group.com Sicherheitshinweise Ihre Sicherheit ist uns wichtig. Bitte lesen Sie diese Informationen, bevor Sie Ihr Kochfeld benutzen.
- Page 34 • Legen Sie niemals brennbare Stoffe oder Gegenstände auf diesem Gerät ab. • Bitte stellen Sie diese Informationen der Person, die für die Installation Ihres Geräts zuständig ist, zur Verfügung, dadurch können Installationskosten gespart werden. • Um Gefahren zu vermeiden, muss dieses Gerät entsprechend den vorliegenden Installationsanweisungen installiert werden.
- Page 35 • Die Nichtbeachtung dieser Anweisung kann Stromschlag oder Tod zur Folge haben. Gesundheitsrisiko • Dieses Gerät entspricht den elektromagnetischen Sicherheitsstandards. • Jedoch müssen Personen mit Herzschrittmachern oder anderen elektrischen Implantaten (wie z.B. Insulinpumpe) vor der Benutzung dieses Geräts ihren Arzt oder den Hersteller ihres Implantats um Rat fragen, um zu gewährleisten, dass ihre Implantate nicht vom elektromagnetischen Feld beeinträchtigt werden.
- Page 36 andere Kochzonen, die eingeschaltet sind, nicht überlagern. Halten Sie Griffe außerhalb der Reichweite von Kindern. • Nichtbeachten dieses Hinweises kann zu Verbrennungen und Verbrühungen führen. Gefahr durch Schneiden • Die messerscharfe Klinge eines Glasschabers ist ungeschützt, wenn die Schutzhülle entfernt wurde. Benutzen Sie ihn mit äußerster Sorgfalt und bewahren Sie ihn sicher und außerhalb der Reichweite von Kindern auf.
- Page 37 • Verwenden Sie Ihr Gerät niemals zum Wärmen oder Heizen von Räumen. • Schalten Sie nach der Benutzung die Kochzone und das Kochfeld wie in dieser Anleitung beschrieben aus (d.h. über die Bedienelemente). Verlassen Sie sich nicht auf die Topferkennung, um die Kochfelder abzuschalten, wenn Sie Töpfe entfernen.
- Page 38 • Verwenden Sie keinen Dampfreiniger für die Reinigung des Kochfeldes. • Stellen Sie keine Gegenstände auf dem Kochfeld ab und lassen Sie nichts auf das Kochfeld fallen. • Stellen Sie sich nicht auf Ihr Kochfeld. • Verwenden Sie keine Töpfe mit rauen Kanten und ziehen Sie Töpfe nicht über die Glasoberfläche des Induktionskochfeldes, da Kratzer auf dem Glas entstehen können.
- Page 39 • Dieses Gerät kann von Kindern ab 8 Jahren und Personen mit eingeschränkten körperlichen, sensorischen oder geistigen Fähigkeiten oder mangelnder Erfahrung und mangelndem Wissen benutzt werden, wenn diese in die sichere Bedienung des Geräts eingewiesen wurden oder beaufsichtigt werden und die damit verbundenen Gefahren verstanden haben.
-
Page 40: Herzlichen Glückwunsch
VORSICHT: Der Garvorgang muss überwacht werden. Eine kurzfristige Garung muss laufend überwacht werden. WARNUNG: Um das Kippen des Gerätes zu verhindern, muss dieses Mittel zur Stabilisierung montiert werden. Beachten Sie die Installationshinweise. WARNUNG: Verwenden Sie nur Herdschutzvorrichtungen vom Hersteller des Kochgeräts oder die in der Bedienungsanleitung als geeignet empfohlen werden, bzw. - Page 41 Produktübersicht Ansicht von oben 1. 2000 W-Zone, Boost auf 2600W 2. 1500 W-Zone, Boost auf 2000W 3. 2000 W-Zone, Boost auf 2600W 4. 1500 W-Zone, Boost auf 2000W 5. Glasplatte 6. Bedienfeld Bedienfeld 1. Kochzonen Auswahlsteuerungen 2. Timer-Steuerung 3. Taste Leistungsstufen/Timer 4.
- Page 42 Ein Wort zum Induktionskochen Induktionskochen ist eine sichere, moderne, effiziente und kostengünstige Kochtechnologie. Durch elektromagnetische Schwingungen wird die Wärme direkt im Topf erzeugt und nicht indirekt über die Erhitzung der Glasfläche. Das Glas des Kochfeldes wird nur deshalb heiß, weil es vom Topf oder der Pfanne erwärmt wird. Eisentopf Magnetkreis Keramikglasplatte...
- Page 43 Auswahl des richtigen Kochgeschirrs • Verwenden Sie ausschließlich Kochgeschirr mit einem für das Induktionskochen geeigneten Boden. Achten Induktionssymbol auf der Verpackung oder am Boden des Topfes oder der Pfanne. • Ob ein Topf für das Kochen mit Induktion geeignet ist, können Sie auch mit dem so genannten Magnettest herausfinden.
- Page 44 Topfgröße Die Kochzonen werden bis zu einer Obergrenze automatisch dem Topfdurchmesser angepasst. Der Topfboden muss jedoch einen Mindestdurchmesser haben, der dem der entsprechenden Kochzone entspricht. Um die maximale Effizienz des Kochfeldes zu erzielen, platzieren Sie den Topf in die Mitte der Kochzone. Der Bodendurchmesser von Induktionskochgeschirr Kochzone Minimum (mm)
- Page 45 Wenn die Anzeige abwechselnd mit der Temperatureinstellung blinkt Das bedeutet: • Sie haben den Topf oder die Pfanne nicht richtig auf die Kochzone gestellt oder • der verwendete Topf oder Pfanne ist nicht für das Induktionskochen geeignet oder • der Topf oder die Pfanne ist zu klein oder nicht richtig auf der Kochzone zentriert. Es findet kein Aufheizen statt, bis ein geeigneter Topf oder Pfanne auf der Kochzone erkannt wird.
- Page 46 Verwendung der Energieverwaltung Über die Energieverwaltung können Sie die Gesamtleistung auf 2,5kW/ 3,0kW/ 4,5kW/ 6,5kW und 7,4kW einstellen. Voreingestellt ist die maximale Leistungsstufe. Gesamtleistung an Ihre Anforderungen anpassen 1. Stellen Sie sicher, dass die Kochfläche ausgeschaltet ist. Hinweis: Sie können die Energieverwaltung nur einstellen, wenn das Kochfeld ausgeschaltet ist.
- Page 47 Regeln der Energieverwaltung Über die Energieverwaltung können Sie die Gesamtleistung auf 2,5kW/ 3,0kW/ 4,5kW/ 6,5kW und 7,4kW einstellen. Voreingestellt ist die maximale Leistungsstufe. Wenn Sie diese durch Berühren von „+“ erhöhen, piept das Kochfeld dreimal und die Anzeige blinkt „Pn“. Daher müssen Sie die Leistungsstufe der anderen Zonen verringern, bevor Sie die Leistung der gewünschten Zone erhöhen können.
- Page 48 a. WLAN-PARAMETER Technologie WLAN Standard 802.11 b/g/n v4.2 BR/EDR&BLE Frequenzbandbereich(e) [MHz] 2400 ~ 2500 2400 ~ 2500 Maximale Leistung [mW] b. PRODUKTINFORMATIONEN FÜR VERNETZTE GERÄTE Produktinformationen für vernetzte Geräte Stromverbrauch des Produkts im vernetzten Standby-Modus, wenn alle verkabelten Netzwerkanschlüsse verbunden und alle drahtlosen Netzwerkanschlüsse aktiviert sind: Zur WiFi-Aktivierung drücken So aktivieren Sie einen drahtlosen...
- Page 49 Verwendung der Boost-Funktion Mithilfe der Boost-Funktion können Sie die Leistung einer Zone innerhalb einer Sekunde auf eine höhere Leistung steigern, die dann für 5 Minuten anhält. Damit wird die Kochleistung schneller und stärker. Verwendung der Boost-Funktion für mehr Leistung 1. Bei Berührung der Kochzonen-Auswahlsteuerung blinkt die Anzeige neben der Taste auf.
- Page 50 Gruppe a Gruppe b Verwendung der Pausenfunktion Die Pausenfunktion kann jederzeit während des Garvorgangs genutzt werden. Mit ihr wird das Induktionskochfeld aus- und wieder angeschaltet. 1. Prüfen Sie, ob die Kochzone angeschaltet ist. 2. Berühren Sie die Taste, und die Anzeige der Kochzone zeigt „ll“ an. Der Betrieb aller Kochzonen wird deaktiviert, mit Ausnahme der Tasten der Pausenfunktion, zum Ein-/Ausschalten und zur Verriegelung.
- Page 51 So werden die Bedienelemente gesperrt Berühren Sie die Tastensperre. Auf der Timer-Anzeige wird der Schriftzug „Lo“ angezeigt. So wird die Tastensperre für die Bedienelemente aufgehoben 1. Stellen Sie sicher, dass das Induktionsfeld eingeschaltet ist. 2. Berühren Sie die Tastensperre und halten Sie sie eine Weile gedrückt 3.
- Page 52 Personen mit Herzschrittmachern sollten vor der Benutzung dieses Geräts ihren Arzt um Rat fragen. Verwendung der Timer-Funktion Sie können den Timer auf zwei verschiedene Arten verwenden: • Sie können ihn als Minute-Minder verwenden. In diesem Fall schaltet der Timer nach Ablauf der eingestellten Zeit die jeweilige Kochzone aus. •...
- Page 53 Einstellung des Timers zum Ausschalten einer Kochzone Auf diese Funktion eingestellte Kochzonen: 1. Berühren Sie die Kochzonen-Auswahlsteuerung für die Kochzone, für die Sie den Timer einstellen möchten (z.B. Zone Nr.1). 2. Berühren Sie die Timer-Steuerung. Die Minder- Anzeige fängt an zu blinken und das Timer-Display zeigt „30“...
- Page 54 Andere Kochzonen setzen den Betrieb fort, wenn sie nicht schon vorher ausgeschaltet wurden. Einstellung des Timers zum Ausschalten mehr als einer Kochzone 1. Wenn Sie diese Funktion für mehr als eine Kochzone verwenden, zeigt die Timer- Anzeige die kürzeste Zeit an. (z.B.
-
Page 55: Pflege Und Reinigung
Pflege und Reinigung Was? Wieso dies so ist? Wichtig! Alltägliche • 1. Den Netzschalter auf dem Kochfeld Wenn die Stromversorgung auf Verschmutzungen auf ausschalten. dem Kochfeld ausgeschaltet ist, gibt es keine Anzeige für „heiße dem Glas 2. Einen Kochfeld-Reiniger auftragen, (Fingerabdrücke, Oberfläche“, aber die Kochzone wenn das Glas noch warm ist (aber... - Page 56 Hinweise und Tipps Mögliche Ursachen Problem Was zu tun ist Das Induktionskochfeld Stellen Sie sicher, dass das Kein Strom. kann nicht eingeschaltet Induktionskochfeld an die werden. Stromversorgung angeschlossen und eingeschaltet ist. Überprüfen Sie, ob ein Stromausfall in Ihrem Haus oder Wohnbereich vorliegt. Wenn Sie alles überprüft haben und das Problem weiterhin besteht, wenden Sie sich an einen qualifizierten Techniker.
- Page 57 Technische Störung. Das Induktionskochfeld Bitte notieren Sie die Buchstaben und oder die Kochzone hat Zahlen des Fehlers, schalten Sie das sich selbst unerwartet Induktionskochfeld an der Wand aus ausgeschaltet, ein und kontaktieren Sie einen qualifizierten Signalton ertönt und ein Techniker. Fehlercode wird angezeigt (in der Regel abwechselnd mit einer...
-
Page 58: Technische Merkmale
Technische Merkmale Kochfeld HI642CTTWIFI Kochzonen 4 Kochzonen Versorgungsspannung 220-240V~, 50-60Hz Installierte elektrische Leistung 2,5kw:2250-2750W oder 3,0 kw:2700-3300W oder 4,5kw:4050-4950W oder 6,5kw:5850-7150W oder 7,4kw:6600-7400W Produktgröße L×B×H(mm) 590X520X60 Einbaugröße A×B (mm) 560X490 Gewicht und Abmessungen sind ungefähre Angaben. Wir sind ständig bemüht, unsere Produkte zu verbessern, sodass Spezifikationen und Gestaltung ohne vorherige Ankündigung geändert werden können. - Page 59 DICHTUNG L(mm) W(mm) H(mm) D(mm) A(mm) B(mm) X(mm) 50 Mini Stellen Sie sicher, dass das Induktionskochfeld in jedem Fall gut belüftet wird und dass der Lufteintritt und -austritt nicht behindert werden. Stellen Sie sicher, dass das Induktionskochfeld in einem guten Betriebszustand ist. Wie unten dargestellt Hinweis: Der Sicherheitsabstand zwischen der Kochplatte und dem darüber liegenden Schrank sollte mindestens 760mm betragen.
- Page 60 • die Installation mit allen Abstandsanforderungen und anwendbaren Normen und Vorschriften übereinstimmt • ein geeigneter Trennschalter mit vollständiger Trennung vom Stromnetz in der Festverdrahtung integriert ist, in Übereinstimmung mit den lokalen Regeln und Vorschriften über die Montage und Positionierung der Verdrahtung. Der Trennschalter muss von einem zugelassenen Typ sein und einen Luftspalt von 3 mm als Kontaktabstand an allen Polen (oder an allen aktiven [Phasen] Leitern, wenn die lokalen Verdrahtungsregeln hierfür eine Variante der...
- Page 61 Glas Halteklammer Schraube ST3.5*8 Arbeitsplatte/Küchenschra Gehäuse Unterseite Vorsicht 1. Die Induktionskochplatte muss von qualifiziertem Personal oder Technikern installiert werden. Unsere Kundendienstmitarbeiter stehen Ihnen zu Diensten. Bitte führen Sie den Vorgang nie selbst aus. 2. Das Kochfeld darf nicht direkt über einem Geschirrspüler, Kühlschrank, Gefrierschrank, Waschmaschine oder Wäschetrockner installiert werden, da die Feuchtigkeit die Elektronik des Kochfeldes beschädigen kann.
- Page 62 Die Stromversorgung sollte in Übereinstimmung mit der einschlägigen Norm oder mit einem 1-poligen Leistungsschalter angeschlossen werden. Die Anschlussmethode wird unten dargestellt. Einspeisung Einspeisung Einspeisung Einspeisung Stromkabel Stromkabel Stromkabel Stromkabel • Wenn das Kabel beschädigt ist oder ersetzt werden muss, müssen die Arbeiten von einem Kundendienst-Vertreter mit den entsprechenden Werkzeugen durchgeführt werden, um mögliche Unfälle zu vermeiden.
- Page 63 Informationen zu Haushaltskochfeldern gemäß der Verordnung (EU) Nr. 66/2014 Position Symbol Wert Einheit Modellkennung HI642CTTWIFI Elektrisches Art des Kochfeldes: Kochfeld Anzahl der Zonen Kochzonen und/oder Bereiche Bereiche Heiztechnik Induktionskochzonen (Induktions- Induktionskochfelder Kochzonen, abstrahlende abstrahlende Kochzonen Kochzonen, Festplatten) feste Platten Hinten Ø...
- Page 64 Zentral Mitte rechts Vorne links Vordere Mitte Vorne rechts Hinten ECelectric 193,5 Wh/kg links cooking Hinten in ECelectric Wh/kg der Mitte cooking Hinten ECelectric 197,2 Wh/kg rechts cooking ECelectric Mitte links Wh/kg cooking Energieverbrauch pro Kochzone ECelectric Zentral Wh/kg oder Fläche, berechnet pro kg cooking Mitte ECelectric...
Need help?
Do you have a question about the HI642CTTWIFI and is the answer not in the manual?
Questions and answers