
Subscribe to Our Youtube Channel
Related Manuals for Vemer Tuo Wi-Fi RF Bianco


Summary of Contents for Vemer Tuo Wi-Fi RF Bianco
- Page 1 Cronoumidostato Digitale TUO Wi-Fi RF Manuale d’Uso User Manual DIGITAL CHRONOTHERMOSTAT WITH HUMIDISTAT...
- Page 3 Index ■ Safety warnings Page ■ Dimensions Page ■ Device description Page ■ Connection diagram Page ■ Installation and initial configuration Page ■ App description Page ■ Operating mode Page ■ Configuration menu description Page ■ CLOCK menu - Date and time setting Page ■...
- Page 4 Tuo Wi-Fi RF Cloud Vemer The device connects to the Vemer cloud to check if there are changes to the confi guration and programming created using the app, and if so, regulates the temperature and/or humidity according to the new confi guration.
-
Page 5: Safety Warnings
SAFETY WARNINGS ■ During installation and operation of the product, it is necessary to comply with the following instructions: 1) The device must be installed by a skilled person, in strict compliance with the connection diagrams. 2) Do not power on or connect the device if any part of it is damaged. 3) After installation, inaccessibility to the connection terminals without appropriate tools must be guaranteed. -
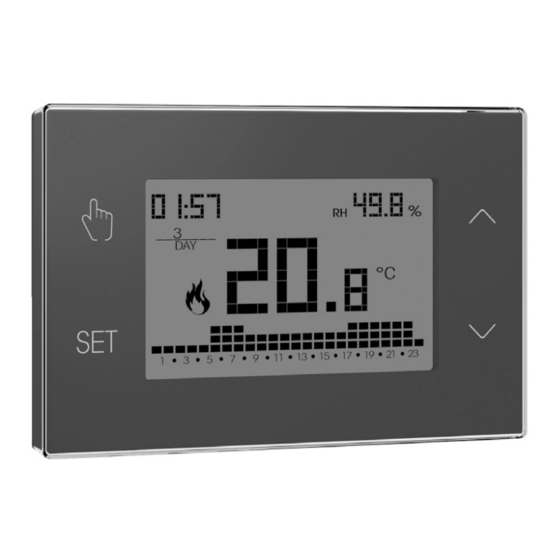
Page 6: Device Description
Local active operation. In this state the device is disconnected from the Cloud Vemer and any change in operation must be made using the keys on the chronothermostat. Local operation can be disabled by the app (see page 58) ... -
Page 7: Connection Diagram
CONNECTION DIAGRAM AIR CONDITIONER or BOILER DEHUMIDIFIER Note: the boiler or air conditioner can also be controlled via the relay. - 49 - TUO Wi-Fi RF Chronothermostat with humidistat User Manual... -
Page 8: Installation And Initial Configuration
INSTALLATION AND INITIAL CONFIGURATION Device installation The device can be installed on the wall or to cover the 3-module flush-mounting box (type 503). We recommend positioning at a height of 1.5 meters from the floor, in an area that respects as much as possible the average temperature conditions of the entire environment. - Page 9 Preliminary operations If you intend to use the device with remote control, before proceeding with the installation and confi guration make sure you have a Vemer account available. To create a Vemer account, do the following: 1. Install and start the Clima Wi-Fi app on your smartphone (or tablet) 2. Choose “Register” and fi ll in the “e-mail” and “password” fi elds Note: for security reasons it is recommended to choose a password different from the one used to access your e-mail box 3. Check your e-mail box: confi rm the activation of the account by clicking on the link contained in the e-mail sent by the system 4. Log in by entering the e-mail address and password chosen in the registration process - 51 - TUO Wi-Fi RF Chronothermostat with humidistat User Manual...
- Page 10 Configuring the remote control device (for Android) 1. Install and connect the device according to the connection diagrams shown in this manual. 2. On Tuo Wi-Fi RF, hold down the keys simultaneously until the display shows “ Conf nEt” and the icon starts flashing (wait for it to become steady before proceeding with the next point). 3. Start the app, choose “New Thermostat”, select the TUO model among those available and press "Next".
- Page 11 Configuring the remote control device (for iOS) 1. Install and connect the device according to the connection diagrams shown in this manual. 2. On Tuo Wi-Fi RF, hold down the keys simultaneously until the display shows “ Conf nEt” and the icon starts flashing (wait for it to become steady before proceeding with the next point).
-
Page 12: App Description
APP DESCRIPTION Thanks to the app you can control your TUO Wi-Fi RF device remotely, easily and intuitively. Page “Login” Access using the access credentials (email, password) chosen during registration phase of your account. Page “Devices list” identifi es a device or created group allows you to record a new device allows you to group several devices - 54 -... - Page 13 Main page This screen shows the “TUO Wi-Fi RF” status: indicates the measured temperature and humidity (23.1°C - 45.7% RH), the operating mode (Heating), the system status: ( ) red = on ( ) gray = off indicates the set temperature and running program name: touch this area to access the program list indicates operating mode:...
- Page 14 Modify a program To modify an existing program, select the profi le program of the day to be modifi ed. On the screen that opens, assign at any time of day one of the three available tempe- rature T1, T2 and T3 (marked by blue, green and red colours). Created a program for a day, it’s possible to copy it to any other day of the week (“Copy”...
- Page 15 Confi guration menu Touch the symbol Touch the symbol on the upper right to access the advanced confi guration. on the upper right to access the advanced confi guration. NOTE: the chronothermostat is compatible with Google Home and Amazon Echo. By the association with Google or Amazon account is possible to interact with the device by giving voice commands by speaking to the Voice Assistant via the voice activated speaker.
- Page 16 Set a holiday period Set vacation days in which the regulation is turned off by selecting them on the calendar. During the holiday period the operation fi led shows VAC Advanced settings enter the user email who will receive the alarm set themperature thresholds and delay to trigger the alarm access the screen for setting the temperature,...
-
Page 17: Operating Mode
Local operation is indicated both on the device display by the icon and on the app. Local operation can be stoped and/or disabled at any time from the app (but not from the device). If local operation is disabled (useful if you want to have control of the device only from the app), the icon will appear on the display and when you try to access the configuration menu using the device keyboard, will not be possible to make... - Page 18 To switch from automatic to manual operation Automatic Manual operation Tm operation operation Automatic Manual operation Tm operation operation Automatic Manual operation Tm operation operation 3" To switch from manual to automatic operation Manual 3" Automatic Tm operation operation operation Manual Automatic Tm operation...
-
Page 19: Configuration Menu Description
CONFIGURATION MENU DESCRIPTION The parameters setting of the CLOCK, PROG, SET, RH%, EXT, TIMER and ADV menus (excluding the ADJ and LOOK menus) must be done via the App. Any modification of these parameters from the keyboard would be overwritten. Change the parameters from the keyboard only when the device is not connected to the Cloud. - Page 20 CLOCK MENU - DATE AND TIME SETTING When connected to the Wi-Fi network, the device acquires the date and time settings from the server and no settings are required. However, if you need to manually set the date and time values, proceed as follows: Initial screen Configuration menu Set the seconds...
- Page 21 Configuration of the summer / winter time change You can configure the device to independently manage the summer time update. The factory setting includes: • the passage winter time → summer time (+1h) the last Sunday of March at 2:00 o'clock •...
- Page 22 PROG MENU - PROGRAMS SETTINGS Access the PROG menu to change the programming of the automatic operation. The factory setting includes: • the P1 program from Monday to Friday • the P2 program on Saturday and Sunday If this program is not suitable for your needs, you can: •...
- Page 23 How to customize the profile of a Px program Choose the Choose the temperature Choose the temperature PX program for the selected time for the next hour • starting from midnight 00:00, press the keys to assign to each hour of the day one of the 3 possible temperatures (T1, T2, T3) and the key to confirm and go to the next hour.
- Page 24 SET MENU - TEMPERATURES T1, T2, T3 SETTING Access the SET menu to change the values of the 3 temperatures used in automatic operation. The factory setting includes: • T1 = 5°C, T2 = 15°C, T3 = 18°C (heating/winter operation ) •...
- Page 25 RH% MENU - SETTING OF HUMIDITY THRESHOLDS Access the RH% menu to set the operating thresholds relating to humidity regulation. Humidity regulation is active only when the temperature regulation operation is set to air conditioning. The parameters to be set are HR1 (switch-on threshold of the dehumidifier), HR2 (switch-off threshold of the air conditioner), HRd (intervention differential, common for HR1 and HR2, centered on the threshold).
- Page 26 EXT MENU - MEV ACTIVATION PROGRAM SETTING Access the EXT menu to program the switching on times of the controlled mechanical ventilation unit. The programming is weekly, with a different program for each day. The resolution is one hour, with the possibility of delaying switching by 15, 30 or 45 minutes.
- Page 27 TIMER MENU - TIMING SETTING Set a timing for temperature regulation to prolong the current operation. There are 3 timings available: • Timed manual: set a time delay during manual operation to maintain this operation until timing has elapsed. At the end of the timing, the device activates the automatic operation. •...
- Page 28 ADV MENU - ADVANCED PARAMETERS SETTING x 6 times Initial screen Initial screen ADV menu In the ADV menu, the parameters related to the advanced configuration of the device are proposed in sequence. Press: • the keys to change the value of the selected parameter •...
- Page 29 Regulation type (this menu is active only if operating mode = heating) Setting up: • 0 to choose on/off regulation. • P to choose proportional regulation. • tP to choose proportional regulation (to be used when the device is paired to a radiofrequency radiator valve type Thermopro RF) Factory value: 0 (on/off).
- Page 30 Antifreeze temperature (this menu is active only if operating mode = heating) The antifreeze temperature avoids the risk of freezing of the system when on the chronothermostat is set the off operation Allowed values: --- (excluded), 1°C ÷ 50°C . Factory value: 6 °C.
- Page 31 - the status of the Wi-Fi connection: on fixed: device connected to the home network flashing: search for Wi-Fi network in progress - the association between the device and Vemer account: on fixed: associated with a Vemer account flashing: not associated with any Vemer account...
- Page 32 System control mode (air conditioning/heating) The device allows you to control the air conditioner (or the boiler) in two ways: • through the relay (connection via wires) • through a radiofrequency signal, therefore without making connections between the device and the air conditioner (or the boiler) Setting up: •...
- Page 33 Minimum/Maximum settable temperature Under particular installation conditions, for example in public buildings, hotels, etc., it may be useful to limit the range of values that the temperatures T1 / T2 / T3 and Tm can assume, in order to prevent incorrect settings by the user. •...
- Page 34 Operating hour meter It displays the operating hours of the system (relay contacts on C-NA or ON command to the remote actuator). The device has two counters (5-digit) independent for heating operation and for the conditioning operation, but is displayed only the counter of the selected operation mode.
- Page 35 RF MENU - CONNECTION CONFIGURATION WITH THE ACTUATORS Access the RF menu to configure and test the radiofrequency connection between the device and the remote actuator used to control the air conditioning (or heating) system, the dehumidifier and the controlled mechanical ventilation unit. x7 times Initial screen Configuration menu...
- Page 36 Configuring the connection with the remote actuators To configure the remote actuator: 1. activate the "network configuration" mode on the remote actuator (for the procedure, see the specification of the remote actuator). The actuator remains in configuration mode for about 30 seconds, the time within which the device TUO Wi-Fi RF must send the pairing code 2.
- Page 37 OTHER FUNCTIONS OF THE DEVICE Display of minimum/maximum daily temperature The device stores the values of the temperature and of the minimum and maximum humidity measured during the day. 3" Maximum values Maximum values Initial screen display resetting 3" Minimum values Minimum values Initial screen display...
-
Page 38: Device Reset
DEVICE RESET Perform a reset to delete the settings entered and restore the device to the factory values (excluding the network settings for remote control which can be changed as described on pages 52-53). To reset: 1. from the initial screen, press and hold the key to enter the configuration menu. -
Page 39: Regulation Type
REGULATION TYPE On/off regulation With the on/off regulation, the device activates the heating (air conditioner) until the measured temperature is lower (higher) than the set one. In order to avoid the oscillation straddling the set temperature which would cause the system to switch on and off continuously, a differential (or hysteresis) is introduced. - Page 40 tP Setting Note. This regulation should be used only if you are controlling a valve for ThermoPro RF radiators This type of regulation allows you to make the ThermoPro RF valve work by “opening modulation”. In this way, the valve opens proportionally according to the difference between the set temperature (set point) and the detected temperature.
- Page 41 Enter the name, device pin (see page 73 for the pin of your device) and an icon to help identify the device. Choose "Save" - If you do not have a personal Vemer account yet: c. Follow the "Device configuration" procedure on pages 52-53.
-
Page 42: Technical Characteristics
TECHNICAL CHARACTERISTICS • Power supply: 230V AC ± 10% 50/60 Hz • Output: bistable relay with changeover contact 5A / 250V AC • Weekly programming with 3 settable temperatures: T1, T2, T3 • Daily resolution: 1h • Switch-on delay set between 15, 30 or 45 minutes (independent for each hour) •... -
Page 43: Reference Standards
ETSI EN 300 328, ETSI EN 300 220-1, ETSI EN 300 220-2 , ETSI EN 301 489-1, ESTI EN 301 489-17, ETSI EN 301 489-3 The full text of the EU Conformity Declaration is available at www.vemer.it address. information to users pursuant to art. 14 of the directive... - Page 44 WINTER PROGRAMS ■ ■ ■ ■ ■ ■ ■ T2 ■ ■ ■ ■ ■ ■ ■ ■ ■ ■ ■ ■ ■ ■ ■ ■ ■ ■ ■ ■ ■ ■ ■ ■ T1 ■ ■ ■ ■ ■ ■ ■ ■ ■ ■ ■ ■ ■ ■ ■ ■ ■ ■ ■ ■ ■ ■ ■ ■ 0 1 2 3 4 5 6 7 8 9 10 11 12 13 14 15 16 17 18 19 20 21 22 23 ■...
- Page 45 SUMMER PROGRAMS T3 ■ ■ ■ ■ ■ ■ ■ ■ ■ ■ ■ ■ ■ ■ ■ ■ ■ T2 ■ ■ ■ ■ ■ ■ ■ ■ ■ ■ ■ ■ ■ ■ ■ ■ ■ ■ ■ ■ ■ ■ ■ ■ T1 ■...
- Page 48 Vemer S.p.A. I - 32032 Feltre (BL) Via Camp Lonc, 16 e-mail: info@vemer.it - web site: www.vemer.it 02-2023...
Need help?
Do you have a question about the Tuo Wi-Fi RF Bianco and is the answer not in the manual?
Questions and answers