
Related Manuals for Uplift Desk Dillo ACC101


Summary of Contents for Uplift Desk Dillo ACC101
- Page 1 Dillo Connecting Brackets ACC101 For assembly assistance, visit upliftdesk.com/contact, or call 800-349-3839, or email info@upliftdesk.com ©2022 UPLIFT Desk®. All Rights Reserved...
- Page 2 Safety and Warnings CAUTION: Read all instructions before assembly. CAUTION: Only assemble the units per these instructions, ensuring all Dillo Connecting Bracket screws are tightened and connection points are secure. Failure to assemble or secure parts properly may result in instability and personal injury.
- Page 3 Dillo pieces can only be joined at the sides of pieces. Dillo pieces will not connect on the front or back of pieces. © UPLIFT Desk • 800-349-3839 • info@upliftdesk.com • upliftdesk.com...
- Page 4 Step 2 - Install the Connecting Brackets A. To avoid any damage to the floor or Dillo pieces, we recommend assembling on a debris-free carpet or blanket. B. Turn the first piece over so the base and Connecting Bracket mounting holes are accessible. Each piece has a pre-installed base with mounting holes for Connecting Brackets.
- Page 5 When connecting a Seat without Back or a Table to a Wedge Seat or Table, use the position 1 holes on the Seat without Back or Table base as shown: Front view Bottom view Detailed view © UPLIFT Desk • 800-349-3839 • info@upliftdesk.com • upliftdesk.com...
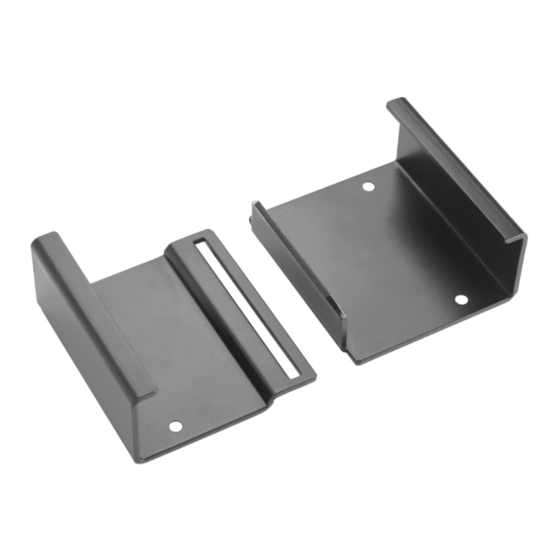
- Page 6 E. Ensure the sides of the Dillo pieces being connected to each other have alternating bracket pieces (one has a tabbed Connecting Bracket and one has a slotted Connecting Bracket) as shown. Tabbed Slotted Tabbed Slotted F. Use a handheld screwdriver for this step. Do not use an electric screwdriver or drill to avoid over tightening the screws and stripping the plastic base.
- Page 7 Phillips head screwdriver (not an electric screwdriver or drill to avoid stripping the plastic base), and remove the necessary brackets from the Dillo pieces. Refer to Step 2 to reposition and install the Connecting Brackets as needed. © UPLIFT Desk • 800-349-3839 • info@upliftdesk.com • upliftdesk.com...
- Page 8 Copyright Notice: This guide is a component of this UPLIFT Desk product. This guide is a part of © the scope of delivery, even if the item is resold. This guide is also available on the UPLIFT Desk website: upliftdesk.com. These specifications are subject to United States copyright law.
Need help?
Do you have a question about the Dillo ACC101 and is the answer not in the manual?
Questions and answers