
Related Manuals for Eberg ROT 720


Summary of Contents for Eberg ROT 720
- Page 1 INSTRUKCJA OBSŁUGI USER MANUAL PANELOWY PROMIENNIK CIEPŁA NA PODCZERWIEŃ INFRARED PANEL HEATER ROT 720/960...
-
Page 2: Uwagi Dotyczące Bezpieczeństwa
ROT PL Przed uruchomieniem urządzenia przeczytaj uważnie niniejszą instrukcję oraz zachowaj ją w bezpiecznym miejscu do wykorzystania w przyszłości. Nie pozwalaj aby osoby, które nie zapoznały się z tą instrukcją montowały, włączały lub wyłączały, zmieniały nastawę lub w jakikolwiek inny sposób obsługiwały urządzenie. - Page 3 PL ROT • Nie wolno użytkować urządzenia w strefie zagrożenia wybuchem. • Po zakończeniu pracy urządzenia, przed czyszczeniem lub w przypadku stwierdzenia nieprawidłowej pracy należy zawsze odłączyć urządzenie od źródła zasilania przez wyciągnięcie wtyczki z gniazda sieciowego. • Należy zawsze odłączyć urządzenie gdy nie będzie ono używane. Przed odłączeniem przewodu zasilającego należy wyłączyć...
- Page 4 ROT PL 2. ROZPAKOWANIE I MONTAŻ URZĄDZENIA NA ŚCIANIE UWAGA! NIEBEZPIECZEŃSTWO PORAŻENIA PRĄDEM. URZĄDZENIE NALEŻY UZIEMIĆ! Przed użyciem należy dokładnie sprawdzić zawartość zestawu. Należy wyciągnąć panel grzewczy z opakowania i upewnić się, czy urządzenie jest w dobrym stanie. Nie należy uruchamiać urządzenia z uszkodzonym przewodem lub obudową.
-
Page 5: Zawartość Opakowania
PL ROT 3. ZAWARTOŚĆ OPAKOWANIA Panel grzewczy: 1 szt. Akcesoria - 1 zestaw: • 4 x Kołki rozporowe • 4 x Metalowe wkręty • 1 x Instrukcja obsługi • 1 x Termostat bezprzewodowy... - Page 6 ROT PL 4. MONTAŻ W POZYCJI WOLNOSTOJĄCEJ (NA STOPACH MONTAŻOWYCH) Ustaw stopy montażowe na podłożu tak, aby otwory na posadowienie panela grzewczego znajdowały się w jednej linii. Dopasuj panel grzewczy do otworów w stopach montażowych. Odległość stopy od krawędzi urządzenia powinna wynosić około 12 centymetrów. Wkręć...
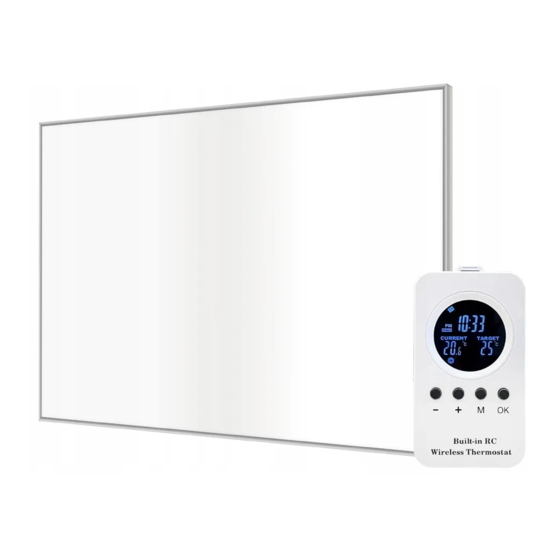
- Page 7 PL ROT 5.2. FUNKCJE PRZYCISKU „M” – NASTAWA CZASU, DNIA TYGODNIA, JEDNOSTKI WYŚWIETLANEJ TEMPERATURY Podłącz panel grzewczy do zasilania i włącz go przełącznikiem głównym w tylnej części panela. Naciśnij przycisk OK aby włączyć podświetlenie pilota. Naciśnij i przytrzymaj przycisk M. Na wyświetlaczu pojawi się pulsujący napis 12h lub 24h, co oznacza wybór wskazania czasu w formacie 12 lub 24 godzinnym.
- Page 8 ROT PL Naciśnij przycisk OK aby przełączyć się pomiędzy: ON – Ogrzewanie włączone. Manualna nastawa temperatury „Target”. ON – Ogrzewanie włączone. OFF – Ogrzewanie wyłączone Praca w trybie nr 1: Termostat bezprzewodowy (pilot) zawiera czujnik temperatury, względem którego odbywa się regulacja i podczas pracy urządzenia powinien znajdować...
- Page 9 PL ROT Uwaga! Gdy aktywuje się tryb otwartego okna, wszystkie pozostałe tryby zostają wyłączone. 8. KONFIGURACJA POŁĄCZENIA Z SIECIĄ BEZPRZEWODOWĄ WI-FI i APLIKACJĄ MOBILNĄ 8.1. Zeskanuj telefonem poniższy kod QR lub wyszukaj i pobierz aplikację „Tuya Smart”. 8.2. Zarejestruj się i zaloguj do aplikacji. 8.3.
- Page 10 ROT PL 8.4.4. Wciśnij przycisk “Reset” w 8.4.5. Rozpocznie się proces 8.4.6. Znalezione urządzenie zostanie urządzeniu. Potwierdź operację w wyszukiwania urządzenia wyświetlone na liście. aplikacji. bezprzewodowego w sieci WI-FI. W przypadku problemów należy postępować zgodnie z podpowiedziami aplikacji mobilnej. 8.4.7. Potwierdź zakończenie 8.4.8.
- Page 11 PL ROT 8.5. Dodawanie urządzenia w trybie automatycznym 8.5.1. Aby dodać nowe urządzenie, 8.5.2. Rozpocznie się proces 8.5.3. Twoja sieć, w której będzie naciśnij przycik “+” w prawym wyszukiwania urządzenia urządzenie musi pracować w paśmie górnym rogu i wybierz opcję “Auto bezprzewodowego w sieci WI-FI a po 2.4GHz.
- Page 12 ROT PL 9. OBSŁUGA URZĄDZENIA ZA POMOCĄ APLIKACJI MOBILNEJ UWAGI OGÓLNE DOTYCZĄCE STEROWANIA URZĄDZENIEM Aby za pomocą aplikacji mobilnej można było zdalnie sterować skonfigurowanym urządzeniem, musi ono pozostawać podłączone do sieci zasilającej, być włączone, znajdować się w zasięgu zapisanej w jego pamięci sieci WI-FI (o nazwie SSID oraz z hasłem ustawionym podczas konfiguracji), sieć...
- Page 13 PL ROT 9.1. Aby włączyć urządzenie w 9.2. Aby ustawić temperaturę zadaną 9.3. Aby ustawić tryb pracy aplikacji naciśnij ikonę „Przełącznik dla trybu „Auto” naciśnij ikony „+” „Inteligentny” – „Smart” lub ON/OFF”. lub „-”. „Automatyczny” – „Auto” naciśnij ikonę „Tryb” – „Mode” a następnie potwierdź...
-
Page 14: Wymiana Baterii
ROT PL 9.7. Ustaw temperaturę zadaną w wybranym przedziale a następnie potwierdź „Gotowe” – „Done”. W celu usunięcia zawartość przedziału czasowego naciśnij „Delete - skasuj”. Temperatura nastawy musi być wyższa niż aktualna temperatura w pomieszczeniu. Następnie aktywuj tryb „Inteligentny” – „Smart” wg. pkt. 9.3. 10. -
Page 15: Czyszczenie I Przechowywanie
13. SPECYFIKACJA TECHNICZNA Moc znamionowa Wymiary Temp. Model Zasilanie szer. x wys. powierzchni [°C] ROT 720 220-240V, 50Hz 595 x 1195 [mm] 85-125 ROT 960 220-240V, 50Hz 805 x 1195 [mm] 85-125 Przed uruchomieniem należy upewnić się, że napięcie sieciowe jest zgodne z podanym na tabliczce znamionowej urządzenia. -
Page 16: Safety Notes
ROT EN Before operating the appliance, please read this manual carefully and keep it in a safe place for future reference. Do not allow anyone who has not read these instructions to assemble, switch on/off, adjust or operate the heating panel. 1. - Page 17 EN ROT their safety. • Children should be constantly supervised to ensure that they do not play with the device. Children are not allowed to connect the device, operate, regulate, clean and maintain. • Children under three years of age must be kept away from the appliance, unless they are constantly supervised.
- Page 18 ROT EN 2. UNPACKING AND WALL MOUNTING INSTRUCTIONS WARNING! ELECTRIC SHOCK! KEEP THE GROUND WIRE CONNECTED. Before use, carefully check the contents of the kit. Take the heating panel out of its packaging and make sure that the device is in good condition. Do not start the device with a damaged cable or housing. Before commissioning, make sure that the mains voltage parameters are consistent with the data given on the rating plate of the device.
-
Page 19: Packing List
EN ROT 3. PACKING LIST Heating panel: 1 piece Accessories pack 1 set: • 4 x Rails fitting • 4 x Screw bolts • 1 x Instruction manual • 1 x Wireless thermostat... - Page 20 ROT EN 4. MOUNTING ON FREE STANDING FEET Place the free standing feet on the ground, keep the slots of both feet inline, distance the foot at least 12cm from the edge and offset the other foot by similar distance (at the opposite end). Insert the panel into the slots.
- Page 21 EN ROT 5.2. FUNCTIONS OF THE „M” BUTTON - SETTING THE TIME, DAY OF THE WEEK, UNIT OF DISPLAYED TEMPERATURE Connect the heating panel to the power supply and turn it on with the main switch on the back of the panel.
- Page 22 ROT EN Press the OK button to switch between: ON - Heater turned on. Manual temperature setting „Target”. ON - Heater turned on. OFF - Heating off Work in mode no.1: The wireless thermostat (remote control) contains a temperature sensor, in relation to which the regulation takes place, and during the operation of the device it should be in the same room as the heating panel, away from other heat sources, in a reference place for temperature measurement, height about 1.5m above floor and a maximum distance of 8m from the operated device.
- Page 23 EN ROT Attention! When open window mode is activated, all other modes are turned off. 8. CONFIGURATION OF CONNECTION WITH Wi-Fi WIRELESS NETWORK AND MOBILE APPLICATION 8.1. Use your phone to scan the QR code below or search and download the „Tuya Smart” application. 8.2.
- Page 24 ROT EN 8.4.4. Press the „Reset” button on the 8.4.5. The process of searching for a 8.4.6. The found device will be device. Confirm the operation in the wireless device in the Wi-Fi network displayed on the list. application. will begin. In case of any problems, please follow the prompts of the mobile application.
- Page 25 EN ROT 8.5. Adding device in automatic mode 8.5.1. To add a new device, press the 8.5.2. The process of searching for a 8.5.3. Your network, in which the „+” button in the upper right corner wireless device in the Wi-Fi network device will be used, must operate in and select the option „Auto Scan”...
- Page 26 ROT EN OPERATING THE DEVICE BY MEANS OF A MOBILE APPLICATION GENERAL NOTES ON CONTROLLING THE APPLIANCE In order to be able to remotely control a configured device using the mobile application, it must remain connected to the power network, be turned on, be within the range of the Wi-Fi network saved in its memory (with the name SSID and password set during configuration), this network must access the internet and ports may not be blocked.
- Page 27 EN ROT 9.1. To turn on the device in the 9.2. To set the set temperature for the 9.3. To set the operating mode application, press the „ON / OFF „Auto” mode, press the „+” or „-” icons. „Intelligent” - „Smart” or „Automatic” switch”...
-
Page 28: Battery Replacement
ROT EN 9.7. Set the desired temperature in the selected range and then confirm „Done”. In order to delete the content of the time interval, press „Delete”. The setpoint temperature must be higher than the actual room temperature. Then activate the „Smart” mode - „Smart” according to point 9.3. 10. -
Page 29: Cleaning And Storage
13. SPECIFICATIONS Dimensions Surface Model Rated power [W] Voltage W x H temperature [°C] ROT 720 220-240V, 50Hz 595 x 1195 [mm] 85-125 ROT 960 220-240V, 50Hz 805 x 1195 [mm] 85-125 Before starting it, make sure that the mains voltage corresponds to that specified on the rating plate of the device. - Page 30 ROT PL GWARANCJA 1. Produkty objęte są gwarancją producenta w okresie 24-miesięcy licząc od dnia sprzedaży 2. W przypadku naprawy gwarancyjnej urządzenia objętego gwarancją, okres gwarancji ulega wydłużeniu o okres naprawy urządzenia liczony w pełnych dniach. 3. Gwarancją objęte są ukryte wady produkcyjne wyrobów. 4.
-
Page 31: Karta Gwarancyjna
PL ROT KARTA GWARANCYJNA Nazwa urządzenia: Pieczęć punktu sprzedaży i podpis sprzedawcy: Model: Nr fabr. / nr silnika: Nr rachunku / faktury: Data sprzedaży: Dane zgłaszającego reklamację: Nazwa i adres firmy: Telefon kontaktowy: Osoba do kontaktu: Adnotacje o przebiegu napraw Wykonał... - Page 32 Kokotów 703 32-002 Kokotów biuro@eberg.eu tel. + 48 513 677 545 www.eberg.eu...
Need help?
Do you have a question about the ROT 720 and is the answer not in the manual?
Questions and answers