
Related Manuals for Agilent Technologies 4100


Summary of Contents for Agilent Technologies 4100
- Page 1 Agilent Microwave Plasma Atomic Emission Spectrometers For models 4100, 4200, and 4210 User’s Guide...
-
Page 2: Svs
Use, duplication or disclosure of Software is subject to The material contained in this Agilent Technologies’ standard © Agilent Technologies, Inc. 2011, document is provided “as is,” and is commercial license terms, and non- 2013, 2016, 2018 subject to being changed, without DOD Departments and Agencies of the notice, in future editions. -
Page 3: Table Of Contents
Contents Contents 1. Safety Practices and Hazards General Verifying Safe State Plasma Heat, Vapors and Fumes Compressed Gas Hazards Dangerous Goods Electrical Hazards Other Precautions Warning Symbols Color Coding CE Compliance Electromagnetic Compatibility EN55011/CISPR11 South Korean Class A EMC declaration ICES/NMB-001 2. -
Page 4: Advanced Valve System (Avs)
Contents Specifications Installation category Pollution level Environmental conditions Electrical power supplies Gas supplies Exhaust system MP-AES instrument cooling air supply Drain vessel Personal computer requirements Weights and dimensions 3. Installation Agilent MP-AES Instrument Overview Installing the MP Expert Software Hardware Components Replacement Accessories Organic solvents kit External Gas Control Module (EGCM) - Page 5 Contents Turning On the MP-AES Instrument and Software Preparing for Analysis MP-AES Instrument Wavelength Calibration Creating/Opening a Worksheet Creating a new worksheet Opening an existing worksheet Creating a new worksheet from a template Developing a Method Running Samples Printing a Report Turning Off the MP-AES instrument 5.
- Page 6 Contents This page is intentionally left blank. Agilent Microwave Plasma Atomic Emission Spectrometers User’s Guide...
-
Page 7: Safety Practices And Hazards
ICES/NMB-001 General Unless otherwise specified, statements in this manual apply to the Agilent 4100, 4200, and 4210 MP-AES instruments. Operation of an Agilent Microwave Plasma Atomic Emission Spectrometer (MP-AES) involves the use of compressed gases, high microwave energy and hazardous materials including corrosive fluids and flammable liquids. -
Page 8: Verifying Safe State
Safety Practices and Hazards The MP-AES instrument incorporates interlocks and covers that are designed to prevent inadvertent contact with any potential hazards. If the MP-AES instrument is used in any manner not specified by Agilent, this protection may be impaired. It is good practice to develop safe working habits that do not depend upon the correct operation of the interlocks for safe operation. -
Page 9: Plasma
Safety Practices and Hazards Plasma The plasma is extremely hot (about 6,000 °C, 11,000 °F) and operates using high levels of microwave energy. The plasma emits high intensity light. Always wear appropriate eye protection if viewing the plasma. Close contact with the operating plasma can result in severe heat burns to the skin, and exposure to microwave radiation can cause sub-surface skin burns. -
Page 10: Heat, Vapors And Fumes
Safety Practices and Hazards The plasma system has been carefully designed to operate safely and effectively when using torches and related components that conform to Agilent’s design criteria. Use of non-approved components in the MP-AES instrument may render the system inoperative and/or hazardous. -
Page 11: Dangerous Goods
Safety Practices and Hazards Use only approved regulator and hose connectors (refer to the gas supplier’s instructions). Keep gas cylinders cool and properly labeled. (All cylinders are fitted with a pressure relief device that will rupture and empty the cylinder if the internal pressure is raised above the safe limit by excessive temperatures.) Ensure that you have the correct cylinder before connecting it to the MP-AES instrument. -
Page 12: Other Precautions
Safety Practices and Hazards Other Precautions Use of the MP-AES instrument and accessories may involve materials, solvents and solutions that are flammable, corrosive, toxic or otherwise hazardous. Careless, improper or unskilled use of such materials, solvents and solutions can create explosion hazards, fire hazards, toxicity and other hazards that can result in death, serious personal injury or damage to equipment. - Page 13 Safety Practices and Hazards A triangular symbol indicates a warning. The meanings of the symbols that may appear alongside warnings in the documentation or on the MP-AES instrument itself are as follows: Corrosive liquids Extreme cold Electrical shock Eye hazard Fire hazard Heavy weight (danger to feet)
-
Page 14: Color Coding
Safety Practices and Hazards The following symbols appear on the MP-AES instrument. Mains power on Mains power off Single phase alternating current Socket for Agilent accessory USB cable Color Coding The various indicator lights appearing on Agilent instruments and associated accessories represent the status of the instrument or accessory. -
Page 15: Electromagnetic Compatibility
Make sure that all peripheral devices are also certified. Make sure that appropriate cables are used to connect the device to peripheral equipment. Consult your equipment dealer, Agilent Technologies, or an experienced technician for assistance. Agilent Microwave Plasma Atomic Emission Spectrometers User’s Guide... -
Page 16: South Korean Class A Emc Declaration
Safety Practices and Hazards Changes or modifications not expressly approved by Agilent Technologies could void the user’s authority to operate the equipment. South Korean Class A EMC declaration This equipment is Class A suitable for professional use and is for use in electromagnetic environments outside of the home. -
Page 17: Introduction
Introduction 2. Introduction Site Preparation Requirements User Documentation Specifications Site Preparation Requirements Prior to receiving your Agilent MP-AES instrument, you will have been provided with an Agilent MP-AES Site Preparation Guide, which describes the environmental and operating requirements and specifications of the MP-AES instrument. You must prepare your laboratory according to these instructions and specifications before the instrument can be installed. -
Page 18: Conventions
Introduction An extensive Help system containing context-sensitive Help, step- by-step instructions for frequently performed operations and instructions for using any accessories you ordered. Access the Help by pressing F1 on your keyboard with the MP Expert software open, by clicking the resources icon and then Help and Documentation on the Start page, or by double-clicking the MP Expert Help icon on the computer desktop. -
Page 19: Environmental Conditions
Introduction Environmental conditions See the Agilent MP-AES Site Preparation Guide for specifications. Laboratory conditions The area selected for the operation of an MP-AES instrument: must be free from drafts, corrosive atmospheres and vibration should have sample preparation areas and materials storage ... -
Page 20: Gas Supplies
Introduction Other electrical connections Basic insulation is provided for single fault protection on the USB connector. NOTE Gas supplies The primary gas used by the MP-AES instrument is nitrogen, which is the supply gas for the plasma. A small quantity of argon is used in the plasma ignition cycle. -
Page 21: Exhaust System
Introduction Air — for supply of air to the plasma when analyzing organic samples The MP-AES instrument is fitted with PTFE gas supply hose assemblies, 1.8 meters (6 feet) in length, and 1/4 inch Swagelok hardware. The operator (or other authorized personnel) must carry out appropriate leak tests necessary to ensure safety on the gas connections that the operator is directed to assemble during installation, normal use or maintenance. -
Page 22: Mp-Aes Instrument Cooling Air Supply
Introduction WARNING Hot Surface The external vent may become hot during MP-AES instrument operation and remain hot for some time after the MP-AES instrument has been switched off. Allow the external vent to cool for at least five minutes before attempting to remove the exhaust hose. -
Page 23: Personal Computer Requirements
Introduction A chemically-inert container, not glass, to hold a minimum of 2 liters (4 pints) of waste must be provided by the user. It should be located underneath the sample tray (or on the right side of the MP-AES instrument), where it is protected by the bench and in full view of the operator. - Page 24 Introduction This page is intentionally left blank. Agilent Microwave Plasma Atomic Emission Spectrometers User’s Guide...
-
Page 25: Installation
Installation 3. Installation Agilent MP-AES Instrument Overview Installing the MP Expert Software Hardware Components Replacement Accessories The Agilent MP-AES instrument must be installed by an Agilent- trained, Agilent-qualified or Agilent-authorized field service engineer. You should have completed and returned the form in the Agilent MP-AES Site Preparation Guide stating that you have prepared the laboratory in accordance with the requirements detailed in that guide. -
Page 26: Agilent Mp-Aes Instrument Overview
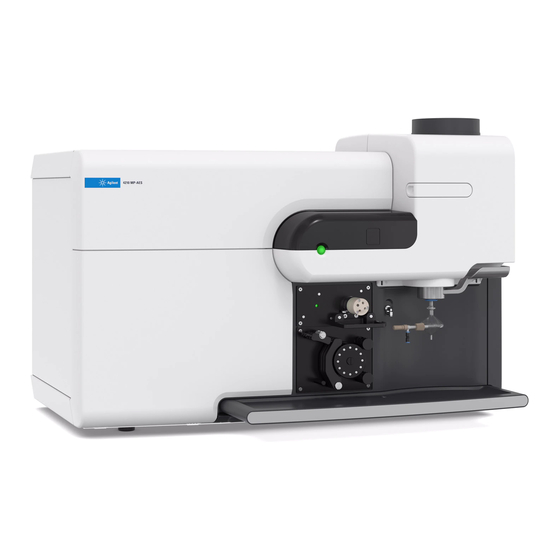
Installation Agilent MP-AES Instrument Overview Figure 1. Front of the MP-AES instrument Where: 1. Power status LED 5. Peristaltic pump 9. Torch 2. Plasma Enable button/ 6. Pre-optics window 10. Torch clamp for spray status LED access door chamber and torch 3. - Page 27 Installation All connections of services to the MP-AES instrument are made on the right side of the instrument. Remove the cover by hand to gain access to the power, USB, accessory, and gas connections. The onboard argon bottle and regulator (if used) are also accessed via this side cover.
-
Page 28: Installing The Mp Expert Software
Installation Installing the MP Expert Software Although the Agilent-trained, Agilent-qualified or Agilent-authorized field service engineer will install the MP Expert software for you during the installation process, you may need to install the software yourself at some later stage, for example if you change the PC. Install the MP Expert Software first, and then plug the USB cable into the NOTE computer. -
Page 29: Hardware Components Replacement
NOTE torches used with the Agilent 4200 and 4210 MP-AES instruments and are not interchangeable. Torches for the 4100 MP-AES have a grey base (Figure 3). Torches for the 4200 and 4210 MP-AES have a blue base (Figure 4). Figure 3. 4100 MP-AES EasyFit torch Figure 4. -
Page 30: Accessories
Installation Accessories The following accessories may be available for use with your MP-AES instrument: Organic solvents kit External Gas Control Module (EGCM) SPS 3 and SPS 4 Autosamplers Advanced Valve System (AVS) 4 SVS 1/1+ Switching Valve System ... -
Page 31: External Gas Control Module (Egcm)
Installation External Gas Control Module (EGCM) For safety information and to install the EGCM on the MP-AES instrument, please see the instructions that came with the accessory. The EGCM is an accessory with two specific functions: Supply nitrogen gas to purge the optics system for analytical ... -
Page 32: Svs 1/1
Installation SVS 1/1+ For safety information and to prepare the SVS 1 or SVS 1+ for installation, please see the instructions that came with the accessory. The SVS 1/1+ is a 4-port switching valve positioned between the spray chamber and the peristaltic pump of the spectrometer. During the rinse time, when the instrument is usually idle, the autosampler cleans the probe and presents the next sample for measurement, increasing productivity. -
Page 33: Multimode Sample Introduction System (Msis)
Installation The Agilent 4107 Nitrogen Generator can be used to provide a nitrogen supply for the MP-AES instrument and EGCM. This allows the instrument to operate without the need for a cylinder or Dewar nitrogen supply. A supply of clean, dry, oil-free compressed air is required to supply the nitrogen generator and the MP-AES instrument. -
Page 34: Monochromator Air Purge
Installation Monochromator air purge For safety information and to prepare the monochromator air purge accessory for installation, please see the instructions that came with this accessory and the MP Expert Help. The monochromator air purge accessory provides clean air to the MP-AES instrument monochromator to maintain it at a positive pressure. -
Page 35: Operation
Operation 4. Operation Analysis Checklist Turning On the MP-AES Instrument and Software Preparing for Analysis MP-AES Instrument Wavelength Calibration Creating/Opening a Worksheet Developing a Method Running Samples Printing a Report Turning Off the MP-AES instrument This chapter provides a quick guide to getting the Agilent MP-AES instrument set up and running samples. -
Page 36: Turning On The Mp-Aes Instrument And Software
Operation Run samples Print a report Turning On the MP-AES Instrument and Software Before starting the system, carefully read the Safety Practices and Hazards section at the front of this guide and ensure that the laboratory is set up according to the details specified in the Agilent MP-AES Site Preparation Guide. -
Page 37: Preparing For Analysis
Operation WARNING Hot Surfaces – Noxious Fumes – Non-Ionizing Radiation Burn danger, inhalation hazard. The plasma emits heat, ozone and fumes, which can be hazardous. Always switch on the exhaust system before lighting the plasma. 12 To start the MP Expert software, double-click the MP Expert desktop icon. -
Page 38: Mp-Aes Instrument Wavelength Calibration
To perform an MP-AES instrument wavelength calibration: If you are using a 4100 MP-AES, ensure a standard glass concentric nebulizer, a single pass spray chamber and 4100 EasyFit plasma torch are installed. If you are using a 4200 or 4210 MP-AES, ensure the OneNeb nebulizer, double pass spray chamber and 4200 and 4210 EasyFit torch are installed. -
Page 39: Creating/Opening A Worksheet
Operation You must install the correct peristaltic pump tubing for the wavelength NOTE calibration: Pump Drain 4100 MP-AES White/white Blue/blue 4200 and 4210 MP-AES Orange/green Blue/blue Click the Instrument button. Click Calibration. Place the solution inlet tubing into the wavelength calibration solution and allow the sample to reach the plasma. -
Page 40: Opening An Existing Worksheet
Operation Opening an existing worksheet To open an existing worksheet: Click Open from the Start page or from the File menu. A list of recently used files will be displayed. Otherwise, you may Browse for more files. The ‘Open’ dialog box will be displayed in this instance. - Page 41 Operation Highlight the wavelength you wish to use from the list of available wavelengths displayed. Click Add. Alternatively, press CTRL and the element from the periodic table to add the NOTE primary wavelength for the selected element to your method. The element will appear in the table with the selected wavelength and default settings selected.
-
Page 42: Running Samples
Operation Click Standards to enter the concentration of the elements in your standards and select whether to use other options such as Standard Additions or MultiCal. Click IEC (if enabled) to enter the concentration of the elements in your IEC standards. 10 Click Sequence to specify the end of run actions, number of samples, select the solution type and edit the sample labels. -
Page 43: Printing A Report
Operation Printing a Report To print a report: Click Report on the toolbar or File > Report. Choose whether you want to print or preview the report or save the report as a PDF file. Previewing the report allows you to ensure that you have included all of the data you require. - Page 44 Operation Extinguish the plasma by choosing Plasma Off from the Plasma button drop-down arrow or pressing SHIFT and F5 on the keyboard. The peristaltic pump stops automatically when the plasma is extinguished. The green Plasma enable button, located on the front of the MP-AES NOTE instrument, is intended to be used only in an emergency.
- Page 45 Operation WARNING Noxious Fumes Asphyxiation danger. The exhaust system MUST remain on if the gas supplies are on. If the MP-AES instrument is not going to be in use for a period of time the torch NOTE should be cleaned of any deposits, dirt or residue. For further information about cleaning the torch see Page 49.
- Page 46 Operation This page is intentionally left blank. Agilent Microwave Plasma Atomic Emission Spectrometers User’s Guide...
-
Page 47: Maintenance, Spare Parts And Troubleshooting
Maintenance, Spare Parts and Troubleshooting 5. Maintenance, Spare Parts and Troubleshooting Routine Maintenance Cleaning the MP-AES Instrument Cleaning the MP-AES Easy Fit Torch Cleaning the Spray Chamber Checking the Gas Supply Tubing for Leaks Spare Parts Technical Support Troubleshooting This chapter includes the Agilent MP-AES instrument maintenance requirements that may be carried out by an operator. -
Page 48: Routine Maintenance
Maintenance, Spare Parts and Troubleshooting Routine Maintenance The following parts of the MP-AES instrument require routine maintenance. Daily Check and, if necessary, empty the drain vessel. Inspect the torch condition and cleanliness. Clean as necessary. See Page 49. Clean the surface of your MP-AES instrument (spills should be ... -
Page 49: Cleaning The Mp-Aes Instrument
Maintenance, Spare Parts and Troubleshooting Cleaning the MP-AES Instrument Any spills in the sample compartment or on the MP-AES should be wiped up immediately. The user (or other authorized personnel) must perform the appropriate decontamination procedure if hazardous material is spilled on or inside the MP-AES instrument. The exterior surfaces of the MP-AES instrument should be kept clean. -
Page 50: Cleaning The Spray Chamber
Maintenance, Spare Parts and Troubleshooting Cleaning the Spray Chamber The ‘wetting’ of a spray chamber is its ability to produce a uniform coating of aerosol on the internal surfaces of the spray chamber. This uniform coating is essential for the efficient transport of aerosol from the spray chamber to the plasma torch. -
Page 51: Checking The Gas Supply Tubing For Leaks
Spare Parts For details on spare parts and consumables ordering information, refer to the Agilent Technologies website: www.agilent.com To replace the items listed below, you must use Agilent- manufactured parts, which can be ordered online from the Agilent website or through your local sales representative. -
Page 52: Technical Support
Maintenance, Spare Parts and Troubleshooting Technical Support For technical support contact information, refer to the Agilent Technologies website for details: www.agilent.com Troubleshooting For troubleshooting information, please see the Help provided with the MP Expert software. To access it, double-click the MP Expert Help on the computer desktop and then click Troubleshooting. - Page 54 In This Guide The guide describes the following: Safety Practices and Hazards Introduction Installation Operation Maintenance, Spare Parts and Troubleshooting © Agilent Technologies 2011, 2013, 2016, 2018 Printed in Malaysia 07/18 *G8000-90002* *G8000-90002* G8000-90002 Issue 4...