
Related Manuals for R.G.V. ROBUSTA JUNIOR


Summary of Contents for R.G.V. ROBUSTA JUNIOR
- Page 1 Grattugia elettrica Electric grater ROBUSTA ROBUSTA JUNIOR JUNIOR Libretto di istruzioni (Istruzioni originali) Instruction manual (Translation of original instructions)
- Page 3 Introduzione Gentile Cliente, la ringraziamo di aver scelto un nostro prodotto e confidiamo che questa scelta soddisfi a pieno le Sue aspettative. Prima di utilizzare questo apparecchio, La invitiamo a leggere attentamente il presente “libretto di istruzioni per l’uso” al fine di ottimizzarne le caratteristiche funzionali ed eliminare qualsiasi inconveniente che potrebbe insorgere da un uso errato o non conforme dello stesso.
-
Page 4: Istruzioni Di Sicurezza Importanti
Istruzioni di sicurezza importanti Significato delle indicazioni di avvertenza presenti nel libretto PERICOLO: Indica una situazione di pericolo imminente che, se non evitata, può provocare lesioni gravi o addirittura la morte. L’utilizzo di questo termine è limitato alle situazioni più estreme. - Page 5 Avvertenze d’uso Per un uso sicuro dell’apparecchio: • Prima di ogni utilizzo verificare l’integrità meccanica dell’apparec- chio in tutti i suoi componenti. Il corpo apparecchio e tutti i componenti non devono presentare rotture o incrinature. La guaina e la spina del cavo di alimentazione non devono eviden- ziare screpolature o rotture.
- Page 6 Assicurarsi che l’apparecchio sia appoggiato in modo sicuro. L’apparecchio può essere utilizzato da bambini di età non inferiore a 8 anni e da persone con ridotte capacità fisiche, sensoriali o mentali, o prive di esperienza o della necessaria conoscenza, purché sotto sorveglianza oppure dopo che le stesse abbiano ricevuto istruzioni relative all’uso sicuro dell’apparecchio e alla comprensione dei pericoli ad esso inerenti.
-
Page 7: Avvertenze Importanti
Avvertenze importanti Seguire le istruzioni di seguito descritte per ridurre il rischio di incendi, scosse elettriche o lesioni a persone durante l’utilizzo dell’apparecchio: • Se il cavo di alimentazione è danneggiato, deve essere sostituito solo dal produttore o presso un centro di assistenza autorizzato o da altro personale qualificato al fine di evitare rischi. -
Page 8: Caratteristiche Tecniche
Caratteristiche tecniche CARATTERISTICHE Dimensioni apparecchio (L x P x H) 170 x 229 x 250 Dimensioni interno bocca (X x K) 79 x 60 Peso netto apparecchio 2,05 Rumorosità <68 Temperatura ambiente max. °C - Tensione: 220/240 - Frequenza: - Potenza: - Kb (tempo massimo di uso in continuo) 5’... -
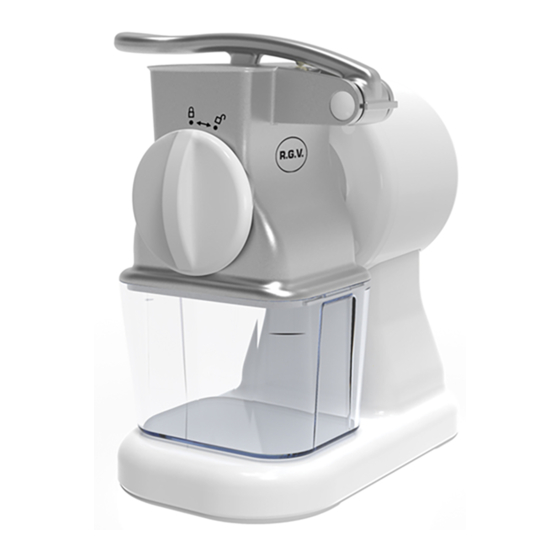
Page 9: Descrizione Apparecchio
Descrizione apparecchio 1. Corpo apparecchio 7. Albero motore 2. Tramoggia 8. Contenitore 3. Leva pressore 9. Coperchio forato 4. Piedini 10. Coperchio contenitore 11. Interruttore ad azione mantenuta 5. Presa alimentazione elettrica 12. Pittogramma di sicurezza 6. Rullo grattugia 13. Cavo di alimentazione elettrica 6a. -
Page 10: Al Primo Utilizzo
Al primo utilizzo J1. Rimuovere tutti componenti dell’imballaggio e le eventuali etichette; smaltire il tutto secondo le disposizioni legislative vigenti. - Prima di eliminare i materiali dell’imballo assicurarsi che tutti i componenti indicati nel paragrafo “F” siano presenti. J2. Posizionare l’apparecchio su un piano orizzontale e stabile. Assicurarsi che tutti i piedini (4) appoggino sul piano. - Page 11 Assicurarsi che il cavo di alimentazione (13) non sporga dal piano di appoggio onde evitare che qualcuno possa anche inavvertitamente tirarlo rovesciando l’apparecchio. K4. Posizionare il contenitore (8) nell’apposita sede. Usare l’apparecchio SOLO DOPO aver posizionato correttamente il contenitore (8) sotto alla bocca di uscita della tramoggia (2). K5.
- Page 12 K7. Abbassare il pressore (3) nella tramoggia (2). K8. Tenere premuto il pulsante di avviamento (11) per avviare l’apparecchio. K9. Rilasciare il pulsante (11) per fermare la rotazione del rullo grattugia (6). START “I” STOP • Non sollevare la leva pressore (3) dalla tramoggia (2) senza aver PRIMA rilasciato il pulsante di avviamento (11) ! •...
- Page 13 Utilizzare l’apparecchio SOLO con il contenitore (8) correttamente posizionato sotto alla tramoggia (2). - Non far funzionare in continuo l’apparecchio per più di 5 minuti. Si consiglia di interporre delle pause. K11. A rullo grattugia (6) fermo, rimuovere il contenitore (8) dall’apparecchio. Consigli •...
-
Page 14: Pulizia E Manutenzione
Pulizia e manutenzione • Prima di effettuare le operazioni di pulizia e movimentazione, fermare l’apparecchio quindi disinserire SEMPRE la spina dalla presa di corrente. M1. Al termine dell’utilizzo rimuovere eventuali residui di alimenti dalla tramoggia (2). M2. Per la pulizia del corpo apparecchio (1) e l’interno della tramoggia (2) usare un panno umido evitando l’impiego di materiali o detergenti abrasivi o corrosivi. - Page 15 - Non rimuovere il tappo (6a) dal rullo grattugia (6). - Per agevolare l’asciugatura del rullo grattugia (6) lasciarlo in posizione verticale con il tappo (6a) verso l’alto. d. Attendere che sia completamente asciutto prima di rimontarlo. e. Dopo aver rimosso il rullo grattugia (6) e sfilato il contenitore (8) da sotto alla tramoggia (2), è...
- Page 16 Il rullo grattugia (6) è dotato di parti appuntite ed affilate; maneg- giarlo con cura. M4. Come utilizzare il contenitore (8). a. Dopo aver grattugiato l’alimento desiderato, scollegare la spina dalla presa di corrente quindi sfilare il contenitore (8) dal corpo apparecchio. b.
-
Page 17: Smaltimento Dell'apparecchio
Possibili inconvenienti • Se il risultato della lavorazione non è soddisfacente, verificare che ..l’alimento lavorato sia idoneo (non troppo morbido nè troppo duro) ..le sue dimensioni non siano eccessive. Non tentare di affilare il rullo grattugia (6). •... - Page 18 Avvertenze supplementari Prima di collegare l’apparecchio accertarsi che i dati targa siano rispondenti a quelli della rete di distribuzione elettrica. La targa è situata sul fondo del corpo apparecchio. In caso di incompatibilità tra la presa e la spina dell’apparecchio fare sostituire la presa con altra di tipo adatto da personale professionalmente qualificato che dovrà...
- Page 19 Condizioni di garanzia convenzionale La presente Garanzia non pregiudica i diritti dell’acquirente stabiliti con D. Lgs. 02/022002, n. 24. Con la presente Garanzia, il produttore offre all’Acquirente che si rivolge direttamente ad un Punto Vendita il ripristino della conformità tecnica dell’apparecchio in modo rapido, sicuro e qualitativamente ineccepibile.
- Page 21 Introduction Dear customer, Thank you for choosing our product and we are confident that this choice will meet your expectations in full. Before using this equipment, please read carefully this “instruction manual” in order to optimize the functional characteristics and eliminate any problems that may arise from incorrect use.
-
Page 22: Important Safety Information
Important safety information Meaning of warning signs in the booklet DANGER: Indicates an imminently hazardous situation which, if not avoided, could result in serious injury or even death. The use of this term is limited to the most extreme situations. CAUTION: Indicates a potentially hazardous situation which, if not avoided, could result in serious injury (and in extreme cases death). -
Page 23: Warnings For Use
Warnings for use To ensure safe operation: • Before each use, verify the mechanical integrity of the device and of all its components. The device body and all components must not show cracks or tears. The protective sheath and the plug of the power cord should not be cracked or broken. - Page 24 Make sure that the unit is leant in a safe manner. The appliance can be used by children aged 8 years or over and by persons with reduced physical, sensory or mental capabilities, without experience or the necessary knowledge, as long as they are under supervision or after they received instructions on the safe use of the appliance and on awareness of the dangers linked to it.
-
Page 25: Important Warnings
Important warnings To reduce the risk of fire, electric shock, injury to persons when using your appliance, follow basic precautions, including the following: • If the supply cord is damaged, it must be replaced by the manu- facturer, its service agent or similarly qualified persons in order to avoid any risk. -
Page 26: Technical Specifications
Technical specifications SPECIFICATIONS Appliance dimensions (L x P x H) 170 x 229 x 250 Mouth interior size (X x K) 79 x 60 Appliance net weight 2,05 Noise level <68 Max. ambient temperature °C - Voltage: 220/240 - Frequency: - Power: - Kb (maximum time of continuous use) 5’... -
Page 27: Appliance Description
Appliance description 1. Appliance body 7. Motor shaft 2. Hopper 8. Container 3. Pressing device lever 9. Drilled lid 4. Feet 10. Container lid 11. Maintained-action switch 5. Power socket 12. Safety pictograms 6. Grater roller 13. Power cord 6a. Grater roller cap Safety devices •... -
Page 28: Use Of The Appliance
At first use J1. Remove all the components of the packaging and the possible labels; dispose everything according to the legislative provisions in force. - Before disposing of the materials of the packaging, make sure that all components indicated in paragraph “F” are present. J2. - Page 29 Make sure the power cord (13) does not protrude from the bear- ing plane to avoid that someone may, even inadvertently, pull it overturning the appliance. K4. Position the container (8) in its specific seat. ONLY use the appliance AFTER having placed the container (8) cor- rectly under the outlet mouth of the hopper (2).
- Page 30 K7. Lower the pressing device (3) into the hopper (2). K8. Keep the start-up button (11) pressed to start the appliance. K9. Release the button (11) to stop the rotation of the grater roller (6). START “I” STOP • Do not raise the pressing device lever (3) from the hopper (2) without having released the start-up button (11) FIRST ! •...
- Page 31 ONLY use the appliance with the container (8) correctly positioned under the hopper (2). - Do not make the appliance work continuously for more than 5 minutes. It is advised to take breaks. K11. When the grater roller (6) is stationary, remove the container (8) from the appliance. Tips •...
-
Page 32: Cleaning And Maintenance
Cleaning and maintenance • Before carrying out cleaning and displace- ment operations, stop the appliance, then ALWAYS disconnect the plug from the power outlet. M1. At the end of use, remove possible food residues from the hopper (2). M2. For cleaning of the appliance body (1) and of the inside of the hopper (2), use a moist cloth avoiding the use of abrasive or corrosive materials or detergents. - Page 33 - Do not remove the cap (6a) from the grater roller (6). - To ease drying of the grater roller (6), leave it in vertical position with the cap (6a) upwards. d. Wait for it to be completely dry before reassembling it. e.
- Page 34 The grater roller (6) is equipped with sharp and pointed parts; handle it with care. M4. How to use the container (8). a. After grating the desired food, disconnect the plug from the power socket, then extract the container(8) from the appliance body. b.
-
Page 35: Disposal Of The Appliance
Possible problems • If the result of processing is not satisfying, check that..processed food is suitable (not too soft nor too hard) ..its size is correct. Do not try to sharpen the grater roller (6). • If the appliance should overheat, interrupt the use immediately, remove the plug from the power outlet, then wait for it to cool down, then try to start it again. -
Page 36: Additional Warnings
Additional warnings Before connecting the appliance, make sure that the data on the plate correspond to those of the electricity distribution network. The plate is located on the bottom of the unit body. In case of incompatibility between the socket and power cable plug, have the socket replaced with a suitable type by a qualified professional who will also have to make sure that the section of the cord is suitable for the power absorbed by the appliance. -
Page 37: How To Contact Technical Support
Conventional warranty conditions This Warranty does not affect your statutory rights under D. Lgs. 02/022002, n. 24. With this guarantee, the manufacturer suggests the Purchaser to address directly a Point of Sale which to comply with the restoration in a fast, safe and unquestionable quality. This Warranty is effective regardless of the evidence that the defect - resulting from man- ufacturing defects present at the time of purchase of the device, except as provided in paragraph “d”... - Page 40 Timbro e Firma del rivenditore : Stamp and Signature of the retailer : Compilare i campi sottostanti per la validità della Garanzia Fill out the spaces below for validation of the Guarantee Modello ROBUSTA JUNIOR Model Cognome Surname Nome Name n°...
Need help?
Do you have a question about the ROBUSTA JUNIOR and is the answer not in the manual?
Questions and answers