
Related Manuals for Roadmaster Sterling


Summary of Contents for Roadmaster Sterling
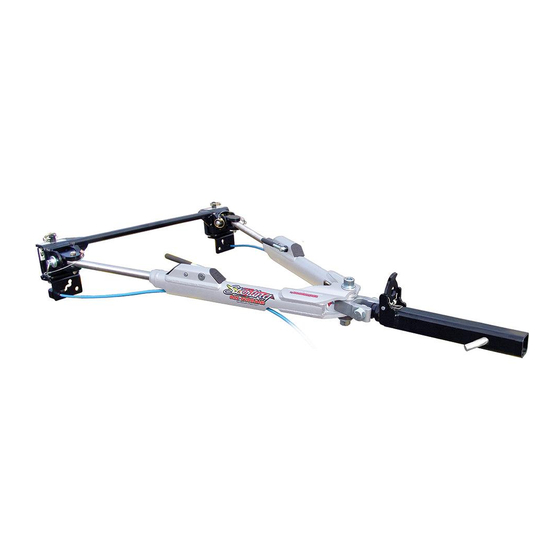
- Page 1 IMPORTANT! CONTENTS OF THIS MANUAL MUST BE READ BY OWNER R O A D M A S T E R I N E S T L A N E T...
- Page 2 (30) thirty days of purchase. As a bonus, we'll extend your warranty to a total of two years at no additional cost. As a STERLING owner, rest assured you have bought the finest tow bar on the planet. We thank you for your patronage and greatly...
- Page 3 While under warranty, ROADMASTER will make arrangements for your product to be repaired or replaced . Do not purchase replacement parts or pay for labor - you will not be reimbursed. See section titled “ROADMASTER Limited Warranty”...
- Page 4 As is the case with most precision equipment, frequent cleaning and care results in prolonged service. Details for cleaning & lubricating your STERLING tow bar are outlined in the section titled "Care and Cleaning" (page 18). OWNER MUST INSPECT ALL MOUNTS, BRACKETS AND FASTENERS Visually inspect ALL bolts, wiring, cables and metal components each time before you tow to avoid problems on the road.
- Page 5 Backing up while the towed vehicle is attached, will easily "jackknife" the vehicle being towed. This will result in damage to the towed vehicle, hitch, tow bar assembly, and/or motorhome. ROADMASTER, Inc assumes no responsibility for any damage that is caused by improper use. Backing up with a towed vehicle is considered "improper use".
- Page 6 ATTACHED TO THE TOWED VEHICLE’S FRAME OR UNIBODY. The STERLING tow bar is designed as a bolt-on device only. Virtually all vehicles require a mounting bracket assembly that is connected safely to the frame, unibody or chassis and extends beyond the bumper.
- Page 7 INSTALLER MUST STRESS IMPORTANCE OF OWNER SENDING IN WARRANTY CARD New owners are to be urged to mail their Warranty Registration Card as soon as possible. This will enable ROADMASTER to expedite any claim or update important information concerning their STERLING tow bar.
-
Page 8: Hook-Up Instructions
HOOK-UP INSTRUCTIONS Use caution when operating the tow bar to be sure that your hands, fingers or any part of your body does not get caught between any moving components. Doing so can result in pinching, crushing or cutting causing severe personal injury. TABS QD BASE SAFETY CHAN-... - Page 9 Fig. 1 mount STERLING Quick Disconnect Base STEP 2 With the STERLING tow bar in the folded position (Fig.1), insert it into the motorhome’s receiver and secure with Hitch Pin & Clip. STEP 3 Firmly hold both tow bar arms and rotate them so that they are vertical as shown in Figure 2.
- Page 10 TIP: If the STERLING arm does not automatically lock when you pull the motorhome ahead, try turning the mo- torhome left, then right as you drive away. This will pull each arm in the necessary direction to engage the locking mechanism.
- Page 11 The locking mechanism should disengage. CAUTION: Do not use any type of leverage tool to assist with lifting of the Sterling Release Handle. Doing so will damage the locking mechanism, and is not covered by warranty.
-
Page 12: Wiring Instructions
WIRING INSTRUCTIONS Wiring the Plug. 1. Insert the end of the wiring cord through the safety channels. See illustration on page 12. 2. Wire the plug to match your vehicle or follow Figure A below. Apply silicone sealant to the wires where they attach to the plug. - Page 13 • Loosen all of the set screws on the side of the socket and connect the wires to the back of the socket as shown in the diagram below or wire the socket to match the existing wiring on the motorhome. Front of Socket on Towed Vehicle and Motorhome Fig.
-
Page 14: Installation Of Cables
SAFETY CABLES INSTRUCTIONS WARNING: USE ONLY 6,000 LB. (or higher) RATED SAFETY CABLES Figure 2 Figure 1 Cable Anchors Cable Anchors Safety Channels Installation of Cables Route the safety cables through the safety channels by inserting the small end of the cable through the safety channel toward the towed car. -
Page 15: How To Use Safety Cables
Figure 3 Route safety cables Cables must through channels. be crossed. Quick-link Short cables How to Use Safety Cables Connect the cables to the anchor bracket by inserting the cables through the anchor bracket and dragging down (Figure 2). If your baseplate has short cables on the car, attach them to holes "A"... - Page 16 REMEMBER TO LEAVE ENOUGH SLACK FOR TURNING SHARP CORNERS! If you are connecting the Sterling to a ROADMASTER bracket that has removable arms, then you MUST use the short safety cables (that came with your brackets) to connect between the Cable Anchor and the portion of your mounting bracket that is permanently bolted to your towed car.
- Page 17 OR LOCKS. Unless your tow bar is secured to both vehicles with all designated pins and/or padlocks, YOU WILL LOSE YOUR TOWED VEHICLE. NEVER HEAT, BEND OR WELD STERLING TOW BAR OR IT WILL WEAKEN METALS • RESULTING IN NON-WARRANTY FAILURE. TOWED VEHICLE MUST HAVE EMERGENCY BRAKE SET & VEHICLE IN PARK WHEN •...
- Page 18 Towing with an upward or downward slope of the tow bar puts undue strain on the tow bar and mounting brackets. DO NOT TOW if the STERLING is over 3 inches out of level as shown. To determine if your bar is at a safe angle: a.
- Page 19 DO NOT TOW IF STERLING IS MORE THAN 3 INCHES OUT OF LEVEL while using receiver extension. Extensions cause the towing system to swing much higher and lower when traveling in and out of dips. The enlarged arc of motion creates many problems: Excessive strain on the tow bar, brackets and frame.
-
Page 20: Care And Cleaning
® operation. Use the following guidelines when maintaining your tow bar: Always clean the bar before lubricating. Use Roadmaster’s Voom! to clean the bar. It does ® an exceptional job of breaking down road film, dirt and grease. Spray a liberal amount on the tow bar, then operate the tow bar to work the cleaner into all of the moving parts. -
Page 21: Parts And Components
910655 Outer/Inner Arm Assembly - Passenger Side 910650 Safety Cable Optional items listed not shown above 98146 6-wire 057 Sterling Tow Bar Cover 315 Receiver Hitch Lock 301 QD Lock 98164 4-wire for Sterling 302 2-pack QD Locks 305 Coupler Lock... - Page 22 "towed" vehicle FAILURE TO FOLLOW INSTRUCTIONS MAY RESULT attached or failures which are caused by products not supplied by ROADMASTER, Inc or failures IN PROPERTY DAMAGE, PERSONAL INJURY OR DEATH.
- Page 23 In no event shall ROADMASTER's liability under any claim or theory exceed the purchase price of the equipment in respect of which damages are claimed. No agent, representative, dealer or employee has the authority to alter or increase the obligations or limitations of this warranty.
- Page 24 ROA DM ASTER , INC. Towing and Suspension Solutions 6110 NE 127th Ave. Vancouver, WA 98682 1-800-669-9690 www.roadmasterinc.com...
Need help?
Do you have a question about the Sterling and is the answer not in the manual?
Questions and answers