Roadmaster BrakeMaster 9100 Owner's Manual
Proportionate towed car braking system
Hide thumbs
Also See for BrakeMaster 9100:
- Installation instructions manual (24 pages) ,
- Installation instructions manual (8 pages)
Table of Contents
Advertisement
Quick Links
Advertisement
Table of Contents

Subscribe to Our Youtube Channel
Related Manuals for Roadmaster BrakeMaster 9100


Summary of Contents for Roadmaster BrakeMaster 9100
-
Page 2: Table Of Contents
All illustrations and specifications contained herein are based on the lat- est information available at the time of publication. ROADMASTER, Inc. reserves the right to make changes, at any time, without notice, in material, Serial number: specifications and models, or to discontinue models. -
Page 3: Components
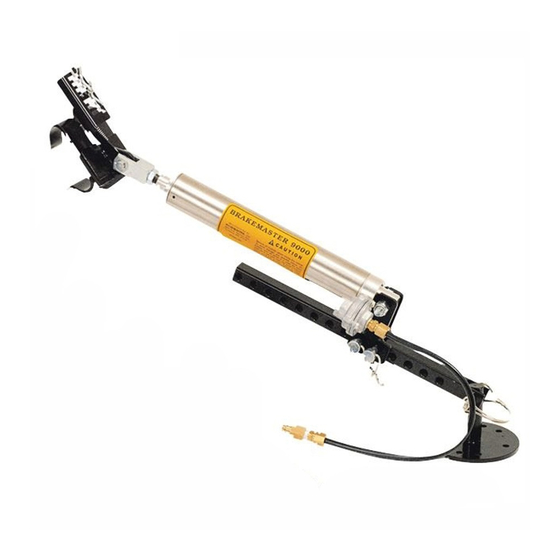
Components This overview is intended to introduce you to the major components in the BrakeMaster system and to briefly explain their functions. While some of these components will be “out of sight and out of mind,” you will connect and disconnect others every time you tow. -
Page 4: Operation
Operation CAUTION 2. Make certain that the towed vehicle’s emergency brake The Brake Pressure Reducer (part number 900002) is released. is required for: 1) all towed vehicles with full-time (‘ac- tive’) power braking systems; and 2) all towed vehicles without power brakes — Failure to release the towed vehicle’s emergency 1) Vehicles with ‘active’... - Page 5 Operation CAUTION Attach the pedal clamp and air cylinder The air cylinder must be pulled back when it is con- continued from preceding page in Figure 1 — the arrow on the sticker will point “Up” when nected, in order to create sufficient spring tension to the pedal clamp is properly positioned.
-
Page 6: Connect The Air Line, Patch Cord And Break Away System
Operation Attach the pedal clamp and air cylinder prevent the cable from pulling freely away from the break away switch. Do not wrap the cable around continued from preceding page connect it to the mounting post. anything — doing so could keep the cable from pull- ing the break away pin, preventing the system from activating in a break away. -
Page 7: Disconnecting The Air Cylinder
Master 9060 and 9160; it is an optional accessory for the 9100. For motorhomes with air or air over hydraulic brakes (BrakeMaster 9100 and 9160) — with the motor- home engine on, the air compressor completely charged and the parking brake released, depress the brake pedal for 15 seconds —... -
Page 8: Test The System
For motorhomes with air or air over hydraulic brakes (BrakeMaster 9100 and 9160) — with the motor- or in a particular sequence. Refer to the owner’s manual, or call the dealership for home engine on, the air compressor completely charged vehicle-specific information. -
Page 9: Using The Quick Couplers
Failure to follow these instructions may cause property damage, personal injury or even death. * The most current version of the installation instructions is at the ROADMASTER web site — www.roadmasterinc.com — under ‘Sup- port.’ Using the quick couplers You will use six ‘quick couplers’ to connect and dis- housing on the female coupler until they release. -
Page 10: The Motorhome Monitor Led
ROAD- tal braking system. MASTER warranty — ROADMASTER will disallow warranty The purpose of the motorhome monitor light is to notify claims on any brake damage or brake failure. -
Page 11: Maintenance
(An CAUTION air cylinder storage bag, part number 104, is available from ROADMASTER.) If the motorhome will be stored in an area where Always connect the male and female quick couplers... -
Page 12: Troubleshooting Brakemaster 9100 And 9160
Troubleshooting — BrakeMaster 9100 and 9160 Symptom directly in line with the brake pedal. If it is mounted at an The motorhome monitor LED does not illuminate, even angle to the brake pedal (to one side or the other), the air though the brakes in the towed vehicle are being ap- cylinder may jam in the extended position. -
Page 13: Brakemaster 9060
Troubleshooting — BrakeMaster 9060 (The installation instructions contain illustrations and should release air each time the pedal is depressed. instructions to accompany this section. To download or A. If there is air at the proportioning valve — follow the air print a copy of the most recent version of the instructions, line back to the air cylinder in the towed vehicle. - Page 14 Troubleshooting — BrakeMaster 9060 plete the vacuum in the vehicle’s power brake system continued from preceding page stalling the proportioning valve. Re-bleed the proportion- before you resume towing. ing valve, as well as all brakes (and any components 2. If the towed vehicle has a full-time (‘active’) power connected to the braking system) downstream from the braking system, install the optional Brake Pressure Re- brake tee.
-
Page 15: Parts
Parts for all BrakeMaster systems — 9060, 9100 and 9160 Item Qty. Description Part Number Item Qty. Description Part Number pedal clamp assembly, complete air and monitor wire patch (color-coded red) ....... 9329-B cord assembly ........921004 1a 1 spring ..........450012 optional patch cord assembly, 1b 1 piston rod clevis ......... -
Page 16: Brakeaway ™ - Models 9160 And 9060
Parts for all BrakeMaster systems — 9060, 9100 and 9160 continued from preceding page for specific BrakeMaster systems BrakeAway ™ included with models 9160 and 9060; optional with model 9100 Item Qty. Description Part Number 1 BrakeAway assembly, complete ..8600 continued from preceding page 21a 1 air cylinder Item... -
Page 17: Model 9060 Only
Parts for BrakeMaster model 9060 only Item Qty. Description Part Number Item Qty. Description Part Number regulator assembly, complete compressor and air tank (color-coded red) ....... 900001 assembly, complete ....... 8315 24a 1 bleeder valve 32a 1 drain valve bleeder valve ....450116-10 (includes brake bleed screw) ..... -
Page 18: Index
Index ‘Active’ power brake systems — required component for ....2 Adjustable arm — Attaching ..............3 Disconnecting ............5 Air cylinder — Adjusting ..............3 Attaching ............. 3-4 Disconnecting ............5 Air tank, draining ............9 Brake pressure reducer (part number 900002) —...
Need help?
Do you have a question about the BrakeMaster 9100 and is the answer not in the manual?
Questions and answers