Table of Contents
Advertisement
Quick Links
Advertisement
Table of Contents

Subscribe to Our Youtube Channel
Related Manuals for Roadmaster Sterling


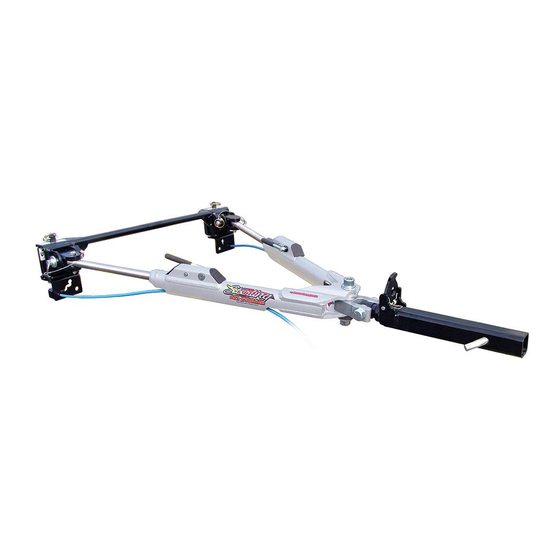
Summary of Contents for Roadmaster Sterling
- Page 1 ® 2007-2018 ROADMASTER, Inc. All rights reserved. 853326-24 01-18...
-
Page 2: Table Of Contents
All illustrations and specifications contained herein are based on the latest information available at the time of publication. ROADMASTER, Inc. reserves the right to make changes, at any time, without notice, in material, specifica- Serial number: tions and models, or to discontinue models. -
Page 3: Safe Towing Practices
• The towed vehicle and all its contents cannot ex- and stand as close to the back of the motorhome as pos- ceed 8,000 pounds. The Sterling All Terrain tow bar is sible before releasing the locking mechanisms, to keep rated at a maximum of 8,000 pounds carrying capacity;... - Page 4 Safe towing practices continued from preceding page more than just one vehicle (for example, a truck which is towing a trailer which is towing a boat). However, when using a tow bar never tow more than one vehicle, or non- warranty damage or injury may result.
-
Page 5: Installing The 'Quick-Disconnect' System
INSTALLING THE ‘QUICK-DISCONNECT' SYSTEM the quick-disconnects, the quick-disconnect bases or This ROADMASTER tow bar is equipped with an exclu- sive “quick-disconnect” (or, “QD”) system. Before connect- other components may vibrate loose, which may cause ing the tow bar to the vehicle, first install the components property damage, personal injury or even death. -
Page 6: Connecting The Tow Bar
Note: the quick-disconnect system is not used with brake and chock one of the wheels. ROADMASTER ‘MS’ or ‘MX’ baseplates. Instead, the 3. With the tow bar in the folded position (Figure 4), insert the stinger into the motorhome hitch receiver and attach... - Page 7 Additionally, check the other components of your towing Connecting the tow bar system, to ensure that they are fully engaged. continued from preceding page Both tow bar arms must be locked before towing. If Never release the tow bar arms when they are in they are not, the momentum of the towed vehicle will the vertical position.
-
Page 8: Disconnecting The Tow Bar
ROADMASTER recommends replacing at least one base pins. Failure to do so may result in a ‘runaway’ of the linch pins with a padlock (part number 301, 302 or vehicle or may crush you between the towed vehicle 308) to prevent accidental release or theft. -
Page 9: Wiring Instructions
2. Strip ¼" to 3/8" of insulation from the ends of the wires. Loosen the set screw at the back of the socket and push Socket Roadmaster Motorhome/ the inner connector out the front. Then run the six-wire Number Code... -
Page 10: Safety Cables
“pole vault” the towed vehicle. • The safety cables must be the correct length… • Some ROADMASTER tow bar mounting kits with re- • Make sure the cables are not too short — if you use a movable arms use two safety cables on each side. -
Page 11: Proper Installation Of Safety Cables
Other baseplates are bolted directly to the frame of the towed vehicle and do not re- quire short safety cables. If your ROADMASTER baseplate kit contains short safety cables, refer to the installation instructions for complete information. -
Page 12: Stay Within The 'Safe Zone
Towing with the tow bar more than three inches above first, connect the motorhome and towed vehicle on level or below level will void the ROADMASTER warranty. ground. Next, measure the distance from the center of the motorhome receiver down to the ground. Then, measure... -
Page 13: Limited Warranty
1a. WARRANTY OF CONFORMITY AT TIME OF SALE Warranty Period or 60 days from the date of the return shipment to ROADMASTER, Inc. warrants that at the time of sale of this product the customer, whichever is greater. All replaced products and all parts... - Page 14 7a), and two springs and two snap • 68" 8,000-pound capacity EZ Hook safety cables rings (not shown) — color-coded red ....910652 (pair) — included with Sterling All Terrain ....655 7a latch cap only ...........200460-00 • 76" 8,000-pound capacity EZ Hook safety 8 stinger assembly, complete cables (pair) —...
Need help?
Do you have a question about the Sterling and is the answer not in the manual?
Questions and answers