Table of Contents
Advertisement
Quick Links
Pivot DS3 Users Guide
Pivot DS3 Users Guide
Pivot DS3 Users Guide
Pivot DS3 Users Guide
Pivot DS3 Users Guide
Operation
Operation of your Pivot DS3 is simple, essentially the same as reading an analog instru-
ment except the information is digital instead of analog. However, the Pivot® DS3 offers far
greater precision plus more features than a "standard" analog gauge. Learning how to
properly use the Pivot DS3 consists of understanding four different digital displays:
Surface, Dive, Alternate Dive, and Dive Log. You should also learn how to replace the
battery when it becomes necessary.
WARNING: Improper use of the Pivot DS3 may result in serious injury or
death. Read and understand these instructions thoroughly before you
dive.
Activation/Diagnostic Mode
Before the first dive of the day, you must activate the Pivots DS3 by
pressing the button on its face while above water (see figure 1). A "full-
segment" display will appear, followed by a countdown from 9 to 0.
During diagnostic mode the Pivots DS3 calibrates itself to ambient
atmospheric pressure. When diving at high altitude (over 4,000 feet)
lakes or rivers the depth display is recalibrated to measure feet
freshwater (FFW) instead of feet of saltwater (FSW).
Low Battery
The battery power level is checked during diagnostic mode. If the power
is low, a "LOW BATT" indicator will flash on the display (see figure 2).
This alerts you to change the battery. Usually there is enough battery
power to dive for at least the rest of the day. When there is not enough
power to complete a full day of diving, the LOW BATT indicator will flash
four times and then the display will deactivate. The Pivot DS3 is
designed to avoid battery-related shutdown between dives. If you do not
dive within 2 hours after activation, a battery-saver feature deactivates
the Pivot DS3. Reactivation is required before diving.
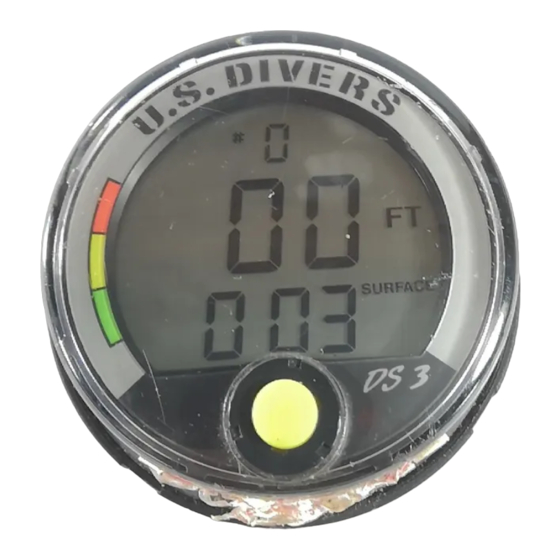
Surface Mode
Surface Mode (figure 3) is displayed after diagnostic mode is completed,
or after completing a dive. In surface mode the DS3 displays the
following information:
1.
Dive number (0-9 dives) which alternates with air temperature in °F
or in °C for metric version.
2.
Depth (0 feet, or 0 meters for metric version).
3.
Surface time in hours:minutes.
Dive Mode
Dive mode (figure 4) begins once you descend past 5 feet. It displays
dive number, bottom time, depth (0-249 ft., or 0-76 meters) and your
ascent speed. The ascent rate indicator, located on the left side of the
screen, has six different ascent rate "speed zones" represented by
inverted triangles. Figure 5 shows the different ascent rates represented
by the triangles. When ascending, keep your ascent rate slow enough to
avoid entering the red zone which will cause all the triangles to flash.
Figure 1
Figure 2
Figure 3
Figure 4
Advertisement
Table of Contents

Related Manuals for Pivot DS3


Summary of Contents for Pivot DS3
- Page 1 Pivot DS3 Users Guide Operation Operation of your Pivot DS3 is simple, essentially the same as reading an analog instru- ment except the information is digital instead of analog. However, the Pivot® DS3 offers far greater precision plus more features than a “standard” analog gauge. Learning how to properly use the Pivot DS3 consists of understanding four different digital displays: Surface, Dive, Alternate Dive, and Dive Log.
- Page 2 The calibration codes will scroll E8, E7, E6, etc., down to E1. After the calibration codes finish scrolling, the Pivot DS3 will return to Surface Mode. These calibration codes are for factory use only. Flying After Diving Since the surface interval timer automatically deactivates 12 hours after a dive, you can use this as an indication of when to board a commercial airliner.
- Page 3 Lanyard Attachment Post On each side of the Pivot DS3 boot, there is a lanyard attachment post (figure 8). You can attach one end of a lanyard to the post and the other end to your buoyancy compensator. This keeps the console close to your body, preventing damage to both the gauge and the marine environment.
- Page 4 13. Replace the battery hatch (make sure 0-ring is installed) and tighten hand tight with a nickel, or quarter. DO NOT use a screwdriver. 14. Activate the Pivot(r) DS3 to test the battery connection. 15. To insert the module back into the rubber boot, you first want to orient the gauge straight up and down.
Need help?
Do you have a question about the DS3 and is the answer not in the manual?
Questions and answers