Webasto Telestart T100 HTM Operating Instructions Manual
Hide thumbs
Also See for Telestart T100 HTM:
- Installation instructions manual (19 pages) ,
- Operating instructions manual (16 pages) ,
- Operating and servicing manual (26 pages)
Table of Contents
Advertisement
Advertisement
Table of Contents

Related Manuals for Webasto Telestart T100 HTM


Summary of Contents for Webasto Telestart T100 HTM
- Page 1 Telestart T100 HTM Operating Instructions...
-
Page 2: About This Document
– Warranty and liability Webasto shall not assume liability for defects or damage that are the result of the installation and operating instructions being disregarded. This liability exclu- sion particularly applies for: mechanical damage to the equipment –... -
Page 3: General Safety Information
Keep the hot air flow free. DANGER Risk of injury from the defective unit Do not operate a defective Telestart T100 HTM and put it out of service by removing the fuse: - prolonged heavy smoke development - unusual burner noise... -
Page 4: Intended Use
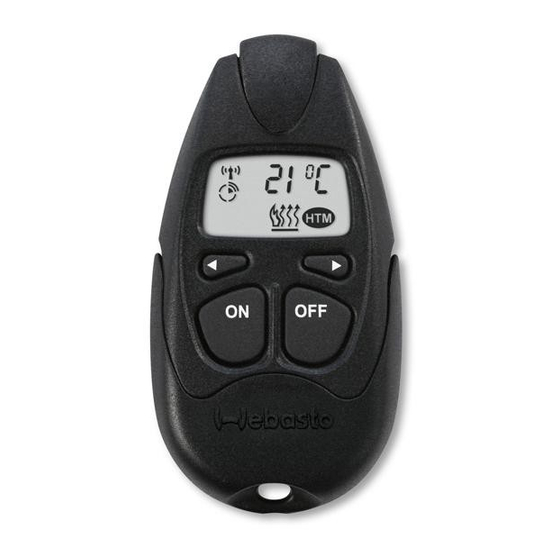
Intended use The control element Telestart T100 HTM is currently approved for the following applications: Switching Webasto water heaters on and off. Overview Housing with transmitter Display Arrow push button : Select the Settings menu Push button : Switch on... -
Page 5: Functional Description
Sym- Function Sym- Function Operating time Ventilation Functional description The heating time management (HTM) system calculates the heating time and the heater switch-on time depending on the passenger compartment tem- perature of the vehicle and the selec- ted comfort level. Follow the setting options described below. -
Page 6: Setting The Time
Setting up a vehicle heating system Before switching on the heater (with the ignition on), set the vehicle heating system to “warm”. Set the vehicle fan to the lowest setting (lower power consumption). NOTE Depending on the type of vehicle, the air-conditioning system can per- form these settings automatically or partly autonomously. -
Page 7: Operating Mode
Operating mode Calling up the operating mode NOTE The ventilation function is optional. Necessary action Indicator Press the push button three times until the heating or ventilation symbol is displayed. Setting the operation mode Necessary action Indicator The heating or ventilation operat- ü... -
Page 8: Switch On The Heater
Setting the heating time 10.2 Necessary action Indicator Press the buttons simultaneously. Press the push button. Set the desired minutes. Press the buttons simultaneously. The symbol stops flash- ing. The heating time is set. Switch on the heater Hand-held transmitter 11.1 Necessary action Indicator... -
Page 9: Pairing The Hand-Held Transmitter
Pairing the hand-held transmitter The hand-held transmitter Telestart T100 HTM must be paired with the Tele- start receiver in the vehicle. Determining the installation position of the fuse 13.1 Depending on the heater and its installation or application, the Telestart fuse is installed in the engine compartment or the vehicle interior. - Page 10 Necessary action Indicator Press the push button three times until the comfort level is dis- played. Changing the comfort level 14.2 NOTE The start-out time must first be deactivated. See "Deactivating the start-out time on page 11". Necessary action Indicator The comfort level has been selec- ü...
- Page 11 Setting the start-out time 14.4 Necessary action Indicator The start-out time is selected. ü Press the buttons simultaneously. Press the button. Select the desired start-out time. Press the buttons simultaneously. symbol stops flashing. The start-out time is set. Activating the start-out time 14.5 Necessary action The start-out time must be set, see "Setting the...
- Page 12 Displaying the vehicle temperature Necessary action Indicator Press the push button two times until the temperature is dis- played. NOTE The displayed temperature corresponds to the passenger compartment temperature near the installation location of the temperature sensor. In case of severe temperature fluctuations, the actual temperature may be displayed with a delay at the temperature sensor.
-
Page 13: Battery Disposal
Battery disposal 16.1 Dispose of packaging in corresponding recycling container in accordance with national regulations. Changing the battery 16.2 Ensure the correct polarity when inserting the battery into the hand-held transmitter. Battery status 16.3 NOTE When the battery is fully charged, no charge state is displayed. Charge state Display example Battery at half capacity... -
Page 14: Maintenance And Handling
LED display Battery status Lights orange for 2 s. Almost spent. Very cold. Battery is almost spent; replace it as soon as possible. Transmitter heats up. Flashes orange very quickly for 5 s. Battery flat. Replace battery. No display. Battery flat. Replace battery. Restarting 16.5 To extend the life of the battery, we recommend removing the battery from... -
Page 15: Statutory Regulations Governing Installation
Declaration of Conformity 18.2 CE-Declaration of Conformity and UKCA-Declaration of Conformity The Telestart T100 HTM was developed, manufactured, tested and supplied in accordance with the relevant directives, regulations and standards for safety, EMC and environmental compatibility. Webasto declares that the product Telestart T100 HTM is manufactured and delivered in accordance with the directives and regulations. - Page 16 To request this Installation Documentation in another language, please locate and contact your local Webasto dealer. You can find your nearest dealer at: https://dealerlocator.webasto.com/en- int. Europe, Asia Pacific UK only Webasto Thermo & Comfort SE Webasto Thermo & Comfort UK...
Need help?
Do you have a question about the Telestart T100 HTM and is the answer not in the manual?
Questions and answers