Webasto Telestart T100 HTM 869 Operating Instructions Manual
Hide thumbs
Also See for Telestart T100 HTM 869:
- Installation instructions manual (19 pages) ,
- Operating and servicing manual (26 pages) ,
- Operating instructions manual (17 pages)
Table of Contents
Advertisement
Advertisement
Table of Contents

Related Manuals for Webasto Telestart T100 HTM 869


Summary of Contents for Webasto Telestart T100 HTM 869
- Page 1 Telestart T100 HTM 869 Operating Instructions...
-
Page 2: About This Document
Text with the symbol describes an action. Warranty and liability Webasto shall not assume liability for defects or damage that are the result of the installation and operating instructions being disregarded. In particular, this liability exclusion applies in the following cases: mechanical damage to the equipment –... -
Page 3: General Safety Information
Risk of injury from the defective unit Do not operate a defective Telestart T100 HTM. Contact a Webasto service workshop. Intended use The control element Telestart T100 HTM is currently approved for the following applications: Switching Webasto water heaters on and off. -
Page 4: Explanation Of The Display Symbols
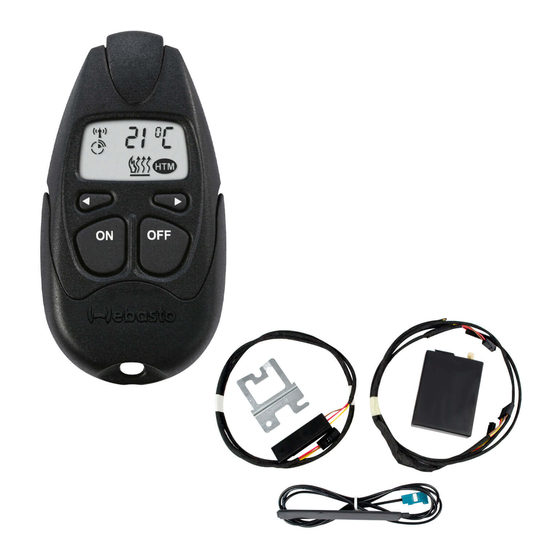
Overview Housing with transmitter Display Arrow push button : Select the Settings menu Push button : Switch on heater or ventilation Battery housing cover Arrow push button : Select the Settings menu Push button : Switch off heater or ventilation NOTE The following generally applies: Press the buttons at the... -
Page 5: Functional Description
Functional description The heating time management (HTM) system calculates the heating time and the heater switch-on time depending on the passenger compartment tem- perature of the vehicle and the selec- ted comfort level. Follow the setting options described below. An optimum signal transmission is achieved in an open area or from elevated locations. -
Page 6: Setting The Time
Time Call up time Necessary action Indicator Press the push button once until the time is displayed. Setting the time Necessary action Indicator The time is called up. ü Press the buttons simultaneously. Press the push button. Set the desired hour. Press the buttons simultaneously. -
Page 7: Setting The Operation Mode
Necessary action Indicator Press the push button three times until the heating or ventilation symbol is displayed. Setting the operation mode Necessary action Indicator The heating or ventilation operat- ü ing mode is selected. Press the buttons simultaneously. The indicator flashes. -
Page 8: Switch On The Heater
Switch on the heater Hand-held transmitter 11.1 Necessary action Indicator Press the button. : The signal has been received and forwarded to the heater. As a switch-on check, the display shows the symbol for operation and the re- maining operation time (heating time in the example is 30 minutes). Switching off the heater Necessary action Indicator... - Page 9 Teaching the unit 13.2 Open the battery compart- ment cover. Release the two side sections . Remove cover by pulling downwards Insert the battery in the hand-held transmitter. Ensure the correct polarity when inserting the battery into the hand-held transmit- ter.
- Page 10 HTM Heating-Time-Management Information regarding the heating time: We recommend matching the heating time to the driving time (heating time = driving time) : for a driving time of approx. 20 min. (in one direction), we re- Example commend not exceeding a switch-on time of 20 min. Heating time management enables automatic preheating (not ventila- tion) of the vehicle for a selected start-out time.
- Page 11 Press the buttons simultaneously. The comfort level symbol stops flashing. The comfort level is set. Calling up the start-out time 14.3 Necessary action Indicator Press the push button two times until the start-out time is displayed. Setting the start-out time 14.4 Necessary action Indicator...
- Page 12 Deactivating the start-out time 14.6 Necessary action The start-out time must be set, see "Setting the start-out time on page 11". Calling up the start-out time, see "Calling up the start-out time on page 11". The start-out time must be activated, see "Activating the start-out time on page 11".
-
Page 13: Battery Disposal
Battery ATTENTION Improper use can cause the batteries to leak, overheat or explode. When handling the battery, follow all instructions and warnings that are supplied with or printed on the battery. The battery is not rechargeable therefore never attempt to charge the battery. -
Page 14: Battery Status
EMC and environmental compatibility. Webasto declares that the product Telestart T100 HTM is manufactured and delivered in accordance with the directives and regulations. The complete CE Declaration of Conformity can be found in the download area... - Page 15 These are the original instructions. The German language is binding. You can request your language if it is missing. The telephone number of each country can be found in the Webasto service centre leaflet or the website of the respective Webasto representat- ive of your country.
Need help?
Do you have a question about the Telestart T100 HTM 869 and is the answer not in the manual?
Questions and answers