Webasto Telestart T100 HTM Operating And Servicing Manual
Hide thumbs
Also See for Telestart T100 HTM:
- Installation instructions manual (19 pages) ,
- Operating instructions manual (16 pages) ,
- Operating instructions manual (17 pages)
Table of Contents
Advertisement
Advertisement
Table of Contents

Related Manuals for Webasto Telestart T100 HTM


Summary of Contents for Webasto Telestart T100 HTM
- Page 1 Telestart T100 HTM...
- Page 2 Deutsch English Français Italiano Español Nederlands Dansk...
- Page 3 Telestart T100 HTM to your complete satisfaction. With these operating instructions we would like to provide you with an overview of the use of the hand-held transmitter Telestart T100 HTM.
- Page 4 In enclosed rooms (e.g. garages), not even via the timer or Telestart. Care and handling Note the following points to avoid damage to the Telestart T100 HTM: Do not expose to heat above 70 °C (e.g. direct sunlight). Operating temperature between 0 °C and +50 °C.
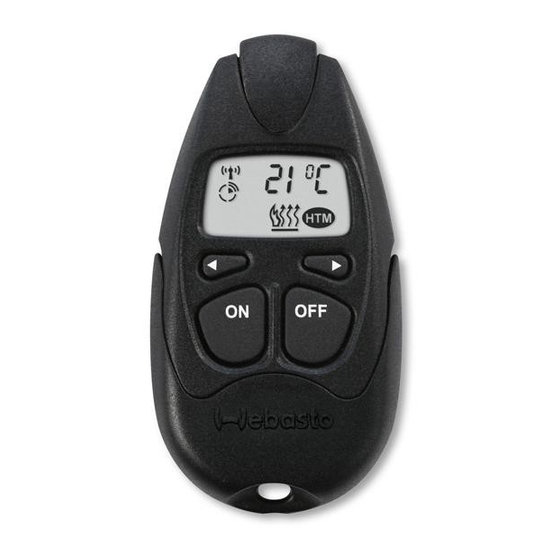
- Page 5 (Thermo Top C, Thermo Top E, Thermo Top P) or the vehicle fan* on and off at a long distance via a wireless link. The Telestart T100 HTM displays the operating status of the heater or the vehicle ventilation using the corresponding function symbol.
- Page 6 Optimum signal transmission is achieved out in the open or from a position higher than the vehicle.In this case, the auxiliary heating system can be operated at a distance of approx. 1000 m from the vehicle. When operating the transmitter, please hold it vertically pointing upward and do not cover the upper side (see photo).
- Page 7 The Telestart T100 HTM is designed so it is possible to switch between the information displays by pressing the buttons. The Telestart T100 HTM returns to its initial status if you do not press a button for 6 seconds. Setting mode...
- Page 8 Basic functions Radio transmission display When radio transmission is taking place between the Telestart T100 HTM and the heater, this is indicated by the symbol in the top left corner of the display. Opening the battery compartment cover 1. Carefully bend the two lugs outwards (take care not to break them!) 2.
- Page 9 Basic functions Battery change Note Return batteries of our products after use at the point of purchase or in its immediate vicinity. Returning them is free. As end user you are legally obliged to return used batteries. Caution! Risk of explosion if battery is replaced by an incorrect type! Dispose of the used batteries according to the instructions.
- Page 10 Basic functions Programming Telestart transmitter 1. Place the battery into the battery compartment of the transmitter. 2. Remove fuse 1 A (black) from the heater’s fuse holder (voltage interruption). 3. Wait at least 5 seconds. 4. Replace fuse in heater’s fuse holder and within 5 seconds press the OFF-button on the transmitter for at least 1 second.
- Page 11 Basic functions Displaying and setting the time Displaying Press 1x Setting Press at same time Symbol flashes Setting the time Press at same time Time set...
- Page 12 Basic functions Displaying and setting the mode The mode is displayed by the following symbols: Heating Ventilation (The “parking ventilation“ function is not available with upgrade of auxiliary heaters) Anzeigen Press 3x Einstellen Press at same time Symbol flashes Setting mode Press at same time Mode set...
- Page 13 Immediate funtions To switch on the heater or ventilation* system Hold the Telestart vertical and pointing upwards. press (approx. 1 second) until the following symbol appears: The signal has been received and the heater/ vehicle fan has been switched on. So you can check the switch-on, the display shows the symbol for the mode and the remaining operating time.
- Page 14 Immediate funtions NOTE: In the heating mode, the vehicle’s heating system is to be set to “warm” prior to leaving the vehicle. In the heating and ventilation modes, the vehicle fan switch is to be turned to position 1 in the case of 3-speed blower fans, and to position 2 in the case of 4-speed blowers.
- Page 15 Immediate funtions Switching off with pushbutton (fitted in the vehicle as an option) If the heater was activated by means of Telestart, the pushbutton installed in the vehicle must be pressed once for deactivation. Switching on and off with pushbutton (fitted in the vehicle as an option) The auxiliary heating system or auxiliary ventilation mode is indicated by a light in the pushbutton.
- Page 16 Immediate funtions Switching off using a digital timer If the heater was activated using Telestart, the instant heat button must be pressed twice to deactivate the heater. Checking and setting the operating time The operating time of the heater or the vehicle’s fan can be preset on the transmitter in increments of 10 minutes.
- Page 17 Immediate funtions Displaying and setting the operating time Displaying Press 4x Setting Press at same time Symbol flashes Set the operating time Press at same time Operating time set...
- Page 18 Immediate funtions Displaying the temperature (information from receiver) Press 2x symbol only appears when the heater / vehicle fan is operating. Please note: The displayed temperature refers to the temperature inside the vehicle close to the location where the temperature sensor is installed. In addition, major temperature fluctuations may result in the actual temperature at the temperature sensor only being displayed after a delay.
- Page 19 Automatic HTM heating time management Heating time management enables automatic preheating (not ventilation) of the vehicle for a selected departure time. The system calculates the preheating time of the auxiliary heating system depending on the temperature inside of the vehicle. The interior temperature achieved at the departure time can be influence using comfort levels (C1 –...
- Page 20 Automatic Displaying, setting and activating the departure time Displaying Press 2x Setting Press at same time Symbol flashes Setting the departure time Press at same time Departure time set Important: The departure time can only be activated in the departure time menu. The heater is switched on directly if you exit the menu.
- Page 21 Automatic Activation Hold the Telestart vertical and pointing upwards. Press (approx. 1 second) until the following symbol appears: The signal has been received and the departure time has been activated. Error during signal transmission. Move to a different location and retransmit.
- Page 22 Automatic Deactivating the departure time Press 2x Hold the Telestart vertical and pointing upwards Press (approx. 1 second) until the following symbol appears: The signal has been received and the departure time has been deactivated. The symbol goes out. Error during signal transmission. Move to a different location and retransmit.
- Page 23 Automatic Modifying the activated departure time To change an activated departure time, it must first be deactivated (see Deactivating the departure time). Following this, it is possible to set the new departure time (see Displaying, setting and activating the departure time).
- Page 24 Automatic Displaying and changing the comfort level Displaying Press 3x Changing Press at same time Display flashes Selecting the comfort level Press at same time Comfort level set Note: The comfort level cannot be changed if a departure time activated. The departure time must be deactivated first.
- Page 25 I tilfælde af en flersproget udgave er den tyske version gældende. Om det förekommer en flerspråkig version är den tyska bindande. Webasto AG Hvis det finnes en flerspråklig versjon, er det den tyske Kraillinger Straße 5 som har forrang. D - 82131 Stockdorf Useampikielisten versioiden yhteydessä...
Need help?
Do you have a question about the Telestart T100 HTM and is the answer not in the manual?
Questions and answers