Table of Contents
Advertisement
Quick Links
User Instructions
HEVC HD Decode System
DMD-10J
Model Name:
DOC-USR-0113-01
Manual Version 2.03
Software Version 2.03
December 21, 2016
Before attempting to connect or operate this product, please read these instructions carefully and save this manual for future use.
Copyright © 2016 Z3 Technology, LLC. All rights reserved.
This document contains proprietary and confidential information of Z3 Technology, LLC ("Z3"). This document may not be used, reproduced,
disclosed, or disseminated to anyone without the prior written approval of an authorized representative of Z3. Z3 reserves the right to change this
product at any time and without notice. All product names, trademarks, trade names, service marks, or service names mentioned in this document
are the property of their respective owners.
Z3 Technology, LLC incorporates HDMI® technology. The terms of HDMI and HDMI High-Definition Multimedia Interface, and
the HDMI Logo are trademarks or registered trademarks of HDMI Licensing LLC in the United States and other countries.
Advertisement
Table of Contents

Subscribe to Our Youtube Channel
Related Manuals for Z3 Technology DMD-10J


Summary of Contents for Z3 Technology DMD-10J
- Page 1 Copyright © 2016 Z3 Technology, LLC. All rights reserved. This document contains proprietary and confidential information of Z3 Technology, LLC ("Z3"). This document may not be used, reproduced, disclosed, or disseminated to anyone without the prior written approval of an authorized representative of Z3. Z3 reserves the right to change this product at any time and without notice.
- Page 2 DOC-USR-0113-01 REVISION HISTORY Version Date Change Note Author 2.03 12/21/2016 Original Document ___________________________________________________________________________________________...
-
Page 3: Table Of Contents
Configure Decode of RTSP Stream ................14 Configure Decode of TSRTP Stream ................14 Decoding with Pro-MPEG Forward Error Correction ............15 8.0 PERFORMING OTHER OPERATIONS WITH THE DMD-10J ............16 Saving Current Settings ................... 16 Using a Static IP Address ..................17 Making a Firmware Update .................. - Page 4 Figure 7 Saving Settings ....................16 Figure 8 Saving Updated Network Settings ................17 Figure 9 DMD-10J IP Address Shown in ZFinder ..............18 Figure 10 User Interface Using New IP Address ..............19 Figure 11 Updating the Device Firmware from the Web Interface ..........20 Figure 12 Firmware Update Screen ..................
-
Page 5: General Description
DOC-USR-0113-01 1.0 GENERAL DESCRIPTION The DMD-10J decoder is a cost-optimized, compact 137 x 117 mm system that allows HEVC/H.265 decode of HD video (up to 1080i). This solution is ideal for applications such as low-cost broadcast decoders, low-bandwidth video security, satellite uplink, remote monitoring and industrial applications. -
Page 6: Quick Start Guide
You can update the firmware via the HTTP-based user interface (GUI) by following the instructions in Section 8.3 “Making a Firmware Update” on page 20. Please Note: Actual version numbers for your DMD-10J product may differ from those pictured in this document. ___________________________________________________________________________________________... -
Page 7: Package Contents
DOC-USR-0113-01 3.0 PACKAGE CONTENTS DMD-10J 12V 2.5A Power Supply ___________________________________________________________________________________________... -
Page 8: Features
DOC-USR-0113-01 4.0 FEATURES HD resolutions up to 1920x1080 including 1080i Pro-MPEG Forward Error Correction (FEC) decode support Video Outputs: HD-SDI Supported input formats include RTSP or TSRTP 1x USB 2.0 interface for playing from local storage ... -
Page 9: Thermal Considerations
In order to operate at the specified maximum temperature of 50 C, the unit must be placed directly on a metallic rack shelf with enough ventilation to not allow heat buildup at the unit or the shelf. The shelf itself must be at or below 50 C. Do not place items between the DMD-10J unit and the shelf. ___________________________________________________________________________________________... -
Page 10: Operating Controls
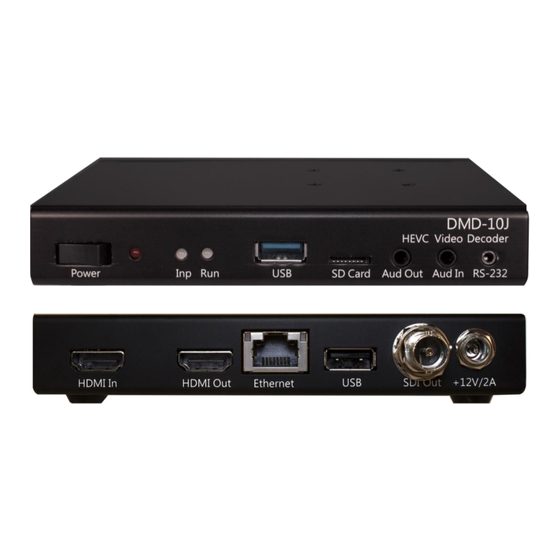
DOC-USR-0113-01 6.0 OPERATING CONTROLS 1: Power Switch 3: USB 2.0 7: RS-232 Serial 11: USB 2.0 2: Status LEDs 4: Micro SD Card* 8: HDMI Input* 12: HD-SDI Output - Input 5: Audio Output* 9: HDMI Output* 13: 12V Power - Running 6: Audio Input* 10: Gigabit Ethernet... -
Page 11: Running The Decoder
This section gives step-by-step instructions on HEVC/H.265 decoding compressed video with the DMD-10J and displaying 1080i video to a TV. In addition to the DMD-10J, a video encoder or other source for compressed content and an HD TV or monitor with SDI input are required. -
Page 12: Figure 3 Zfinder With Dmd-10J Selected
Z3 systems connected to the network. In this case, the DMD-10J appears. Click on the DMD-10J entry in the window to select it. This will cause the “Edit Device”, “Open Device” and “Flash LEDs” boxes to activate. -
Page 13: Figure 4 Dme-10J User Interface Ch1 Tab
DOC-USR-0113-01 Click on “Open Device.” An Internet browser window is opened (for best results, Firefox or Chrome are recommended) and the HTTP-based graphical user interface (GUI) appears at the CH1 tab. Figure 4 DME-10J User Interface CH1 Tab ___________________________________________________________________________________________... -
Page 14: Set Up A Video Encoder Ip Output
-View the encoded video on your PC to confirm encoder setup. Configure Decode of RTSP Stream Return to the DMD-10J user interface and, if necessary, click the “Stop” button in the “Channel Controls” section of the CH1 tab to stop any current decoding. -
Page 15: Decoding With Pro-Mpeg Forward Error Correction
Figure 6 Channel 1 Tab – TSRTP Decode Configuration Decoding with Pro-MPEG Forward Error Correction The DMD-10J supports decode of TSRTP streams with Pro-MPEG Forward Error Correction (FEC). The unit is set to automatically detect for the use of Pro-MPEG FEC by the encoded stream. -
Page 16: Performing Other Operations With The Dmd-10J
DOC-USR-0113-01 8.0 PERFORMING OTHER OPERATIONS WITH THE DMD-10J Saving Current Settings If you have a specific configuration you’d like to preserve, you can save it so that when the decoder is powered off and back on, it automatically uses those settings. -
Page 17: Using A Static Ip Address
DOC-USR-0113-01 Using a Static IP Address The decoder supports DHCP (Dynamic Host Configuration Protocol). This is enabled by default, allowing the decoder to dynamically receive an IP address at startup. The IP address that is assigned can be seen through using ZFinder. If you prefer, you can set your decoder to a static IP address. If you would like to have your PC set to a static IP address, you will need to set your decoder to a static IP address as well in order for it to be discoverable by ZFinder. -
Page 18: Figure 9 Dmd-10J Ip Address Shown In Zfinder
Run the “ZFinder” PC Utility on your Windows PC. The ZFinder window appears. ZFinder completes a scan of the network and lists the location of all Z3 systems connected to the network. The DMD-10J appears with your manually entered IP address. New IP address Figure 9 DMD-10J IP Address Shown in ZFinder Select the DMD-10J and click “Open Device.”... -
Page 19: Figure 10 User Interface Using New Ip Address
DOC-USR-0113-01 A web browser will then open at the IP address of the DMD-10J and you will see the user interface. New IP address Figure 10 User Interface Using New IP Address You can return to the use of DHCP by checking the “Use DHCP” checkbox in the System Setup tab and saving that to the preset. -
Page 20: Making A Firmware Update
DOC-USR-0113-01 Making a Firmware Update The DMD-10J supports updating of firmware through the user interface. You will need an update image file. (1) Access the user interface and return to the System Setup tab. (2) Click the “Update device firmware” button. -
Page 21: Figure 13 Firmware Update In Progress
DOC-USR-0113-01 Figure 13 Firmware Update In Progress (7) Your decoder is now updated. ___________________________________________________________________________________________... -
Page 22: Setting A Password
DOC-USR-0113-01 Setting a Password The DMD-10J supports the assignment of a password to restrict access to the user interface. Note: Once a password has been set, it can be changed, but the requirement of a password cannot be undone. In the System Setup tab, click on the “go” button next to “Set Password”. -
Page 23: Summary Of Options
DOC-USR-0113-01 9.0 SUMMARY OF OPTIONS This section lists the different options that are available in the various menus and tabs for configuration of your decoder. The System Setup Tab Parameter Options (default in bold) Notes Local IP Setup Sets the IP address of the unit. Note that a “save” Local IP Address 192.168.x.y (192.168.0.120) of these settings and a reboot is needed for... - Page 24 DOC-USR-0113-01 Device Management Sets a custom name for the camera to appear in Set Device Name the user interface. Button Sets a password to limit access to the user Set Password Button interface. Click this button to access Simple Network Time Set SNTP Button Protocol (SNTP) configuration options.
- Page 25 DOC-USR-0113-01 Enable/Disable Temperature Recovery Trap. Will Enable True send trap to Trap Hosts when decoder returns to Temperature False nominal operating temperature. Recovery Trap Suppresses Abnormal Temperature Trap such that at Abnormal (30) most one trap will be sent per Host every X Seconds Temperature Trap Suppression Suppresses Temperature Recovery Trap such that at...
-
Page 26: The Ch1 Tab
DOC-USR-0113-01 The CH1 Tab Parameter Options (default in bold) Notes Input Selection Input Interface RTSP Output format for the video stream to be received. TSRTP Server IP 10.1.10.237/z3-1.sdp Enter the IP address of the encoder that is the source of the RTSP stream followed by “/z3-1.sdp” (RTSP Only) Is Multicast Checked... -
Page 27: Values Appearing At The Bottom Of All Tabs
DOC-USR-0113-01 Values Appearing at the Bottom of All Tabs Parameter Options (default in bold) Notes Save Click on this to save selected values to the current preset. system status: ___________________________________________________________________________________________... -
Page 28: Appendix A: Troubleshooting
System Setup tab to capture logs of any issue you’d like to report and send the resulting file to Z3 Technology. Z3 Technology’s Express Limited Warranty will be void if the label on the hardware bearing the Serial Number is removed, tampered with or defaced. You can view Z3 Technology’s full hardware warranty at http://z3technology.com/Support/ZEUS-HW-Warranty.html.
Need help?
Do you have a question about the DMD-10J and is the answer not in the manual?
Questions and answers