
Subscribe to Our Youtube Channel
Related Manuals for Seafloor EchoBoat-240


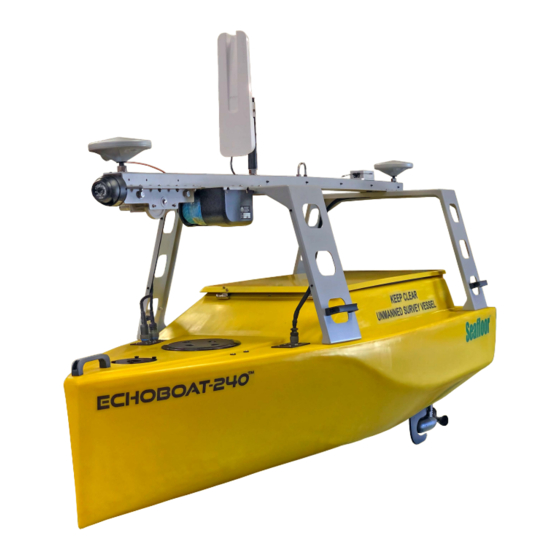
Summary of Contents for Seafloor EchoBoat-240
- Page 1 Seafloor EchoBoat-240 Uncrewed Survey Vessel User Manual Page 1 Seafloor Systems, Inc. | info@seafloor.com | +1(530) 677-1019...
-
Page 2: Table Of Contents
Prelaunch Information ............EchoBoat-240 Setup/Operations 17 ............Remote Overview 19............USB Voltmeter 21 ............Mission Planner 26 ............HYPACK ............SmartCast ............Remote Pairing ............Remote Calibration ............AutoNav Calibration ............ESC Calibration ............Warranty Information ............Change of Record Page 2 Seafloor Systems, Inc. | info@seafloor.com | +1(530) 677-1019... - Page 3 EchoBoat-240 Uncrewed Survey Vessel Thank you for your recent purchase of the Seafloor EchoBoat-240 Uncrewed Survey Vessel or “USV”. EchoBoat-240™ allows users to integrate robust equipment payloads and obtain professional-grade survey results remotely. It is ideal for launching from a trailer or cart in areas where a manned boat is not feasible.
- Page 4 When powering on the EchoBoat-240, always turn on the remote control unit before powering on the boat. Failure to do so could cause the receiver on the boat to not detect a controller signal, and unexpectedly enter a fail-safe mode.
-
Page 5: Maintenance
IMPORTANT EchoBoat-240 Limitations To limit potential damage to the EchoBoat-240, Seafloor Systems doesn't recommend using the USV in the following conditions. • Above Sea State 3 • Operational Air Temperature Range: 14 – 113F (-10 – 45C) Batteries • Operational Water Temp Range: 28.4 – 96.8F (-2 – 36C) T50 Transducers •... - Page 6 • Full freshwater wash down. Do NOT directly spray main hatch seal. Do NOT pressure wash sonar components. • Dry out and let air out with hatches open, if able. • Re-wind SmartCast rope Seafloor Systems, Inc. | info@seafloor.com | +1(530) 677-1019 Page 6...
-
Page 7: Battery Safety
Although Power 24-3500 is protected against high compensating currents, we urge you to have interconnection of multiple Power 3500 batteries performed by specialized staff. Seafloor Systems, Inc. | info@seafloor.com | +1(530) 677-1019 Page 7... - Page 8 In the following, please find a selection of the most important instructions for operation of Power 24-3500 battery. Beside these, please also observe complete operating manual to prevent any damage to the battery Seafloor Systems, Inc. | info@seafloor.com | +1(530) 677-1019 Page 8...
- Page 9 Please find type plate exhibiting complete product description at the spot shown in the figure. Date of inspection or disposal Serial Number Battery identification code (stored in the battery electronics) Seafloor Systems, Inc. | info@seafloor.com | +1(530) 677-1019 Page 9...
- Page 10 For larger battery banks refer to Torqeedo Max. quick charge 100 A Charging time < 1.2 hours Protection class IP 67 Waterproof, can be submerged up to 1 meter for 30 minutes without damage Seafloor Systems, Inc. | info@seafloor.com | +1(530) 677-1019 Page 10...
- Page 11 This is not a malfunction. As soon as values are again within given range, battery may be turned on again. It will then be fully operable again. Seafloor Systems, Inc. | info@seafloor.com | +1(530) 677-1019 Page 11...
- Page 12 • Only plug charger into wall socket after it has been connected to battery. • Observe instructions in charger operating manual. In case of excess heating of battery or charger (for instance due to exposure to the sun), charging time may increase. Seafloor Systems, Inc. | info@seafloor.com | +1(530) 677-1019 Page 12...
- Page 13 Charging operation for batteries connected in parallel Torqeedo recommends use of one charger per battery. However, one charger may be used for two batteries connected in parallel. Charging time will be twice as long. Seafloor Systems, Inc. | info@seafloor.com | +1(530) 677-1019 Page 13...
- Page 14 (Winch Knob center), auto switch is set to Disarm and hold arming safety switch Manual and arming is set to Disarm. for 3 seconds. The AutoNav will chime when disarmed. Page 14 Seafloor Systems, Inc. | info@seafloor.com | +1(530) 677-1019...
- Page 15 Optional Long Range Module Install R9M with antenna on the back side of the remote. Plug in external 2s battery to the R9M. Seafloor Systems, Inc. | info@seafloor.com | +1(530) 677-1019 Page 15...
- Page 16 When the EchoBoat-240 is traveling away from you it will respond to control signals as expected. When the EchoBoat-240 is inbound (traveling toward you) the controls will be the same but can cause confusion.
-
Page 17: Echoboat-240 Setup/Operations
Remote Desktop connection and software initialization (Dry) Connect to on-board PC with host PC/laptop using Remote Desktop Configure host PC/laptop network properties as follows: Internet Protocol Version 4 (TCP/IPv4) IP Address: 192.168.1.4 Subnet Mask: 255.255.255.0 Seafloor Systems, Inc. | info@seafloor.com | +1(530) 677-1019 Page... - Page 18 VII. Turn off T50 transmit power before removing from water. Once secured on trailer turn off T50-R Power off EchoBoat-240 by holding Torqeedo Power button until red LED ring lights up Turn off transmitter Seafloor Systems, Inc. | info@seafloor.com | +1(530) 677-1019...
-
Page 19: Usb Voltmeter
3. Navigate to “Ports (COM & LPT)” and look for a COM port labeled “USB Serial Device”. Enter this number into the USB Voltmeter program in the bottom left of the box. Seafloor Systems, Inc. | info@seafloor.com | +1(530) 677-1019 Page 19... - Page 20 Flight Plan 1. Click FLIGHT PLAN in Mission Planner on the control bar. 2. Find your survey area on the satellite map. Seafloor Systems, Inc. | info@seafloor.com | +1(530) 677-1019 Page 20...
- Page 21 Polygon that is circled on the top far left. Click to enable, click again to disable) a. Click Add Polygon (click OK through prompt) b. Draw your survey area Seafloor Systems, Inc. | info@seafloor.com | +1(530) 677-1019 Page 21...
- Page 22 Click Auto WP Click SimpleGrid c. Under subcategory “Display”, uncheck boxes for Internals and Markers (while this is not a necessary step, it helps to keep the grid space visuals cleaner). Seafloor Systems, Inc. | info@seafloor.com | +1(530) 677-1019 Page 22...
- Page 23 Under subcategory “Simple Options”, adjust the parameters for “Angle [deg]” that you wish to survey. e. Under subcategory “Simple Options”, adjust the parameters for “Distance Between Lines [m]” to suit the needs of your survey. Seafloor Systems, Inc. | info@seafloor.com | +1(530) 677-1019 Page 23...
- Page 24 To initiate the mission, flip the top left switch on the Taranis. Hydrone or EchoBoat will start on its mission shortly after switching from Manual to Auto mode on the Taranis remote. “Write WPs” alone will NOT start the mission. Seafloor Systems, Inc. | info@seafloor.com | +1(530) 677-1019 Page 24...
-
Page 25: Hypack
Open Computer Device Manager to find COM Port number of AutoNav USB • Open Hypack Hardware Setup and add MavLink driver on your mobile device • • Set MavLink connection to serial port number in Device Manager and 115200 Baud Rate Seafloor Systems, Inc. | info@seafloor.com | +1(530) 677-1019 Page 25... - Page 26 Create your line plan using Hypack’s standard Line Plane Editor • Select every other line and reverse the direction • Seafloor Systems, Inc. | info@seafloor.com | +1(530) 677-1019 Page 26...
- Page 27 Start Hypack/Hysweep Survey • MavLink Driver will say Armed • Seafloor Systems, Inc. | info@seafloor.com | +1(530) 677-1019 Page 27...
- Page 28 Make sure the boat has an unobstructed path if using this function o The bottom of the MavLink driver window should say “Flight mode set successfully” whenever one of the buttons are clicked Seafloor Systems, Inc. | info@seafloor.com | +1(530) 677-1019 Page 28...
-
Page 29: Smartcast
Smartcast Quickstart Button Labels Seafloor Systems, Inc. | info@seafloor.com | +1(530) 677-1019 Page 29... - Page 30 Set the COM port from the drop-down menu and set the baud rate using the arrows, only the value 57600 is available. Step 4 Click “Connect SmartCast”, the display should look like the one below if everything was done right. Seafloor Systems, Inc. | info@seafloor.com | +1(530) 677-1019 Page 30...
- Page 31 00, the device can be armed to reset that value to 0.00 for more accurate and measurable c asts. The system can be disarmed by again clicking on the arming buZon. Seafloor Systems, Inc. | info@seafloor.com | +1(530) 677-1019 Page 31...
- Page 32 Dme. A[er this the system will disarm itself. If the sensor hits the boZom of the body of water before the desired depth is reached the cast will stop prematurely and return to the home posiDon. Seafloor Systems, Inc. | info@seafloor.com | +1(530) 677-1019 Page 32...
- Page 33 Use a combinaDon of RC control and maneuvering the boat to try and free the sensor. Once the sensor is free the “Clear Error” buZon can be used to clear the conDnuous error and allow the system to be armed again. Seafloor Systems, Inc. | info@seafloor.com | +1(530) 677-1019 Page 33...
- Page 34 Tangled lines can result the direction of motion to be reverse or large amounts of line being released at once, both of which can stop the SmartCast from functioning properly. Seafloor Systems, Inc. | info@seafloor.com | +1(530) 677-1019 Page 34...
- Page 35 User Flow Chart Seafloor Systems, Inc. | info@seafloor.com | +1(530) 677-1019 Page 35...
-
Page 36: Remote Pairing
ESC. The left side will be plugged into channel 1 the right side will be channel 2. To bind the process must be started on the right pontoon. Seafloor Systems, Inc. | info@seafloor.com | +1(530) 677-1019 Page 36... - Page 37 “Reciever1” on the remote and select it using the knob. (Note: The right pontoon uses “Reciever1” while the left will use “Reciever2”) A page will pop up indicating the remote is waiting to see the receiver. Seafloor Systems, Inc. | info@seafloor.com | +1(530) 677-1019 Page 37...
-
Page 38: Warranty Information
There is one important note, when binding the second receiver, the “Receiver2” option is used. WARRANTY INFORMATION For warranty information, visit https://www.seafloorsystems.com/terms-and-conditions 4415 Commodity Way, Shingle Springs, CA, 95682 • 530-677-1019 https://www.seafloorsystems.com/ Seafloor Systems, Inc. | info@seafloor.com | +1(530) 677-1019 Page 38... - Page 39 6. Move the sticks along each extreme top, bottom, left, and right. During this step the knobs should be turned to their extremes as well. Finally press the silver button to confirm 7. Your transmitter should now be properly calibrated Page 39 Seafloor Systems, Inc. | info@seafloor.com | +1(530) 677-1019...
- Page 40 2. First, press the button in the top left of the program labeled “SETUP” 3. Next press “Mandatory Hardware” 4. Next click “Radio Calibration”, once on the page click the button labeled “Calibrate Radio” Page 40 Seafloor Systems, Inc. | info@seafloor.com | +1(530) 677-1019...
- Page 41 The extreme positions will be marked with red lines on each of the indicator bars. When confident that all sticks have been moved, finish by clicking “Click when Done” Page Seafloor Systems, Inc. | info@seafloor.com | +1(530) 677-1019...
- Page 42 7. A final dialogue box will appear, center all the sticks and switches, and then click “OK”. 8. You are now done with radio calibration. Page Seafloor Systems, Inc. | info@seafloor.com | +1(530) 677-1019...
- Page 43 7. Release throttle after the ESC emits two beeps 8. ESC will finalize calibration with tones 9. Turn off Port switch Repeat with Starboard switch Turn on both switches Seafloor Systems, Inc. | info@seafloor.com | +1(530) 677-1019 Page 43 Page...
- Page 44 Seafloor Systems, Inc. makes every effort to ensure its products meet the highest quality, reli- ability and durability standards and warrants to the original purchaser or purchasing agency that each EchoBoat-240 be free from defects in materials or workmanship for a period of one year from date of shipment.
-
Page 45: Change Of Record
Change of Record 9-14-2022 Creation Date (v1.0) 9-21-2022 Updated Images (v1.1) Seafloor Systems, Inc. | info@seafloor.com | +1(530) 677-1019 Page 45...
Need help?
Do you have a question about the EchoBoat-240 and is the answer not in the manual?
Questions and answers