
Related Manuals for Seafloor EchoBoat 160 ASV


Summary of Contents for Seafloor EchoBoat 160 ASV
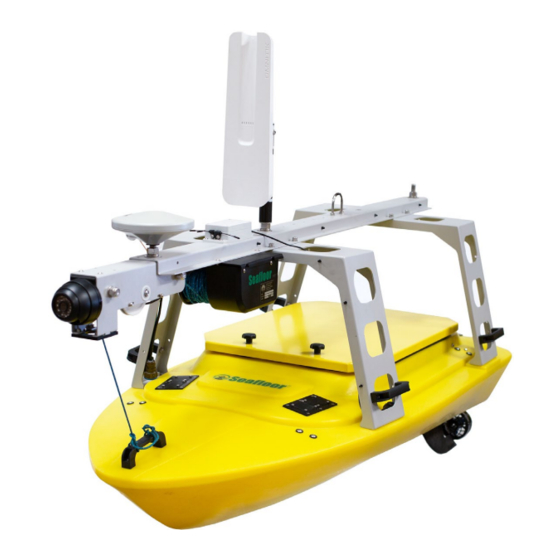
- Page 1 Seafloor EchoBoat 160 Model # ASV/RCV Uncrewed Survey Vessel Horseshoe Bay, San Francisco, CA, USA Seafloor Systems, Inc. | info@seafloor.com | +1(530) 677-1019 Page 1...
-
Page 2: Table Of Contents
Mission Planning....................19 Hypack.........................25 SmartCast........................29 Troubleshooting................36 Remote Pairing......................36 Remote Calibration....................38 AutoNav Calibration.....................39 ESC Programing Card Information...............42 Speed Controller Calibration................44 Thruster Maintenance..................46 Change of Record................51 Page 2 Seafloor Systems, Inc. | info@seafloor.com | +1(530) 677-1019... - Page 3 They meet all relevant requirements of all product safety directives applicable to that product. All equipment sold is new. John Tamplin (Seafloor Systems President) Page 3 Seafloor Systems, Inc. | info@seafloor.com | +1(530) 677-1019...
-
Page 4: Introduction
Model # ASV/RCV Uncrewed Survey Vessel Thank you for your recent purchase of the Seafloor EchoBoat Uncrewed Surface Vessel or “USV”. It was designed specifically to allow the hydrographic surveyor to tackle hydrographic surveys reliably and effectively in shallow waters or difficult to reach areas when conventional survey boats are not an option. -
Page 5: Safety And Specifications
Remote Control Unit ........2.4 GHz Remote Antenna ..........Directional Remote Range ..........Up to 2km GPS ..............Customer specified Communications ..........5Ghz Depth Sounder Transducer ......Through hull mount Seafloor Systems, Inc. | info@seafloor.com | +1(530) 677-1019 Page 5... -
Page 6: Warranty Information
EchoBoat 160 G5 Warranty Seafloor Systems, Inc. makes every effort to assure its products meet the highest quality, reliability and durability standards and warrants to the original purchaser or purchasing agency that each EchoBoat be free from defects in materials or workmanship for a period of one year from date of shipment. -
Page 7: Battery Safety
Never leave LiPo battery packs in an automobile. Temperatures within a vehicle can quickly reach unsafe levels. Always keep a class D chemical fire extinguisher nearby, in case of fire when storing, handling, charging, or using LiPo battery packs. Seafloor Systems, Inc. | info@seafloor.com | +1(530) 677-1019 Page 7... - Page 8 Always charge batteries in a LiPo safety sack or other fireproof container (not included). Do not charge any type of battery on or near any flammable materials including in or near your model. Seafloor Systems, Inc. | info@seafloor.com | +1(530) 677-1019 Page 8...
-
Page 9: Charging
***********ALL BATTERIES MUST HAVE SAME LEVEL OF CHARGE, EACH CELL IN EACH BATTERY MUST BE WITHIN 10%, AND THEY SHOULD REMAIN ABOVE 3.2V AND BELOW 4.2V PER CELL******* Seafloor Systems, Inc. | info@seafloor.com | +1(530) 677-1019 Page 9... -
Page 10: Remote Control
(Winch Knob center), auto switch is set to Disarm and hold arming safety switch Manual and arming is set to Disarm. for 3 seconds. The AutoNav will chime when disarmed. Seafloor Systems, Inc. | info@seafloor.com | +1(530) 677-1019 Page 10... - Page 11 • You should have control of the throttle motors now. Optional Long Range Module • Install R9M with antenna on the back side of the remote. • Plug in external 2s battery to the R9M. Seafloor Systems, Inc. | info@seafloor.com | +1(530) 677-1019 Page 11...
-
Page 12: Operation
• Turn to starboard: Slowly push throttle joystick on remote control unit forward and to the right. The starboard motor will provide reverse thrust and the port motor will provide forward thrust. Seafloor Systems, Inc. | info@seafloor.com | +1(530) 677-1019 Page 12... -
Page 13: Launching And Retrieving
• NOTE – Leaving the LiPo batteries at too high or too low of a state of charge for extended periods of time will cause irreversible damage to the batteries. Seafloor Systems, Inc. | info@seafloor.com | +1(530) 677-1019 Page 13... -
Page 14: Quickstarts
(forward, reverse, left, right) Open Mission Planner Connect to the AutoNav using the correct Com port and 115200 baud rate Verify the AutoNav has GPS Launch Seafloor Systems, Inc. | info@seafloor.com | +1(530) 677-1019 Page 14... - Page 15 Items to Keep in Kit These items are not provided by Seafloor as they vary based upon the user’s smart antenna specifications. 1. Null Modem 2. Serial Gender Changer Seafloor Systems, Inc. | info@seafloor.com | +1(530) 677-1019 Page 15...
-
Page 16: Connection
Then, plug the POE ethernet adapter into the computer being used to remote into the AutoNav Plus. Now, setup the base computers network settings following the steps below: 1. Open Control Panel (Figure 2). Figure 2 Seafloor Systems, Inc. | info@seafloor.com | +1(530) 677-1019 Page 16... - Page 17 2. Open “Network and Internet” (Figure 3). Figure 3 3. Right Click on the ethernet port with the description “Unidentified network” and select “properties” (Figure 3). Figure 4 Seafloor Systems, Inc. | info@seafloor.com | +1(530) 677-1019 Page 17...
- Page 18 8. Type in the IP address: 192.168.1.8 as shown in Figure 6 Figure 6 9. Make sure the Username to log in is “EchoBoat” 10. The password is “Seafloor” with a capital S. Seafloor Systems, Inc. | info@seafloor.com | +1(530) 677-1019 Page 18...
-
Page 19: Mission Planning
Flight Plan 1. Click FLIGHT PLAN in Mission Planner on the control bar. 2. Find your survey area on the satellite map. Seafloor Systems, Inc. | info@seafloor.com | +1(530) 677-1019 Page 19... - Page 20 3. Right click Draw Polygon (Newer versions of Mission Planner have removed it and is now the Polygon that is circled on the top far left. Click to enable, click again to disable) a. Click Add Polygon (click OK through prompt) b. Draw your survey area Seafloor Systems, Inc. | info@seafloor.com | +1(530) 677-1019 Page 20...
- Page 21 Click Auto WP SimpleGrid b. Click c. Under subcategory “Display”, uncheck boxes for Internals and Markers (while this is not a necessary step, it helps to keep the grid space visuals cleaner). Seafloor Systems, Inc. | info@seafloor.com | +1(530) 677-1019 Page 21...
- Page 22 Under subcategory “Simple Options”, adjust the parameters for “Angle [deg]” that you wish to survey. e. Under subcategory “Simple Options”, adjust the parameters for “Distance Between Lines [m]” to suit the needs of your survey. Seafloor Systems, Inc. | info@seafloor.com | +1(530) 677-1019 Page 22...
- Page 23 To initiate the mission, flip the Auto switch on the Taranis. ii. EchoBoat will start on its mission shortly after switching from Manual to Auto mode on the Taranis remote. “Write WPs” alone will NOT start the mission. Seafloor Systems, Inc. | info@seafloor.com | +1(530) 677-1019 Page 23...
- Page 24 Flight Data. Below the HUD, click on Action Tab. Click RTL (Return to Launch) Be AWARE, it WILL head directly to the location where it was first armed. If there are objects in the way or it was armed on shore, the boat may run aground. Seafloor Systems, Inc. | info@seafloor.com | +1(530) 677-1019 Page 24...
-
Page 25: Hypack
Set MavLink connection to COM number in Device Manager and 115200 Baud Rate • Create your line plan using Hypack’s standard Line Plane Editor • • Select every other line and reverse the direction Seafloor Systems, Inc. | info@seafloor.com | +1(530) 677-1019 Page 25... - Page 26 -- " · □ ::: : � o(ml--- � �' -� � 000 y <) • t============:= � � 18000 Y � ,: o ■ • lo> • ··" 1;1 Seafloor Systems, Inc. | info@seafloor.com | +1(530) 677-1019 Page 26...
- Page 27 Start Hypack/Hysweep Survey • • MavLink Driver will say Armed Seafloor Systems, Inc. | info@seafloor.com | +1(530) 677-1019 Page 27...
- Page 28 Make sure the boat has an unobstructed path if using this function o The bottom of the MavLink driver window should say “Flight mode set successfully” whenever one of the buttons is clicked Seafloor Systems, Inc. | info@seafloor.com | +1(530) 677-1019 Page 28...
-
Page 29: Smartcast
Smartcast Quickstart Button Labels Seafloor Systems, Inc. | info@seafloor.com | +1(530) 677-1019 Page 29... - Page 30 Set the COM port from the drop-down menu and set the baud rate using the arrows, only the value 57600 is available. Step 4 Click “Connect SmartCast”, the display should look like the one below if everything was done right. Seafloor Systems, Inc. | info@seafloor.com | +1(530) 677-1019 Page 30...
- Page 31 If the sensor is at the home posiDon but the on-screen display shows something different than 0.00, the device can be armed to reset that value to 0.00 for more accurate and measurable casts. The system can be disarmed by again clicking on the arming buZon. Seafloor Systems, Inc. | info@seafloor.com | +1(530) 677-1019 Page 31...
- Page 32 Dme. A[er this the system will disarm itself. If the sensor hits the boZom of the body of water before the desired depth is reached the cast will stop prematurely and return to the home posiDon. Seafloor Systems, Inc. | info@seafloor.com | +1(530) 677-1019 Page 32...
- Page 33 Use a combinaDon of RC control and maneuvering the boat to try and free the sensor. Once the sensor is free the “Clear Error” buZon can be used to clear the conDnuous error and allow the system to be armed again. Seafloor Systems, Inc. | info@seafloor.com | +1(530) 677-1019 Page 33...
- Page 34 Tangled lines can result in the direcDon of moDon to be reversed or large a mounts of line being released at once, both of which can stop the SmartCast from funcDoning properly. Seafloor Systems, Inc. | info@seafloor.com | +1(530) 677-1019 Page 34...
- Page 35 User Flow Chart Seafloor Systems, Inc. | info@seafloor.com | +1(530) 677-1019 Page 35...
-
Page 36: Troubleshooting
• Once there, press on the center of the knob one time and a new menu will pop up. Find the RX8R and R9 receiver in the boat (top of mast in white box. Seafloor Systems, Inc. | info@seafloor.com | +1(530) 677-1019 Page 36... - Page 37 • Turn the EchoBoat on and the page will change, when prompted select the RX8R or R9 option. • With that done the pairing is now complete and there will be a solid green light on the receiver. Seafloor Systems, Inc. | info@seafloor.com | +1(530) 677-1019 Page 37...
-
Page 38: Remote Calibration
6. Move the sticks and points along each extreme top, bottom, left, and right. During this step the knobs should be turned to their extremes as well. Finally press the silver button to confirm 7. Your transmitter should now be properly calibrated Seafloor Systems, Inc. | info@seafloor.com | +1(530) 677-1019 Page 38... -
Page 39: Autonav Calibration
2. Press the button in the top left of the program labeled “SETUP” 3. Next press “Mandatory Hardware” 4. Next click “Radio Calibration”, once on the page click the button labeled “Calibrate Radio” Seafloor Systems, Inc. | info@seafloor.com | +1(530) 677-1019 Page 39... - Page 40 The extreme positions will be marked with red lines on each of the indicator bars. When confident that all sticks have been moved, finish by clicking “Click when Done” Seafloor Systems, Inc. | info@seafloor.com | +1(530) 677-1019 Page 40...
- Page 41 7. A final dialogue box will appear, center all the sticks and switches, and then click “OK”. 8. You are now done with radio calibration. Seafloor Systems, Inc. | info@seafloor.com | +1(530) 677-1019 Page 41...
-
Page 42: Esc Programing Card Information
Ensure the boat has power and plug the programming card into the port on the ESC. The programming card will start up as soon as you turn the boat on. Seafloor Systems, Inc. | info@seafloor.com | +1(530) 677-1019 Page 42... - Page 43 Next, program the ESC using the charts below. This is a chart of the ESCs settings, highlighted are the ones we use. Programming for ESC (highlighted are default) EchoBoat Default settings: 10:1 11:1 12:1 Seafloor Systems, Inc. | info@seafloor.com | +1(530) 677-1019 Page 43...
-
Page 44: Speed Controller Calibration
Must not hold the set button longer than 3 seconds, otherwise it will go into programming mode. Turn off the ESC and try again. Keep throttle in the neutral position. Push set button. Push throttle into full forward position. Push set button. Seafloor Systems, Inc. | info@seafloor.com | +1(530) 677-1019 Page 44... - Page 45 Push throttle into full reverse position. Push set button. Once the tones finish, turn off the ESC and repeat for the other side. Seafloor Systems, Inc. | info@seafloor.com | +1(530) 677-1019 Page 45...
-
Page 46: Thruster Maintenance
Step 1 Step 2 With socket or end wrench remove the Clean thrusters periodically to prolonging nuts on thruster plate that are on either side thruster life. of the thruster. Seafloor Systems, Inc. | info@seafloor.com | +1(530) 677-1019 Page 46... - Page 47 Remove the four #2 Phillips screws along the outer edge of the thruster. Step 5 Step 6 Remove the 2mm allen screw that holds the Pull the base and propeller out of the nozzle propeller to the motor assembly. and tail cone. Seafloor Systems, Inc. | info@seafloor.com | +1(530) 677-1019 Page 47...
- Page 48 A paperclip or small Allen key works for cleaning it out. Alternatively, you can remove the set screw and pull the two pieces apart for better access. Seafloor Systems, Inc. | info@seafloor.com | +1(530) 677-1019 Page 48...
- Page 49 Plug wires back into wiring harness and tighten compression fitting. Step 11 Reverse these steps to reassemble thruster. Apply loctite to the bolts. Seafloor Systems, Inc. | info@seafloor.com | +1(530) 677-1019 Page 49...
- Page 50 General Warranty Policies Seafloor Systems Inc warrants all products to be free of material and workmanship defects for a period of 365 days from date of purchase for all electronic components and 365 days for all non- electronic components. If a component is defective or was not correctly made, Seafloor Systems Inc will, at its sole discretion, repair or replace the item free of charge.
-
Page 51: Change Of Record
Change of Record 11-9-2022 Creation Date (v1.0) Seafloor Systems, Inc. | info@seafloor.com | +1(530) 677-1019 Page 51...
Need help?
Do you have a question about the EchoBoat 160 ASV and is the answer not in the manual?
Questions and answers