Table of Contents
Advertisement
Quick Links
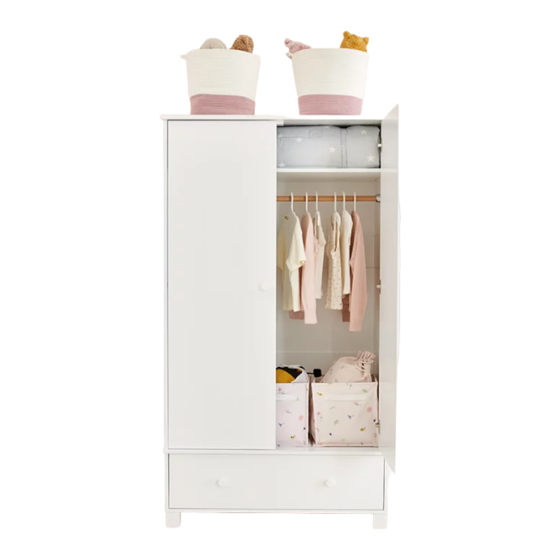
Lulworth Wardobe
Assembly Difficulty
easy
- medium
- hard
two-person job
Thank you for shopping with GLTC, we hope you enjoy
having this product in your home.
We know assembling furniture, toys or accessories is not everyone's
favourite way to spend their time, so we've tried to make assembling
this item as quick and painless as possible.
A few important pointers before you start:
•
Please read the instructions right through before you start, and
check that all the components have been included in the pack;
we find separating all the hardware into piles makes it easier to
be sure that everything is present and correct.
•
Make sure you have the right tools. Allen keys are provided
if required, but screw drivers and other tools are not. You'll
find details of the tools you need at the beginning of the
instructions.
•
It's a good idea to build the unit in the room where you are
going to be using it, to avoid the need to move it after it's been
assembled.
•
Do not throw away any packing materials until assembly is
complete, just in case you accidentally discard smaller parts or
hardware.
V1
12/07/2021
1
Advertisement
Table of Contents

Related Manuals for Great Little Trading Lulworth


Summary of Contents for Great Little Trading Lulworth
- Page 1 We know assembling furniture, toys or accessories is not everyone’s favourite way to spend their time, so we’ve tried to make assembling this item as quick and painless as possible. Lulworth Wardobe A few important pointers before you start: •...
-
Page 2: Safety Warnings
Safety Warnings: Customer Service: • IMPORTANT: PLEASE RETAIN THESE INSTRUCTIONS FOR FUTURE REFERENCE. • If you find that any components are missing or damaged, please do • Adult assembly required. not begin assembly and do not use the item. Please contact GLTC Customer Services on 0344 848 6000 immediately. -
Page 3: Component Checklist
Component Check List Component Check List 1x Upper LH Side Panel 1x Upper RH Side Panel 1x Drawer Front Panel 1x RH Drawer Side Panel 2x Back Rails 1x Top Panel 1x Drawer Back Panel 1x Drawer Base Panel 1x Mid Panel 1x LH Lower Side Panel 1x Hanging Rail 1x Left Door... -
Page 4: Hardware Check List
Hardware Check List Hardware Check List 4 x Screws 1x LH ‘L-Shaped’ Runner 24x Cam Dowels 24 x Cam Locks (25mmL) 2x Rail Mount Plates Note: These plates may come 20x Wooden Dowels 2x Collars 6x Hinge Base Plates connected to Part #15, please unscrew to separate. - Page 5 STEP 1: Hardware for Step 2: FRONT Firstly, decide on the desired height of the hanging rail. There are three positions to choose from. The illustration shows the use of 6x #1 Cam Dowels the recommended middle position that gives you the use of the rail and also allows you to use the shelf (see later step).
- Page 6 STEP 5: Hardware for Step 5: Prepare panel (E) by inserting 6x cam dowels (#1) as Hardware for Step 4: shown. Please note the correct position of this hardware - there are 6x #1 Cam Dowels Using Cam Locks: more drill holes here that will be used on the next stages. When inserting into the panel, ensure that each 6x #2 Cam Locks cam lock’s arrow is pointing towards the drill hole...
- Page 7 STEP 6: STEP 7: Hardware for Step 6: Insert 4x wooden dowels (#4) into the ends of panels (A Attach LH flat runner (#10) to panel (F) and RH flat runner (#11) to panel & B) as shown and then connect panel (E) to these ends. (G) as shown ensuring that you are positioning the x6 screws (#8) through 4x #4 Wooden Dowels Ensure that the grooved edge of panel (E) is facing the...
- Page 8 STEP 8: STEP 9: Hardware for Step 8: Hardware for Step 9: Insert 4x wooden dowels (#4) into the remaining Insert 4x wooden dowels (#4) into the ends of holes on panel (E) and connect side panels (F) panels (F & G) as shown and then 6x slotted and (G) as shown ensuring that the wheel of the barrel nuts (#22) into the holes on the sides of 4x #4 Wooden Dowels...
- Page 9 STEP 11: STEP 10: Hardware for Step 11: Hardware for Step 10: Place back panels (I), (J) and (K) onto the Note: Two people are needed to complete grooved edge on the back of the unit as the next step safely. shown, ensuring that the holes in the panels Carefully turn the unit over so the back is 26x #9 Screws (16mmL)
- Page 10 STEP 12: Create the Drawer. STEP 13: Hardware for Step 12: Hardware for Step 13: Prepare drawer front panel (N) by inserting Attach LH ‘L-shaped’ runner (#13) to 4x cam dowels (#1) as shown and attach 2x drawer side panel (L) as shown with 3x handles (#20) with 2x bolts (#19).
- Page 11 STEP 14: STEP 15: Create the drawer by attaching side panels (L & M) to the drawer back Slide the drawer into the wardrobe. panel (O) using 4x screws (#14). Insert the hanging rail. The runners are to be on the outside of the drawer frame with the wheels of Thread the two collars (#15) onto the rail making sure the threaded the runners at the back of the drawer and the grooves need to align on the ends are facing away from each other and towards each end of the rail...
- Page 12 STEP 16: STEP 17: Hardware for Step 16: Hardware for Step 17: Insert 2x pegs (#23) into the holes on Fitting the hinges. EACH side panel (above the hanging rail) Attach the 3x hinge base plates (#16) to and place the adjustable panel (U) on top 12x #7 Screws (4mm x 12mmL) EACH of the side panels (A &...
- Page 13 STEP 19: STEP 18: Hardware for Step 18: Attaching the doors. Attach 3x hinges (#17) to the back of the LH door (R) using 6x screws (#7) Ensure that all the hinges are in the open position (as shown) on the as shown.
- Page 14 STEP 20: STEP 21: Repeat step 19 for the LH door (R). Before you use your unit, we strongly advise that you attach the anti-tip kit included to the wardrobe to secure this product to your wall. Once all hinges are installed on both doors, you can check the alignment of the door and adjust as required.
- Page 15 When correct position is achieved, repeat with the second door. When in the corrected position, re-tighten the screws. Repeat with the second door. Copyright© 2021 G.L.T.C. Ltd. All rights reserved. Great Little Trading Company and GLTC are registered trade marks of G.L.T.C. Limited.
Need help?
Do you have a question about the Lulworth and is the answer not in the manual?
Questions and answers