Intel Galileo Board Getting Started Manual
Hide thumbs
Also See for Galileo Board:
- Hardware manual (34 pages) ,
- Tutorial manual (32 pages) ,
- User manual (19 pages)
Advertisement
Quick Links
Advertisement

Subscribe to Our Youtube Channel
Related Manuals for Intel Galileo Board


Summary of Contents for Intel Galileo Board
- Page 1 ® Intel Galileo Board Getting Started Guide 04 October 2013 Order Number: 329685-002US...
- Page 2 Note: This release uses a special version of the Arduino IDE. The first thing you must do is download it from the Intel website below and update the SPI flash on the board. The basic steps you will follow are: 1.
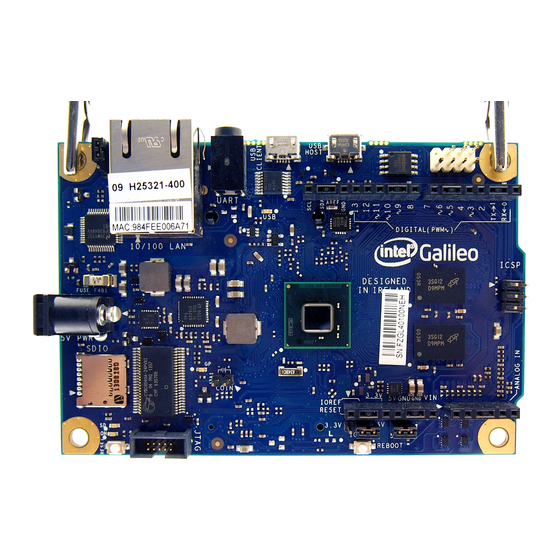
- Page 3 ® Intel Galileo Board Getting Started Guide ® Intel Galileo Board Note: The I/O headers are identical to the Arduino Revision 1.0 pinout. Download the Arduino environment and board firmware Download the latest IDE and firmware files here: https://downloadcenter.intel.com/Detail_Desc.aspx?agr=Y&DwnldID=23171 This release contains multiple zip files, including: Operating system-specific IDE packages, contain automatic SPI flash update: Intel_Galileo_v0.7.5-arduino-1.5.3-linux32.tgz...
- Page 4 Note: Always connect the 5V power before any other connection. The green power LED (labelled PWR) will turn on. Install the drivers and other software Windows: 1. If not done already, connect the 5V power cable to the Galileo board and to a power outlet. Order Number: 329685-002US...
- Page 5 ® Intel Galileo Board Getting Started Guide Note: Always connect the 5V power before the USB connection. 2. Connect the USB cable to the USB Device Port (closest to the Ethernet) and to a PC. Wait for Windows to begin its driver installation process. After a few moments, the process will fail.
- Page 6 Mac OS: The Galileo board is supported by the Mac OS built-in USB drivers, however, the board has to boot for it to show up because the port is driven by software on the board.
- Page 7 Intel Galileo Board Getting Started Guide 5. Launch the IDE and select the board via Tools > Board > Intel® Galileo 6. Select the correct serial port using Tools > Serial Port Note: Do not download any sketch to the board before you upgrade the firmware.
- Page 8 ® Intel Galileo Board Getting Started Guide Linux: Use /dev/ttyAMC0 Mac OS: Use /dev/cu.usbmodemnnnnn Upload the program Click the Upload button in the IDE and wait a few seconds. If the upload is successful, the message Done uploading. will appear in the status bar.
- Page 9 2. Copy CapsuleApp.efi and sysimage_nnnnn.cap to a microSD card and insert it into the slot on the board . 3. Connect the serial cable between the computer and the Galileo board. Set up a serial console session (for example, PuTTY) and connect to the Galileo board’s COM port at 115200 baud rate.
- Page 10 ® Intel Galileo Board Getting Started Guide At the GRUB command line, type quit. 6. The serial console displays a boot device selection box (below). Select UEFI Internal Shell. Order Number: 329685-002US...
- Page 11 ® Intel Galileo Board Getting Started Guide You will see a display similar to this: 7. You will see a print out, the top line of which looks like this: :HardDisk - Alias hd7b blk0 This is your SD card. To mount it, type: fs0: 8.
- Page 12 ® Intel Galileo Board Getting Started Guide The CapsuleApp will update your SPI flash image. This process takes about 2 minutes. Warning: DO NOT remove power or try to exit during this process. Wait for the prompt to return, otherwise your board will become non-functional.
- Page 13 Contact your local Intel sales office or your distributor to obtain the latest specifications and before placing your product order. Copies of documents which have an order number and are referenced in this document, or other Intel literature, may be obtained by calling 1-800-548-4725, or go to: http://www.intel.com/design/literature.htm...
Need help?
Do you have a question about the Galileo Board and is the answer not in the manual?
Questions and answers