Intel Galileo Getting Started Manual
Hide thumbs
Also See for Galileo:
- Hardware manual (34 pages) ,
- Tutorial manual (32 pages) ,
- User manual (19 pages)

Related Manuals for Intel Galileo


Summary of Contents for Intel Galileo
- Page 1 ® Intel Galileo Board Getting Started Guide 22 May 2014 Order Number: 329685-006US...
- Page 2 Note: This release uses a special version of the Arduino IDE. The first thing you must do is download it from the Intel website below and update the SPI flash on the board. The basic steps you will follow are: 1.
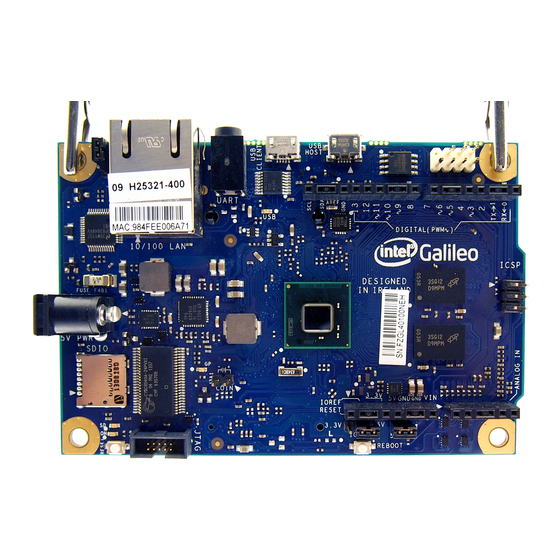
- Page 3 ® Intel Galileo Board Getting Started Guide ® Intel Galileo Board Note: The I/O headers are identical to the Arduino Revision 1.0 pinout. Download the Arduino environment and board firmware Download the latest IDE and firmware files here: https://communities.intel.com/community/makers/drivers You will need up to 200 MB of free space, depending on which OS you are using.
- Page 4 The Power LED shown above (board label = ON) will turn on. Install the drivers and other software Windows: 1. If not done already, connect the 5V power cable to the Galileo board and to a power outlet. Note: Always connect the 5V power before the USB connection.
- Page 5 8. Once the driver is successfully installed, Device Manager will show a Galileo (COMx) device under Ports (COM & LPT). Note the COMx port number as it will be needed in the IDE later. The example below shows COM5.
- Page 6 OS X: The Galileo board is supported by the OS X built-in USB drivers, however, the board has to boot for it to show up because the port is driven by software on the board.
- Page 7 4. Connect the USB cable to the USB Client Port (closest to the Ethernet). Note which COM port it is connected on. ® 5. Launch the IDE and select the board via Tools > Board > Intel Galileo 6. Select the correct serial port using Tools > Serial Port Note: Do not download any sketch to the board before you upgrade the firmware.
- Page 8 Follow these steps to boot your board from an SD card. This setup also allows you to save your sketch to the Galileo board, so it will be able to repeat sketches after board power-down. (These steps create a persistent /sketch folder and rootfs.) Note: If you want to use WiFi, you must follow these steps.
-
Page 9: Troubleshooting Tips
Serial cable (optional) You can access the embedded Linux using a serial cable connected to the 3.5 mm audiojack port on the Galileo board. Be sure that the cable is RS-232 format and not TTL format (details here: https://www.sparkfun.com/tutorials/215). For a 3 pin audio jack, the connections are shown below: Pin 1 Sleeve = Ground •... - Page 10 There is a known issue with Windows that it creates a new COM port every time a device is connected. In cases when there are many unused COM ports, the Galileo board may stop working and/or the IDE may return the error below: /dev/ttyS24: No such file or directory One workaround is to delete all unused and hidden COM ports, including the drivers.
- Page 11 “Delete the driver software for this device” and click OK. Repeat this step for each unused COM port. Close Device Manager when complete. 6. Connect the USB cable to the Galileo board. You will be prompted to reinstall the driver as described in...
- Page 12 Contact your local Intel sales office or your distributor to obtain the latest specifications and before placing your product order. Copies of documents which have an order number and are referenced in this document, or other Intel literature, may be obtained by calling 1-800-548-4725, or go to: http://www.intel.com/design/literature.htm...
Need help?
Do you have a question about the Galileo and is the answer not in the manual?
Questions and answers