Table of Contents
Advertisement
Quick Links
Advertisement
Table of Contents
Troubleshooting

Subscribe to Our Youtube Channel
Related Manuals for Codonics Horizon


Summary of Contents for Codonics Horizon
- Page 1 Horizon ® USER’S MANUAL ®...
- Page 2 ® Horizon ® Multi-media Dry Imager Starter Manual ® Codonics Catalog Number H-START-EN Nov 21, 2005 Version 1.8.3 Codonics, Inc. 17991 Englewood Drive Middleburg Heights, OH 44130 USA 440-243-1198 Phone 440-243-1334 Fax Email info@codonics.com www.codonics.com...
- Page 3 Codonics, Inc. makes no commitment to update nor to keep current the information contained in this document. The Horizon imager is protected by the following patent number: US Patent No. 6,249,299 System for Printhead Pixel Heat Compensation. All other patents are pending.
-
Page 4: Table Of Contents
Potential for Radio Frequency Interference on Imager Operation ..-xvii Potential for Radio and Television Interference ......... -xviii Safety Precautions ................-xix Location Precautions................-xxi Cleaning Precautions ................-xxii Media ....................-xxii File Transfer via FTP and LPR............-xxiv Color Management................-xxiv Horizon Starter Manual... - Page 5 Loading Media ..................1-15 Preparing the Imager for Shipment ............1-15 Chapter 2: Basic Imager Operations Horizon Imager Components..............2-1 Powering the Imager On and Off ..............2-3 Powering On the Imager ..............2-3 Observing the Imager’s Operating Status in the Status Screen... 2-4 Common Cassette Status Messages ..........
- Page 6 Using Job Settings Files with DICOM............4-3 Categories of Job Settings ..............4-4 Specifying a Job Settings File from a DICOM User Application... 4-4 Hierarchy of Settings Used by the Horizon Imager ......4-5 Chapter 5: Printing from Windows via PostScript Introduction to PostScript ................5-2 Printing from Windows Applications ............
- Page 7 Chapter 7: Preventive Maintenance Recommended Maintenance Schedule............7-1 Horizon Cleaning Kits................7-2 Cleaning the Thermal Print Head and Platen Roller........7-3 Cleaning the Pick Tires................7-7 Chapter 8: Film Calibration Chapter 9: Troubleshooting Sources of Status Information ..............9-1 Control Panel ..................9-1 Error Log ....................
-
Page 8: Manual Conventions
2. To scroll through the menu options, press the keys. options The selector arrow ( ) moves up and down through the list. The bottom portion of the control panel display shows a message associated with the currently selected menu option. Horizon Starter Manual... -
Page 9: Control Panel Navigation
Control Panel Navigation Menu paths are used in some procedures instead of documenting every step needed to navigate to a specific menu option. For example: From the Main Menu, select the following options: Default Media Grayscale DV Film Blue Control Panel Keys Control panel keys are shown in small black ovals to resemble the actual keys, for example, “Press the key.”... -
Page 10: Purpose And Scope
• Performing preventive maintenance • Performing film calibration • Troubleshooting common problems NOTE: This manual is current to the Horizon Imager v1.8.3 software. Some features and functions described here may not apply to older versions of the software. Horizon Starter Manual... -
Page 11: Product Information
If you need more detailed or more technical information on a feature or topic, or wish to perform more advanced operations, refer to the Horizon Imager Technical Manual (Catalog no. HORIZON-MNLT) and the Horizon Imager User’s Manual (Catalog no. -
Page 12: Disposal Requirements
European Disposal Requirements Codonics imagers and electronic accessory devices are not to be discarded or recycled; rather they are to be returned to the manufacturer. Contact Codonics directly or by the link provided for the latest information concerning: •... -
Page 13: Warnings And Limitations Of Use
This product is in conformity with the requirements of EC Council directive 93/42/EEC on the approximation of the laws of the Member States relating to medical devices. This product satisfies the Class B limits of EN 55011 and CISPR 11. HORIZON MEDICAL PRINT IMAGER EN 60601-1 CODONICS, INC. -
Page 14: Voltage Warning
A critical component is any component of a life support device or system whose failure to perform can be reasonably expected to cause the failure of the life support device or system, or to affect its safety or effectiveness. Horizon Starter Manual xiii... -
Page 15: Laser Warning
The laser apertures are marked with a single label, shown below. There are three apertures that correspond to the three cassette locations, one for each, on the same side of the Horizon imager as this label. AVOID EXPOSURE LASER RADIATION IS EMITTED FROM THIS APERTURE Safety interlocks are marked by the following label. -
Page 16: Temperature Warning
Temperature Warning Because the Horizon imager is a thermal print device, the surface of the thermal print head heat sink gets hot. Avoid directly touching any components not colored green when accessing the interior of the imager if the imager has been printing. (During some preventative maintenance tasks, you will be touching internal components with cleaning pads or swabs.) -
Page 17: Serial Number, Configuration, Date Code, And Modification Codes
Serial Number, Configuration, Date Code, and Modification Codes The Serial number label is placed onto the Compliance label. It includes the following information: • The serial number (SN), which uniquely identifies the unit. • The configuration number (CNFG), which details the build configuration. -
Page 18: Esd Caution
ESD Caution Connections to other pieces of equipment are made at the rear of the Horizon imager. These connectors are marked with a precautionary ESD warning symbol, as shown below. Do not touch any of the pins of these connectors. When making connections to the imager, it is best done while the imager is plugged in but not powered on. -
Page 19: Potential For Radio And Television Interference
Potential for Radio and Television Interference The Horizon imager generates and uses radio frequency energy, and if not installed and used properly, that is, in strict accordance with the manufacturer’s instructions, may cause interference to radio and television reception. It has been type tested and found to... -
Page 20: Safety Precautions
• If the power cord needs to be replaced, replace it only with another Codonics power cord manufactured specifically for your imager’s power configuration. • If the imager is smoking or making unusual sounds, power off and unplug the imager immediately. - Page 21 • Do not place any liquid containers on the imager. If, for some reason, liquid seeps into the imager, power off the imager and unplug the power cord from the source outlet. If used without corrective measures, the imager may be damaged. •...
-
Page 22: Location Precautions
• Do not locate imager near sources of high RF energy. • Do not locate the imager where it might be subject to jarring or vibrations, such as a table or desk in a high-traffic area. Jarring and vibrations can affect the print quality of images. Horizon Starter Manual... -
Page 23: Cleaning Precautions
Cleaning Precautions • Many plastic components are used in the imager’s construction. Coat flecking and deformation is likely to occur if the imager is wiped with chemical dusters, benzene, thinners, insecticides, or other solvents. Rubber and PVC materials left in contact with the imager for extended times will cause damage. - Page 24 • Codonics film media is designed to be viewed using a light box suitable for viewing medical diagnostic images. • Codonics paper media is designed to be viewed under cool-white, fluorescent light.
-
Page 25: File Transfer Via Ftp And Lpr
File Transfer via FTP and LPR • Different users who share a user name when transferring files to the imager may cause unpredictable and erroneous printed output. The imager associates information with the user name. Each user should have a unique user name when connecting to the imager via FTP and LPR. -
Page 26: Hardware Variations
Indications for Use The Codonics, Inc., family of Horizon imagers produces radiological quality, hardcopy output. They can produce color prints on dye-diffusion film and paper, and grayscale prints on direct thermal film and paper. -
Page 28: Chapter 1: Setting Up The Imager
Setting Up the Imager Preparing for Installation To prepare for the Horizon imager installation, review the following guidelines and requirements: CAUTION Make sure that the table or printer stand can support the weight of the imager [approximately 66.7 kg (147 lbs) with receive trays and three full supply cassettes installed]. -
Page 29: Installing The Imager
Installing the Imager The Horizon imager comes stored in two boxes: • The imager is stored in the larger box. • The receive trays, power cord, manuals, technical briefs, and other accessories are stored in the smaller box. WARNING The imager is heavy. To avoid injury, use two people to unpack and position the imager. - Page 30 This product is in conformity with the requirements of EC Council directive 93/42/EEC on the approximation of the laws of the Member States relating to medical devices. This product satisfies the Class B limits of EN 55011 and CISPR 11. HORIZON MEDICAL PRINT IMAGER EN 60601-1 CODONICS, INC.
- Page 31 7. Open the top cover by pressing any of the green releases. Left release Right release Master release 8. Remove any packing material inside the imager. Setting Up the Imager...
- Page 32 NOTE: Save the imager box and all packing material. You must reinsert any packing material and use the original box to ship the imager. Refer to “Preparing the Imager for Shipment” on page 1-15 for more information. Horizon Starter Manual...
-
Page 33: Connecting The Ethernet Cable
12. Place the receive trays into the imager. Receive trays 13. Close the top cover. Connecting the Ethernet Cable The Horizon imager supports the following network cables and hubs: Setting Up the Imager... - Page 34 This product is in conformity with the requirements of EC Council directive 93/42/EEC on the approximation of the laws of the Member States relating to medical devices. This product satisfies the Class B limits of EN 55011 and CISPR 11. HORIZON MEDICAL PRINT IMAGER EN 60601-1 CODONICS, INC.
-
Page 35: Powering On The Imager-First Time
NOTE: When connecting the imager to only one workstation without the use of a hub, you must use a special Ethernet cable, called a crossover cable . Optionally, you could still connect the imager and the single workstation using two standard Ethernet patch cables and a hub. -
Page 36: Cleaning The Platen Roller
3: No cassette Status No sheets queued Cleaning the Platen Roller Clean the platen roller after powering the imager on for the first time. Refer to “Cleaning the Thermal Print Head and Platen Roller” on page 7-3. Horizon Starter Manual... -
Page 37: Network Settings-Simple Network
Network Settings—Simple Network This topic explains how to add the imager to a simple network. For adding the imager to a complex network, refer to the Horizon Imager Technical Manual. NOTE: If your network is managed by a network administrator or an information technology (IT) department, it would be considered a complex network. -
Page 38: Specifying The Imager's Ip Address
NOTE: If devices on this network do have to communicate with devices on other networks, it is part of a complex network. For more information about configuring the Horizon imager in a complex network, refer to the Horizon Imager Technical Manual . -
Page 39: Specifying The Imager's Ip Address At The Control Panel
Specifying the Imager’s IP Address at the Control Panel NOTE: For a simple network, you will only need to define the imager’s base IP address. You can leave all other network settings for the imager at their default values. NOTE: For instructions on how to use the imager’s control panel and menus, refer to Chapter 2. - Page 40 UP/DOWN to alter octet, LEFT/RIGHT to change octets Press MENU to exit menus NOTE: The Horizon imager can have more than one IP address assigned to it. For more information about assigning multiple IP addresses, refer to the Horizon Imager Technical Manual .
-
Page 41: Specifying Ip Addresses For Other Devices On The Network
Specifying IP Addresses for Other Devices on the Network Just as you did for the Horizon imager, you must specify the IP addresses for each of the other devices on the network. Refer to the documentation or online help that comes with the device for specific instructions. -
Page 42: Loading Media
If you have to ship the imager for any reason, you must use the original imager box and packing materials. If you do not have the original box and packing materials, contact your Codonics representative. 1. If a ribbon is in the imager, remove it. For more information, refer to “Changing the Ribbon (ChromaVista)”... - Page 43 5. Open the top cover by pressing any of the green releases. Left release Right release Master release 6. Make sure that the thermal print head has parked. The thermal print head should be secure with no wobble. Make sure thermal print head is secure and does not wobble Thermal print head...
- Page 44 CAUTION Push the ribbon carriage down slowly. Forcing it down too quickly may damage the carriage. 8. Replace the packing materials into the imager, close the top cover, and repack the imager into its original box. Refer to the box insert for illustrated instructions. Horizon Starter Manual 1-17...
-
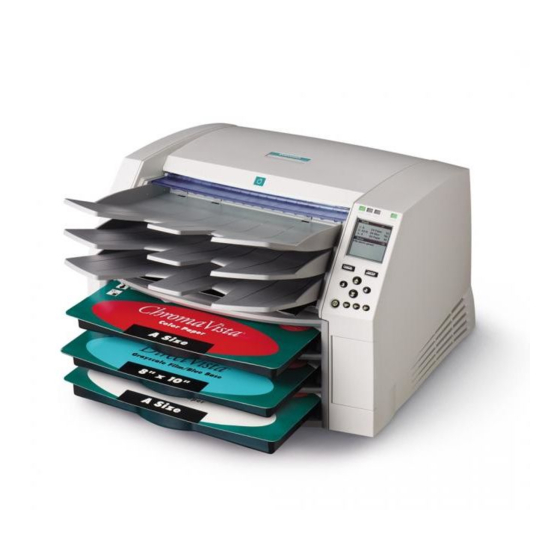
Page 46: Horizon Imager Components
Basic Imager Operations Horizon Imager Components The following illustrations show the names and locations of the main imager components. Top cover Control panel Receive tray 1 Receive tray 2 Receive tray 3 Supply slot 1 Supply slot 2 Smart Card/... - Page 47 This product is in conformity with the requirements of EC Council directive 93/42/EEC on the approximation of the laws of the Member States relating to medical devices. This product satisfies the Class B limits of EN 55011 and CISPR 11. HORIZON MEDICAL PRINT IMAGER EN 60601-1 CODONICS, INC.
-
Page 48: Powering The Imager On And Off
The startup process takes 2 to 3 minutes. When the Status screen To power on displays, the imager is ready to receive images. the imager NOTE: The Horizon Imager Technical Manual includes information about how to obtain more detailed imager status information. Horizon Starter Manual... -
Page 49: Observing The Imager's Operating Status In The Status Screen
Observing the Imager’s Operating Status in the Status Screen The Status screen allows you to observe the imager status. The top portion of the screen—the Supply window—displays the status of the three supply cassettes and whether a color ribbon is installed. The bottom portion of the screen—the Status window—displays printing status messages and the imager’s operational state. -
Page 50: Common Cassette Status Messages
53, indicating the cassette currently has 53 sheets of 14 x 17-in. DirectVista blue film. No cassette No cassette is loaded in the supply slot. Printing The imager is printing from the indicated cassette. Cleaning The imager is cleaning the picking system. Horizon Starter Manual... -
Page 51: Color Ribbon Status
Color Ribbon Status The following table lists the color ribbon status indications. Table 2-2. Color Ribbon Status Indications Indication Explanation Blank; the imager does not support ChromaVista color media. Ribbon loaded. Ribbon type indicated (for example, CMY for cyan/magenta/yellow). Ribbon loaded but the ribbon is spent. Ribbon not loaded (and the imager does support ChromaVista color media). -
Page 52: Powering Off The Imager
However, if the imager is powered off using the rocker switch in the back or power is interrupted, queued jobs may be lost. Horizon Starter Manual... -
Page 53: Understanding The Control Panel
Understanding the Control Panel Indicators Refer to page 2-9 Display Refer to page 2-10 Keys Power key Refer to page 2-3 Basic Imager Operations... -
Page 54: Control Panel Indicators
• On: The imager is powered on but idle. • Off: The imager is powered off. • Flashing: The imager is actively receiving, processing, or printing jobs; or powering on, off, or rebooting. If jobs are paused, the A indicator will not flash. CTIVE Horizon Starter Manual... -
Page 55: Alert And Fault Messages And The Fault Tone
Alert and Fault Messages and the Fault Tone When the imager needs attention or an error occurs, the LERT indicator lights. Messages are displayed in the Status screen AULT to help you respond to the condition. If operator intervention is required, a Fault tone sounds. To stop the Fault tone, press any control panel key. - Page 56 Use the keys to scroll the selector arrow through the list. Press MENU to exit menus When finished, press the key. The Status screen is MENU displayed. To exit the Menu screens Horizon Starter Manual 2-11...
-
Page 58: Chapter 3: Media Handling And Storage
Media Handling and Storage Overview Supply Slots and Cassettes Media used with the Horizon imager is prepackaged in factory-sealed, disposable cassettes. Barcode (on side) Cassette cover: Do not remove Horizon Starter Manual... - Page 59 CAUTION Use only Codonics media. Do not use plain paper, office transparencies, or other unapproved media as damage, improper operation, or malfunction may result. For information about the approved Codonics media types and sizes, and how to order cassettes, refer to “Ordering Media” on page 3-10.
-
Page 60: Viewing The Status Of A Supply Slot
Viewing the Status of a Supply Slot The Status screen shows the status of each supply slot, including media type, size, and number of sheets remaining. Supply 1: 8X10 DV Blue 2: A CV Paper 3: 14X17 DV Blue Status 3 sheets queued Horizon Starter Manual... -
Page 61: Inserting Or Changing Cassettes
Inserting or Changing Cassettes 1. Press the key, and wait until the indicator turns off PAUSE NLINE and the Status screen indicates that the imager is paused. To change a supply If a sheet is currently being printed, the sheet will complete cassette printing before the imager enters the Paused state. - Page 62 4. Insert the new cassette into the supply slot, with the cassette label facing you and the barcode label to the left. 5. Slide the cassette into the supply slot until you feel the cassette settle into the retaining detent. 6. Press the key to resume printing. PAUSE Horizon Starter Manual...
-
Page 63: Handling And Storing Media
Handling and Storing Media For best results, refer to the storage and handling instructions that come with the media. Break-Off Leaders (ChromaVista Only) ChromaVista color paper and film have break-off leaders at the top and bottom to allow edge-to-edge printing: On a completed print, bend the leader at the perforation line fully one way, then fully the other way. -
Page 64: Changing The Ribbon (Chromavista)
(except for the pick tires, refer to the figure on page xx). Remove rings, ties, jewelry, and other items, and tie back hair, so that they do not fall into or get caught in the imager. Horizon Starter Manual... - Page 65 4. Remove the old ribbon, as shown in the following figure. Spring-loaded spindles 5. Load the new ribbon, as shown in the following figure. Spring-loaded spindles Black (Supply) Gray (Take-up) Media Handling and Storage...
- Page 66 After several seconds, the imager will leave the paused state and resume printing. CAUTION Used ribbon retains the negative of the color images that were printed using that ribbon. If you are required to ensure patient confidentiality and privacy, the ribbon should be destroyed. Horizon Starter Manual...
-
Page 67: Ordering Media
Ordering Media The Horizon imager supports a variety of paper and film for both grayscale and color prints. Not all Horizon imager configurations support all media types and sizes. If your Horizon imager does not support the media type and/or size you want to use, contact your Codonics representative. -
Page 68: Chapter 4: Printing From Dicom Applications
Applications The printing procedures covered in this chapter assume that the DICOM support option is installed in your Horizon imager and that you are sending print jobs from a DICOM application. NOTE: If you are running DICOM Lite on the imager and see connection errors at the console or workstation from which you are sending print jobs, you may require full DICOM. -
Page 69: Dicom Conformance Statement
Your key operator or DICOM application vendor must configure the DICOM application running on each imaging device printing to the Horizon imager. This application is the Print Service Class User (SCU). The imager is the Print Service Class Provider. Two pieces of information must be entered into the SCU: the Called AE Title, and the imager’s TCP port number. -
Page 70: Sending A Dicom Print Job
Sending a DICOM Print Job How you select a Horizon imager as a destination, then send a print job to it, is unique to your specific DICOM user application. For details, refer to your key operator, DICOM user application vendor, or the accompanying DICOM application documentation. -
Page 71: Categories Of Job Settings
They can be entered at the control panel, or by sending a text file to the imager via FTP or LPR protocols. The procedures for creating custom Job Settings files are described in the Horizon Imager Technical Manual. Specifying a Job Settings File from a... -
Page 72: Hierarchy Of Settings Used By The Horizon Imager
The Horizon imager also supports IP aliasing for systems that do not support configuring more than one AE title per IP address. For more information about how multiple IP addresses and DICOM printing to the Horizon imager can be implemented, refer to the Horizon Imager Technical Manual. -
Page 74: Chapter 5: Printing From Windows Via Postscript
The printing procedures covered in this chapter assume that: • The PostScript support option is installed in your Horizon imager. • The Horizon imager has been configured as a Windows desktop printer on your workstation using the Horizon PostScript print driver. -
Page 75: Introduction To Postscript
There have been three PostScript technologies released since its inception—levels 1, 2, and, the most recent version, 3. The Horizon imager supports all three levels. Printing from Windows Applications For detailed descriptions about print job, sheet, and image parameters, refer to the Horizon Imager Technical Manual. -
Page 76: Changing Horizon Postscript Parameters-Windows 2000 And Xp
Changing Horizon PostScript Parameters—Windows 2000 and XP NOTE: This procedure assumes that the PostScript driver for the Horizon imager has already been installed on the workstation. For more information, refer to the “Windows 2000 Driver Installation—Horizon” or “Windows XP Driver Installation—Horizon” Technical Brief. - Page 77 5. Specify a Horizon media size and type combination from the drop-down list. The Horizon media choices begin Paper Size with “HZ.” 6. To specify any of the other Horizon PostScript parameter settings, scroll to the list of parameters. Printer Features 7.
-
Page 78: Chapter 6: Default Print Job Settings
Since any setting that appears in the control panel also appears in the PostScript driver, it is usually more convenient to change settings in the driver rather than in the control panel of the Horizon Imager. Refer to the Horizon Imager Technical Manual for a summary of the print job parameters that can be changed. -
Page 79: Changing The Default Settings
Changing the Default Settings Changing the Default Media Type and Size One default media is specified for grayscale images, and one for color images. In practice, the PostScript driver or DICOM application will override the Default Media setting. Default Media is available for the small number of installations for which this is not the case. -
Page 80: Changing The Default User Settings
DICOM application or a PostScript printer’s settings, or use a Job Settings file that contains the values you need. For information about Job Settings files, refer to the Horizon Imager Technical Manual . Horizon Starter Manual... -
Page 82: Chapter 7: Preventive Maintenance
• If the imager has trouble printing. Clean the pick tires • Every 1000 sheets, or more often in dirty page 7-7 conditions. • If the imager has trouble picking sheets from a cassette. • If the imager has trouble printing. Horizon Start Manual... -
Page 83: Horizon Cleaning Kits
The following cleaning kit is available to help you properly maintain the Horizon imager: • The Horizon Cleaning Kit (catalog no. SP-00130) includes special wipes that you will need to clean the thermal print head, platen roller, pick tires, and other internal components. -
Page 84: Cleaning The Thermal Print Head And Platen Roller
Spring-loaded spindles NOTE: Care should be taken to protect the ribbon from dust and dirt when not loaded in the imager. Avoid resting the ribbon on a table; static charge will attract dust from the table top. Horizon Start Manual... - Page 85 5. From the menu, select the Open Top Cover Move Ribbon Carriage menu option. 6. Press the key to move the ribbon carriage down and out of the way. 7. Locate the print bead and nosepiece, shown in the following figure.
- Page 86 13. Using the platen roller cleaning wipe provided with the imager’s cleaning kit, rub the wipe in one direction only along the entire length of the platen roller from end to end until all visible contaminants are gone. Do not rub back and forth. Horizon Start Manual...
- Page 87 Press the key to incrementally rotate the platen roller so that you can clean its entire surface. CAUTION Use only the platen roller cleaning wipe when cleaning the platen roller. Damage to the platen roller may occur if the print head cleaning wipe is used. 14.
-
Page 88: Cleaning The Pick Tires
Cleaning the Pick Tires Some Horizon users may prefer to use the Horizon Cleaning Cassette to clean the pick tires, rather than using the platen roler cleaning wipe. The Horizon Cleaning Cassette, part number SP- 00279, can be ordered by contacting your Codonics representative. - Page 89 3. Place the receive trays on a flat surface, as shown in the following figure. Correct Incorrect 4. Remove any cassettes from the supply slots. 5. Locate the pick tires. There are three pickers, one for each supply slot. The topmost picker is shown in the following figure.
- Page 90 CAUTION Use only the platen roller cleaning wipe when cleaning the pick tires. The tires could be damaged if you use the print head cleaning wipe. 7. Wait for the pick tires to dry thoroughly. 8. Replace the receive trays and any media cassettes that were removed. Horizon Start Manual...
-
Page 92: Chapter 8: Film Calibration
3. Select the appropriate supply slot, then press the key. ENTER The imager prints a test sheet, recalibrating that cassette based on the result. NOTE: If the selected supply slot does not have a DirectVista grayscale film cassette loaded, the calibration will not run. Horizon Starter Manual... -
Page 94: Chapter 9: Troubleshooting
2. Select the following menu options: Utilities Error Log Online Help for Displayed Messages You can display help text for a message displayed in the Status window by moving the selector arrow to the message, then pressing key. HELP Horizon Starter Manual... -
Page 95: Troubleshooting Tables
If this does not clear the condition, then cycle power. Refer to “Powering On the Imager—First Time” on page 1-8). If this still does not clear the condition, contact Codonics technical support. Troubleshooting... - Page 96 CTIVE flashes. Check that the Horizon imager’s network settings are correct. Check that the Horizon imager’s IP address is set correctly at the host sending the print job. Trying to use an unsupported feature Check that you are using only features...
- Page 97 Job Setting are specified at the control panel, select a do not reflect what is set overriding the imager’s Default User Horizon imager Called AE Title that through the control panel. Settings. does not specify any Job Settings parameters (for example, Print_SCP).
- Page 98 Platen Roller” on page 7-3). Perform general cleaning procedures (refer to the Horizon User’s Manual ). Spots or irregular streaks Dust on the sheet. Clean the thermal print head and platen on the sheet.
- Page 99 The printer has been jamming. Perform general cleaning procedures exceeded. (refer to the Horizon User’s Manual ). The imager indicates that A print job was received that requires a Load the appropriate cassette or purge media needs to be...
- Page 100 Experiencing connection Running DICOM Lite on imager, and Contact technical support about errors at console or need more connections than is upgrading to full DICOM. workstation from which provided by DICOM Lite. DICOM print jobs are sent. Horizon Starter Manual...
-
Page 101: Status Message Tables
Status Message Tables Common Cassette Status Messages The following table lists the common cassette-related status messages. Table 9-6. Cassette Status Messages Message Explanation Barcode error The supply cassette’s barcode cannot be read. Calibrating The imager is performing a calibration. When performing a film calibration (when a DirectVista grayscale film cassette is first inserted, or initiated manually through the Main Menu), the “calibrating”... -
Page 102: Color Ribbon Status
A sheet may occasionally get jammed in the imager. If this happens: • The imager goes offline. • A fault message displays. • The area at which the jam occurred is indicated in the Status window. • The indicator lights. AULT • An audible fault beep sounds. Horizon Starter Manual... - Page 103 • The imager pauses while the thermal print head cools, then partially pops open the top cover. The message in the Status screen will be one of the following: • Clear jam from cassette . This message indicates that the sheet - Still in the cassette (possibly because the pick tires are dirty and could not grab the sheet).
- Page 104 Platen Roller Hide track Print head Cassettes Media guides Cassette doors Pick tires Pickers Basement Lower Part Cross-Section of Imager, Showing Internal Media Path Clearing a jam from these likely locations is described in the following topics. Horizon Starter Manual 9-11...
-
Page 105: Clearing A Jam From A Cassette
Clearing a Jam from a Cassette 1. Gently pull out the supply cassette indicated on the Status screen. To clear a jam indicated by 2. Check to see if the sheet is sticking out from the cassette or the “Clear jam supply slot. - Page 106 CAUTION To avoid damaging internal components, use care when removing a sheet from the media path in the upper part of the imager. 8. Discard the sheet. CAUTION Never put a sheet back in the cassette. Dust or oil from your finger will affect the image quality. Horizon Starter Manual 9-13...
-
Page 107: Clearing A Jam From The Printing Area
9. If the top cover is open, close it. After a few seconds, the Status screen displays and printing resumes if jobs are queued. Clearing a Jam from the Printing Area NOTE: When a jam occurs, the imager disengages all motors to allow you to safely pull out the sheet. - Page 108 CAUTION Do not touch the pick tires; body oils from your fingers are hard to remove and could eventually damage the tires. Horizon Starter Manual 9-15...
- Page 109 • If you see the leading edge in the upper part of the imager, gently pull the sheet out through the top of the imager. CAUTION To avoid damaging internal components, use care when removing a sheet from the media path in the upper part of the imager. NOTE: To access the jammed sheet, you may need to remove the ribbon and/or move the ribbon carriage down using the Load/Remove Ribbon option in the Open Top Cover menu.
-
Page 110: Reinstalling Media Guides
When clearing sheet jams, the media guides could accidently come out of their slots. Media guides 1. Slide the media guide into the imager through the cassette slots, as shown in the following figure. To reinstall the media guides Horizon Starter Manual 9-17... - Page 111 2. Insert the bottom leg of the media guide in both sides of the imager, as shown in the following figure. Do not damage sensor CAUTION Be careful not to scratch the polished sheet metal or damage the sensor near the upper guide notch. 3.
-
Page 112: Purging Print Jobs
ENTER All print jobs are purged, and the Utilities menu is displayed again. CAUTION Use care when running the Purge Print Jobs function. This function will purge other users’ print jobs as well as yours. Horizon Starter Manual 9-19... -
Page 113: Contacting Technical Support
Contacting Technical Support For questions regarding your Horizon imager, please first refer to this manual, which describes the features and operations. Technical assistance is available by phone at: +1.440.243.1198 Phone support is available 24 hours a day, 7 days a week. -
Page 114: Appendix A: Specifications
≥ 20 years for DirectVista film when stored under ANSI Archival: extended-term storage conditions Supply Cassettes: All media is pre-packaged in factory-sealed, disposable cassettes Interfaces: 10/100 Base-T Ethernet (RJ-45) Serial diagnostic port UPS monitor port Network Protocols: Standard: FTP, LPR Optional: DICOM, Windows networking printing Horizon Starter Manual... - Page 115 Image Formats: Standard: TIFF, GIF, PCX, BMP, PGM, PPM, XWD, JPEG, PNG, SGI (RGB), Sun Raster (RAS), Targa (TGA) Optional: DICOM, PostScript compatibility Image Quality: Automatic calibration using built-in densitometer Image Control: Contrast, Gamma, Medical Color Matching (MCM), Polarity, Rotate, Saturation, Scaling Sheet Control: Background, Border Fill, Captions, Coverage, Image Warning, Dmax, Dmin, Film View, Look-Up Tables (LUT)
- Page 116 Class 1 laser product according to IEC 60825-1 and 21 CFR 1040.10 and 1040.11. UL, cUL 2601 Classification: Class 1 equipment, type ordinary IXPO, continuous with intermittent loading. Suitable for use in the U.S.A. on a center-tapped, 240-V, single-phase circuit. Horizon Starter Manual...
- Page 118 System Job Settings files contain only Media Type and Media Size parameters. The DefaultGrayscale and DefaultColor system Job Settings files cause the imager to use the Default Medias set at the control panel. Horizon Starter Manual...
- Page 119 System Job Settings File Corresponding Use DefaultGrayscale Imager uses the media set for Grayscale in the Default Media menu at the control panel DefaultColor Imager uses the media set for Color in the Default Media menu at the control panel 8x10-dvfb 8x10 DirectVista film (blue) 8x10-dvfc...
- Page 120 "barcode error" message, 9-8 cleaning kits barcode reader window ordering, 7-2 cleaning schedule, 7-2 cleaning precautions, -xxii base IP address for Horizon imager, 1-13 CMY indicator, 2-4 basement, 1-5 CNFG (configuration) label, -xvi scratches, 1-5 Codonics basic imager operations, 2-1 to 2-11...
- Page 121 2-10 use precautions, -xxii troubleshooting information, 9-1 disposal requirements, -xi hide track, 1-5 donor guide bar Horizon imager cleaning, 7-3 to 7-6 adding to a simple network, 1-10 cleaning schedule, 7-1 base IP address, 1-13 basement, 1-5 basic operations, 2-1 to 2-11...
- Page 122 -xiv format, 1-11 location precautions, -xxi Horizon base address, 1-13 media use precautions, -xxii specifying for Horizon imager, 1-11 to 1-14 modification codes, -xvi specifying for other devices on the network, 1-14 online help, 9-1 operational state indicators, 2-4...
- Page 123 9-1 file transfer precautions, -xxiv network activity indicator, 2-2 network connector, 1-7, 2-2 network speed indicator, 2-2 networks adding the Horizon imager, 1-10 Main Menu, 2-10 simple, 1-10 displaying administrative options, 2-11, 6-3 nosepiece maintenance cleaning, 7-3 to 7-6...
- Page 124 2-3 Power menu, bypassing, 2-7 safety power rocker switch, 1-8 internal components, safe to touch, -xx powering off the Horizon imager, 2-7 location of labels, -xii powering on for first time, 1-8 precautions, -xix powering on the Horizon imager, 2-3...
- Page 125 technical support, 9-20 television interference, -xviii temperature warnings, -xv thermal print head cleaning, 7-3 to 7-6 cleaning schedule, 7-1 troubleshooting, 9-1 to 9-20 cassettes, 9-5 color ribbon, 9-5 image quality, 9-5 miscellaneous, 9-7 print jobs, 9-2 sheet jams, 9-4 startup, 9-2 turning off the imager, 2-7 turning on the imager, 2-3 unshielded twisted pair (UTP) cable, 1-7...
- Page 126 ® 17991 Englewood Drive Middleburg Heights, OH 44130 USA 440-243-1198 440-243 -1334 Fax www.codonics.com...
Need help?
Do you have a question about the Horizon and is the answer not in the manual?
Questions and answers