Table of Contents
Advertisement
Quick Links
Advertisement
Table of Contents
Troubleshooting

Related Manuals for Xcel-Arc RazorWeld TIG320 ACDC


Summary of Contents for Xcel-Arc RazorWeld TIG320 ACDC
- Page 1 TIG32O ACDC OPERATING MANUAL XA-TIG320RZ ACDC-K YEAR YEAR MAC H IN E M ACHI N E WARRANTY WARRANTY PRO DUCT WARRANTY Please read and understand this instruction manual carefully before the installation and operation of this equipment. © Xcel-Arc 2022...
-
Page 2: Warranty - Gas Leak Prevention
Razor Weld Thank you for choosing to purchase this RAZORWELD Welding Machine. We are proud of our range of welding equipment that has a proven track record of innovation, performance and reliability. Our product range represents the latest developments in inverter technology put together by our professional team of highly skilled engineers. -
Page 3: Table Of Contents
CONTENTS PAGE Warranty - Gas Leak Prevention Safety - Precautions Electrical Schematic Diagram Machine Data Technical Specifications Machine Layout Description 10-11 Front Panel Functions Front Panel Operation - Weld Program Selection & Setting 13-18 MMA Weld Program - Set Up Procedure Remote Controls and Water Cooler Modes Job Select, Job Save, Job Recall, Job Delete MMA (stick) Welding Set Up Procedure... -
Page 4: Safety - Precautions
SAFETY Welding and cutting equipment can be dangerous to both the operator and people in or near the surrounding working area if the equipment is not correctly operated. Equipment must only be used under the strict and comprehensive observance of all relevant safety regulations. Read and under- stand this instruction manual carefully before the installation and operation of this equipment. - Page 5 Fire hazard. Welding on closed containers, such as tanks,drums, or pipes, can cause them to explode. Flying sparks from the welding arc, hot work piece, and hot equipment can cause fires and burns. Accidental contact of electrode to metal objects can cause sparks, explosion, overheating, or fire.
- Page 6 CAUTION 1. Working Environment. 1.1 The environment in which this welding equipment is installed must be free of grinding dust, corrosive chemicals, flammable gas or materials etc, and at no more than maximum of 80% humidity. 1.2 When using the machine outdoors protect the machine from direct sun light, rain water and snow etc; the temperature of working environment should be maintained within -10°C to +40°C.
-
Page 7: Electrical Schematic Diagram
Razor Electrical Schematic Diagram 32OAC/DC TIG-MMA... -
Page 8: Machine Data Technical Specifications
Razor Weld RAZORWELD TIG320RZ AC/DC TIG/MMA - 320 Amp AC/DC Inverter Welder Welds: Aluminium, Magnesium, Zinc Alloys, Steels, Stainless, Cast Iron, Bronze, Copper RAZORWELD TIG320RZ AC/DC TIG/MMA 320 Amp 415V AC/DC Inverter Welder Intelligent Digital Control, 43KHz Inverter Multiple AC Wave Forms with Mix Arc Integeral Water Cooler, H.D Trolley Features ■... - Page 9 Razor Weld RAZORWELD TIG320RZ AC/DC TIG/MMA - 320 Amp AC/DC Inverter Welder Welds: Aluminium, Magnesium, Zinc Alloys, Steels, Stainless, Cast Iron, Bronze, Copper AC WAVE FORMS AC Square Wave: Allows the current to change from electrode + positive to electrode - nega- tive very quickly.
-
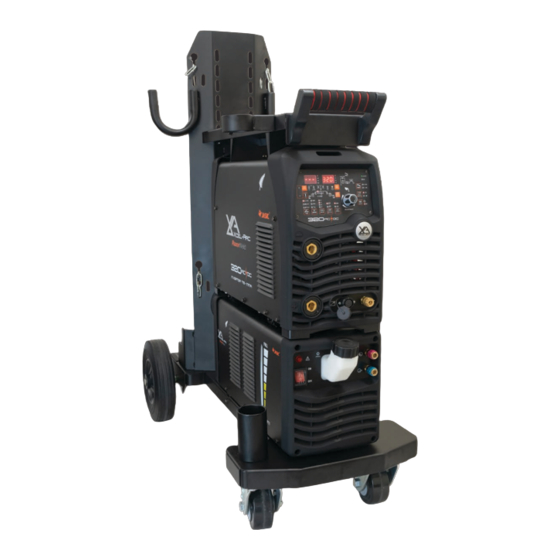
Page 10: Machine Layout Description
Razor Machine Layout Description 32OAC/DC TIG-MMA Front Machine Layout Description 1. Digital control panel 2. Negative output terminal 3. Postive output terminal 4. Torch switch - Remote connector 5. Front Panel Assembly 6. Quick lock gas connector 7. Rotary Encoder Rear Machine Layout Description 8. - Page 11 Razor Machine Layout Description 32OAC/DC TIG-MMA Water Cooler Rear Layout Description 1. Fault Alarm 2. On/Off Swicth 3. Coolant Filler 4. Front Panel 5. Water Connector Inlet 6. Water Connector Outlet Machine Trolley Layout Description 1. Cylinder Rack 2. Cable Hanger 3.
-
Page 12: Front Panel Functions
Razor Front Panel Operation 32OAC/DC TIG-MMA Front Panel Functions Display Data • Amperage • Time# Display Data • Frequency • Voltage Value • Percentage • Job Channel # • Error Code # • Error Indication • Tungsten Size Amperage Value Voltage Value Seconds Value Job Number... -
Page 13: Front Panel Operation - Weld Program Selection & Setting
Razor 32OAC/DC TIG-MMA Front Panel Operation - Weld Program Selection Mode Selector - Enables choice of Welding Mode: (Stick) (Stick) DC TIG - AC TIG - MIX ARC - DC MMA - AC MMA DC Tig: Select by pushing the AC Tig: Select by pushing the MIX ARC Tig: Select by pushing the button to cycle through to illuminate... - Page 14 Razor Front Panel Operation 32OAC/DC TIG-MMA Using the ENCODER to Select Weld Program Functions and Adjust Settings Weld program function selection and adjustment Turning the encoder knob will allow cyclic step by step motion through the weld program, the encoder can be turned in both direc- tions allowing backward and forward travel through the weld program functions.
- Page 15 Razor Front Panel Operation - Weld Program Selection 32OAC/DC TIG-MMA Up Slope Time - Provides selection for the amount of amps required at the start of the weld. Turn the Encoder to set The setting shows on the digi- Up Slope Time: Select by pushing the encoder to Push the Encoder to the Up Slope value tal display.
- Page 16 Continued - Weld Program Selection & Setting Razor 32OAC/DC TIG-MMA - Weld Program - Selecting more weld program parameters Parameter selection: Select by turning the Encoder Knob to cycle through the weld parameter icons. The icon will illuminate when selected. Push the encoder knob to lock the icon.
- Page 17 Razor Continued - Weld Program Selection & Setting 32OAC/DC TIG-MMA Tungsten Diameter - Provides selection of the correct tungsten diameter for the set welding parameters. Warning Alert appears if the parameters are outside the capability of the tungsten diameter. Turn the Encoder to set Tungsten Diameter Select: Select by turning the Push the Encoder to The value selected shown on the...
- Page 18 Continued - Weld Program Selection & Setting Razor 32OAC/DC TIG-MMA - SPOT Weld Program - Selecting SPOT Weld program parameters Parameter selection: Select by turning the Encoder Knob to cycle through the weld parameter icons. The icon will illuminate when selected. Push the encoder knob to lock the icon.
-
Page 19: Mma Weld Program - Set Up Procedure
Set Up Procedure for MMA (Stick) Welding: Razor 32OAC/DC TIG-MMA MMA DC - AC MODE SELECT - Provides selection MMA Mode ( and DC or AC Mode. stick welding) DC MMA MODE: Select by pushing the AC MMA MODE: Select by pushing the button to illuminate the icon. -
Page 20: Remote Controls And Water Cooler Modes
This will prevent the Water Cooled torch cable from over heating and burning out. WARNING! Prevention of Torch Cable Overheating & Burn Out When using RAZORWELD TIG320 ACDC machine with a Water Cooled TIG Torch ensure: 1. The water cooler is plugged into the power supply at the rear of the Power Source. -
Page 21: Job Select, Job Save, Job Recall, Job Delete
Razor Job Select, Job Save, Job Recall, Job Delete - Gas Test 32OAC/DC TIG-MMA JOB SELECT - JOB SAVE - JOB RECALL - JOB DELETE Allows the operator to save the set welding parameters and asign them to a JOB number. The JOB number can be recalled later as required, the welding parameters are preserved inside the JOB number ready for use. -
Page 22: Mma (Stick) Welding Set Up Procedure
Set Up Procedure for MMA (Stick) Welding: Razor 32OAC/DC TIG-MMA MMA (Stick Electrode) Welding Setup and Operation Connecting the Welding Lead Set: Various electrodes require a different polarity for optimum results refer to the electrode manufacturers information for the correct polarity. Most GP electrodes are electrode connected to output socket, Earth Connected to the output socket... - Page 23 Continued - Set Up Procedure for MMA (Stick) Welding: Razor 32OAC/DC TIG-MMA 5) Strike the electrode against the work 4) Place the electrode into the electrode Connect the Earth Clamp securely to piece to create and arc and hold the elec- holder and clamp tight.
- Page 24 MMA (Manual Metal Arc) Welding Razor 32OAC/DC TIG-MMA One of the most common types of arc welding is manual metal arc welding (MMA) or stick welding. An electric cur- rent is used to strike an arc between the base material and a consumable electrode rod or ‘stick’. The electrode rod is made of a material that is compatible with the base material being welded and is covered with a flux that gives off gaseous vapours that serve as a shielding gas and providing a layer of slag, both of which protect the weld area from atmospheric contamination.
-
Page 25: Mma (Stick) Welding Fundamentals
Razor MMA (Stick) Welding Fundamentals 32OAC/DC TIG-MMA Electrode Selection As a general rule, the selection of an electrode is straight forward,in that it is only a matter of selecting an electrode of similar composition to the parent metal. However, for some metals there is a choice of several electrodes, each of which has particular properties to suit specific classes of work. -
Page 26: Installation & Operation For Dc Tig Welding
Installation Set Up for DC TIG Welding: Razor 32OAC/DC TIG-MMA DC HF TIG Welding Setup and Operation 1. Connect the Tig Torch connector to the negative terminal and tighten it. 2. Insert the torch gas connector into the quick lock gas receptacle. 3. -
Page 27: Dc Tig Welding - Standard Set Up Procedure - Operation
DC HF TIG Welding Standard Set Up Procedure: Razor 32OAC/DC TIG-MMA 9). Step by Step procedure for Basic HF DC TIG Welding - Front panel settings. 1. Select DC Tig Function. 4. Select DC Mode 2. Select Torch Mode. 3. Select Arc Ignition Select DC TIG by pressing the Select 2T or 4T trigger function Select HF or LIFT ARC arc igni-... -
Page 28: Weld Start Procedure For Dc, Ac/Dc, Mix Arc Welding
DC HF TIG Welding Standard Set Up Procedure: Razor 32OAC/DC TIG-MMA 9. Select Amperage The setting shows on the digital Turn the Encoder to set Peak Amp: Select by turning the encoder to cycle Push the Encoder to display. It is the maximum am- the Peak Amp value through to illuminate the Peak Amp icon. -
Page 29: Dc Tig Welding
Razor 32OAC/DC TIG-MMA DC TIG Welding The DC power source uses what is known as DC (direct current) in which the main elec- trical component known as electrons flow in only one direction from the negative pole (terminal) to the positive pole (terminal). In the DC electrical circuit there is an electrical principle at work which should always be taken into account when using any DC circuit. -
Page 30: Dc Pulse Tig Welding
Razor 32OAC/DC TIG-MMA DC Pulse TIG Welding Pulse TIG welding is when the current output (amperage) changes between high and low current. Electronics within the welding machine create the pulse cycle. Welding is done during the high-amperage interval (this high amperage is referred to as peak current). During the low amperage period, the arc is maintained but the current output of the arc is reduced (this low amperage is referred to as base current). -
Page 31: Dc Pulse Tig Welding - Set Up Procedure - Operation
Razor Set up and operation for DC PULSE TIG Welding 32OAC/DC TIG-MMA DC Pulse Welding Set Up Procedure EXAMPLE OF PULSE DC TIG WELDING - SETUP PARAMETERS: Material = Stainless Steel x 2.0mm / Tungsten Electrode = 1.6mm 2% Thoriated / Gas = Argon The following steps are a guide as a starting point for you to set the machine up in Pulse mode to give an example of welding in Pulse mode function. -
Page 32: Tig Welding Fusion And Filler Wire Technique
Razor Manual TIG Welding Technique 32OAC/DC TIG-MMA TIG Welding Fusion Technique Manual TIG welding is often considered the most difficult of all the welding processes. Because the welder must maintain a short arc length, great care and skill are required to prevent contact between the electrode and the workpiece. -
Page 33: Machine Set Up For Ac And Mix Arc Tig Welding
Razor Installation Set Up for AC & MIX ARC TIG Welding: 32OAC/DC TIG-MMA AC and MIX ARC TIG Welding Setup and Operation 1. Connect the Tig Torch connector to the negative terminal and tighten it. 2. Insert the torch gas connector into the quick lock gas receptacle. 3. -
Page 34: Ac Welding - Standard Set Up Procedure - Operation
Razor Set up and operation for AC TIG Welding 32OAC/DC TIG-MMA 9). Step by Step procedure for Basic HF AC TIG Welding - Front panel settings. 1. Select AC Tig Function. 4. Select AC WAVE 2. Select Torch Mode. 3. Select Arc Ignition Select AC TIG by pressing the Select your choice of AC wave Select 2T or 4T trigger function... - Page 35 Razor continued - Set up and operation for AC TIG Welding 32OAC/DC TIG-MMA 8. Select Start Amps The value selected shows on the Turn the Encoder to set Start Amp: Select by pushing the encoder to cycle Push the Encoder to digital display.
-
Page 36: Ac Tig Wave Forms
AC TIG Welding - AC Wave Forms Razor 32OAC/DC TIG-MMA AC WAVE FORMS AC Square Wave: Allows the current to change from electrode + positive to electrode - negative very quickly. This produces high voltage as the current switches polarities allowing the arc to re- start easily. -
Page 37: Ac Tig Wave Form Balance Control
Razor AC TIG Welding - AC Wave Balance Control 32OAC/DC TIG-MMA The use of Alternating Current enables us to TIG weld non-ferrous alloys like Aluminium, Magnesium and Aluminium Alloys. These materials have an insulating surface oxide layer that melts at a higher temperature than the base metal beneath, making it difficult to weld if the oxides are not removed. - Page 38 AC TIG Welding - AC Wave Balance Control Razor 32OAC/DC TIG-MMA In older machines, a balanced current output wave was maintained using several capacitors in series or a battery in the welding machine. Modern inverter based TIG power sources use electronics to create and maintain a balanced wave and now most AC TIG power sources produce a Square Wave current output.
- Page 39 Electrode Positive or Electrode Negative IMPORTANT: Xcel-Arc, Razorweld and Viper AC TIG welding machines with Electronic AC Balance Control display the AC Balance by % of time spent in the Electrode Negative phase of the AC cycle Synergic AC Balance - The level of welding amperage selected affects where the ideal AC Balance point is to produce a stable arc that provides good cleaning action and good penetration.
-
Page 40: Ac Pulse Tig Welding - Set Up Procedure - Operation
Razor Set up and operation for AC PULSE TIG Welding 32OAC/DC TIG-MMA AC Pulse Welding Set Up Procedure EXAMPLE OF PULSE AC TIG WELDING - SETUP PARAMETERS: Material = Aluminium x 3.0mm / Tungsten Electrode = 2.4mm Zirconiated / Gas = Argon The following steps are a guide as a starting point for you to set the machine up in Pulse mode to give an ex- ample of welding in Pulse mode function. -
Page 41: Mix Arc Welding
Razor MIX ARC WELDING 32OAC/DC TIG-MMA MIX ARC WELDING MIX Arc is an innovative welding solution for high current AC welding applications, This function of MIX AC/DC makes it possible to modulate the welding current, alternating a period of TIG AC with a period of TIG DC-. This means that the efficiency of AC TIG welding can be combined with the high penetration of DC TIG welding, obtaining higher welding speeds, establishing the weld puddle quicker on cold workpieces, increase weld penetration and reduces tungsten tip temperature. -
Page 42: Remote Amperage Controls - Installation And Operation
Razor Remote Amperage Control Operation Procedure 32OAC/DC TIG-MMA Remote amperage controls allow remote welding current adjustment from the welding machine during welding. ATER1MS-10H XA-RFC-2 amperage on-off adjustment button Connection and operation of the remote hand control 1. Connect the remote control 7 pin 2. -
Page 43: Gas Flow Regulators - Sheilding Gases
Razor Gas Flow Regulators - Sheilding Gases 32OAC/DC TIG-MMA GAS FLOW REGULATORS The job of the gas flow regulator is to reduce the bottle pressure gas down to a lower pressure and deliver it at a constant flow. This constant flow of gas is usually fed through the welding machine where it is controlled by a solenoid valve, operated when the torch trigger is pulled. -
Page 44: Tungsten Electrode Selection & Preparation
Tungsten Electrodes Tungsten is a rare metallic element used for manufacturing TIG welding electrodes. The TIG process relies on tungsten’s hard- ness and high-temperature resistance to carry the welding current to the arc. Tungsten has the highest melting point of any metal, 3,410 degrees Celsius. - Page 45 Tungsten Preparation Always use wheels when grinding and cutting. While tungsten is a very hard material, the surface of a DIAMOND diamond wheel is harder, and this makes for smooth grinding. Grinding without diamond wheels, such as aluminium oxide wheels, can lead to jagged edges, imperfections, or poor surface finishes not visible to the eye that will contrib- ute to weld inconsistency and weld defects.
-
Page 46: Tig Torch Parts Breakdown
TIG WELDING TORCHES ARC T4W Tig Torch 450 Amp Liquid Cooled 450 Amp - Available in 4m, 8m Lengths TIG TORCH 450 AMP LIQUID COOLED Rating: 450A DC, 315A AC @100% duty cycle. Torch Model Description Part Number ARC T4WTig Torch 35-50 Twistlok End, QF Gas, QF H ARC-T4W-4M ARC-T4W-8M Spare Parts... - Page 47 TIG WELDING TORCHES ARC T4W Tig Torch 450 Amp Front End Wear Parts - Collet Bodies, Ceramic Nozzles, Gas Lens Filters, Starter Kits Gas Lens Body Starter Kits - Small Part # Description SGL1 ARC Small Gas Lens Body Starter Kit 1.0mm Ø SGL2 ARC Small Gas Lens Body Starter Kit 1.6mm Ø...
-
Page 48: Trouble Shooting Guide - Tig Welding
TIG WELDING TROUBLE SHOOTING The following chart addresses some of the common problems of TIG welding. In all cases of equipment malfunction, the manufacturer’s recommendations should be strictly adhered to and followed. 1: Tungsten burning away quickly Possible Reason Suggested Remedy Incorrect Gas Check that pure Argon is being used No gas... - Page 49 continued- TIG WELDING TROUBLE SHOOTING 7: Arc wanders during DC welding Possible Reason Suggested Remedy Poor gas flow Check and set the gas flow between 10 - 15 l/min flow rate Lower torch so that the tungsten is off of the work piece 2 - 5mm Incorrect arc length Tungsten incorrect or in poor condi- Check that correct type of tungsten is being used.
-
Page 50: Trouble Shooting Guide - Mma (Stick) Welding
MMA (Stick) WELDING TROUBLE SHOOTING The following chart addresses some of the common problems of MMA welding. In all cases of equipment malfunction, the manufacturer’s recommendations should be strictly adhered to and followed. 1: No arc Possible Reason Suggested Remedy Incomplete welding circuit Check earth lead is connected. -
Page 51: Warranty Policy
WARRANTY TERMS ESSETI New Zealand Limited (‘us’, ‘we’) warrants that the products bearing the brand names ESSETI, XCEL-ARC, RAZORWELD, RAZORCUT, JASIC, VIPER, T&R, XCEL-GAS, Otos, Servore, TECNA & HIT-8SS supplied by us and purchased by you from an Authorised ESSETI (NZ) Ltd. Distributor are free of Material and Faulty Workmanship Defects except for those products listed under ‘Warranty Exclusions’... - Page 52 WARRANTY TERMS WARRANTY / RETURNS / EXCHANGES Our Warranty Returns Policy recognises all and any rights you have under New Zealand Consumer Law and other relevant laws. You shall inspect the goods on delivery and shall within seven (7) days of delivery (time being of the essence) notify the Esseti NZ Ltd. Authorised Distributor from whom you purchased the goods of any alleged defect, shortage in quantity, damage or failure to comply with the description or quote.
- Page 53 Tungsten Electrodes, Collet, Collet Body, Alumina Nozzle, Torch Head, Torch Head water Cooled, Torch Head Flexible, Back Caps, Gas Lens, Torch Handle, Cup Gasket, Torch Body Gas Valve, O-ring, All XCEL-ARC TIG Welding Rods, All XCEL-ARC / Magmaweld Electrodes, Arc Leads, Welding Cable, Electrode Holder, Earth Clamps •...
-
Page 54: Notes
NOTES... - Page 55 NOTES...
- Page 56 Razor Weld New Zealand Limited Esseti New Zealand Limited PO Box 4189, Palmerston North - 4442 Phone: 06 355 1103 Fax: (06) 354 2437 Email: sales@esseti.co.nz www.esseti.co.nz Xcel-Arc © Esseti NZ LTD - 2022...
Need help?
Do you have a question about the RazorWeld TIG320 ACDC and is the answer not in the manual?
Questions and answers