Advertisement
Quick Links
729030319
Owner's Manual
& Assembly Guide
Gloves must be worn
at all times to reduce
risk of injury!
BUILDING DIMENSIONS
†
Approx.
Size
6' x 3'
18 Sq. Ft. 107 Cu. Ft.
1,8 m x ,9 m
1.6 m
* See Inside for Detailed Safety Information.
†
Size rounded off to the nearest foot
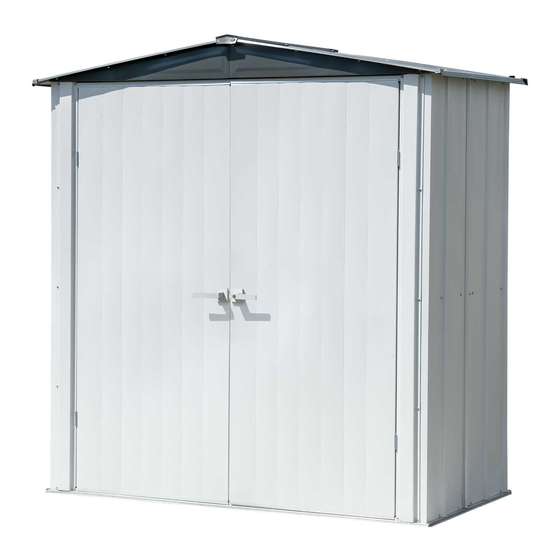
Exterior Dimensions
Storage
(Roof Edge to Roof Edge)
Area
Width
75 3/16"
2
3,0 m 3
190,9 cm
Depth
Height
Width
39 1/4"
78 7/8"
71 1/4"
99,7 cm
200,3 cm
181,0 cm
Model No. PS63
6' x 3'
Base
74 1/16" x 38 3/8"
Size
188,1 cm x 97,4 cm
For proper base construction see page 13
Interior Dimensions
(Wall to Wall)
Depth
Height
35 9/16"
75 7/8"
90,3 cm
192,7 cm
01GZ
Nominal Size
Door
Opening
Width
Height
54 1/2"
69 11/16"
138,5 cm
177,0 cm
Advertisement

Subscribe to Our Youtube Channel
Related Manuals for SPACEMAKER PS63


Summary of Contents for SPACEMAKER PS63
- Page 1 01GZ 729030319 Owner’s Manual & Assembly Guide Model No. PS63 6’ x 3’ Gloves must be worn at all times to reduce Nominal Size risk of injury! Base 74 1/16” x 38 3/8” Size 188,1 cm x 97,4 cm For proper base construction see page 13 BUILDING DIMENSIONS †...
- Page 2 04GC CAUTION • Care must be taken when handling various pieces of your building since many contain sharp edges. • Do NOT attempt to assemble your building before double checking that you have all the parts indicated in the parts lists. Any building left partially assembled may be seriously damaged by even light winds.
- Page 3 05GX ASSEMBLY • The best location is a level area with good drainage. • Allow enough space outside the building to be able to access the roof with a ladder. Use Teamwork: • Two or more people are required to assemble your building. CARE &...
- Page 4 HARDWARE LIST 06GZ Hardware Views by Key No. Part Part Qty. Description List 65103 Hex Nut (#8-32) 65923 Small Bolt (#8-32 x 3/8) (10 mm) #2 Phillips #2 Phillips 11/32 Hex. 65004 Small Screw (#8AB x 5/16) (8 mm) 66783 Flat Head Bolt (#8-32 X 1/2) (13 mm) 66692 Tapping Screw (#10ABx1) (25 mm)
- Page 5 09GZ PARTS LIST Part No. Part Views Qty. Part Description 9399 Front/Rear Floor Frame 11243 Side Floor Frame 11288 Ramp Rear Corner Panel 11147 11278 Front Corner Panel Side Wall Angle 11280 6521 Wall Panel Door Jamb Right 11246 Door Jamb Left 80179 10 11281 Rear Wall Channel Side Wall Channel...
- Page 6 10GZ PARTS LIST Part No. Part Views Qty. Part Description 5997 Left Gable 17 11282 Roof Beam 18 11284 Right Roof Panel 19 11283 Roof Beam Angle Left Roof Panel 20 80189 21 11286 Roof Trim 22 11274 Door Panel Horizontal Door Brace 23 10718 Door Handle Brace...
- Page 7 11GZ ASSEMBLY BY KEY NO.
- Page 8 12GZ ASSEMBLY BY KEY NO.
- Page 9 13GZ CONSTRUCTING A BASE... OPTION 1: Directly on ground (earth) Assemble your building directly on level ground (grass, dirt, rock, sand, etc.). OPTION 2: Wood Platform If you decide to build your own base, be sure to select the appropriate materials. These are the recommended materials for your base: •...
- Page 10 16GZ Step 1 9399 11243 11288 You will need for this page: Frame Floor Front-Rear Frame Floor Side (QTY/QTÉ/CANT: 13) Ramp Do NOT fasten your Floor Frames to your Base at this time. You will anchor your building after it is erected. 11288 9399 FRONT...
- Page 11 17GZ Step 2 Panel Layout 6521 6521 11147 11147 TOP VIEW Floor Frame Assembly 11278 11278 FRONT...
- Page 12 18GZ Step 2 11278 11147 You will need for this page: Front Corner Panel Rear Corner Panel (QTY: 1) (QTY: 8) Uncrimped Rib Crimped Rib Whenever a crimped rib and an uncrimped rib meet, the crimped rib should be placed UNDER the uncrimped rib if possible.
- Page 13 19GZ Step 2 11278 11147 You will need for this page: Front Corner Panel Rear Corner Panel (QTY: 1) (QTY: 8) 11278 11147 Rear...
- Page 14 20GZ Step 2 6521 You will need for this page: Wall Panel (QTY: 3) (QTY: 14) 6521 6521 Rear...
- Page 15 21GZ Step 2 11246 11279 80179 You will need for this page: Left Door Jamb Right Door Jamb (QTY: 6) Lintel (QTY: 8) 11279 FRONT 11279 SIDE VIEW 80179 11246 FRONT...
- Page 16 22GZ Step 2 9397 You will need for this page: Rear Wall Angle (QTY: 10) 9397 Rear SIDE VIEW 9397 Rear...
- Page 17 23GZ Step 2 11280 You will need for this page: Side Wall Angle (QTY: 10) 9397 11280 11280 11280 11280 11279 FRONT...
- Page 18 24GZ Step 2 11281 You will need for this page: Rear Wall Channel (QTY: 10) 11281 Rear SIDE VIEW 11281 Rear...
- Page 19 25GZ Step 2 You will need for this page: 11262 Side Wall Channel (QTY: 10) (QTY: 2) 11281 11262 11262 11262 FRONT...
- Page 20 Step 3 26GZ 5996 5997 6658 11282 You will need for this page: Right Gable Left Gable Gable Brace Roof Beam QTY: 4 QTY: 5 69836 11283 Edge Trim (Purple) 69836 Roof Beam Angle 6658 69836 5996 5997 CAUTION: To avoid mishap on the sharp edge the edge trim must remain in place on the top edge of the gable until right and left roof panels are in place.
- Page 21 27GZ Step 3 You will need for this page: Gable Assembly (QTY: 8) FRONT...
- Page 22 28GZ Step 3 You will need for this page: Gable Assembly (QTY: 8) Rear...
- Page 23 29GZ Step 3 You will need for this page: Roof Beam Assembly (QTY: 4) FRONT...
- Page 24 Step 4 30GZ You will need for this page: 11284 Right Roof Panel (QTY: 6) (QTY: 4) 11284 FRONT Washer 11284 Bolt Gable 11284 69836 FRONT...
- Page 25 Step 4 31GZ 80189 You will need for this page: Left Roof Panel (QTY: 5) (QTY: 6) 80189 FRONT 80189 Washer 80189 Bolt FRONT Gable...
- Page 26 Step 4 32GZ 11284 80189 You will need for this page: Right Roof Panel Left Roof Panel (QTY: 12) (QTY: 9) 11284 Washer 11284 FRONT Washer Bolt 80189 Gable Bolt Gable 80189 FRONT...
- Page 27 Step 4 33GZ 67293B You will need for this page: Weather Stripping 67293B FRONT...
- Page 28 Step 4 34GZ 11287 67468SPM You will need for this page: Ridge Cap (QTY: 6) Peak Cap 11287 67468SPM 67468SPM FRONT...
- Page 29 Step 4 35GZ 11286 66183L 66183R You will need for this page: Right Roof Trim Cap Left Roof Trim Cap Roof Trim (QTY: 2) (QTY: 2) (QTY: 2) 66183R 11286 66183L 66183L 66183R 11286 FRONT...
- Page 30 36GZ Step 5 You will need for this page: 11274 10718 10719 10720 Door Panel Horizontal Door Brace Diagonal Door Brace Door Handle Brace 66692 QTY: 12 QTY: 1 67236 10718 Adhesive Pad 10719 67236 11274 10719 10720 10720 11274 Large holes of Diagonal Door Braces go to center.
- Page 31 37GZ Step 5 You will need for this page: 30000 E - NOT REQUIRED 66609 Latch Shaft-Handle Locking Handle (QTY: 2) (QTY: 6) Hinge (QTY: 2) 66609...
- Page 32 38GZ Step 5 You will need for this page: 11274 10718 10719 10720 Door Panel Horizontal Door Brace Diagonal Door Brace Door Handle Brace 66692 QTY: 8 QTY: 1 67236 10718 Adhesive Pad 10719 67236 11274 10719 10720 10720 11274 Large holes of Diagonal Door Braces go to center.
- Page 33 39GZ Step 5 You will need for this page: 66609 66684 66808 10721 Top Latch Spring Bottom Latch Spring Door Stop Hinge QTY: 12 QTY: 6 30001 E - NOT REQUIRED 66684 (QTY: 2) Left Handle (QTY: 2) 66609 10721 66808...
- Page 34 40GZ Step 6 You will need for this page: Right Door Assembly Left Door Assembly (QTY: 12) Left Door Assembly Door Jamb Right Door Assembly Door Close doors. Adjust so that latch engages behind left door, then tighten set screw. The unit is locked. Turn key and remove.
- Page 35 31EE ANCHORING OPTIONS... IMPORTANT: • If you have swing doors, they must hang and swing level before anchoring building. • Anchor your building at this time. See below for details on anchoring. • Please take a moment to ensure that the building is installed in accordance with these instructions and with all applicable regulations.
Need help?
Do you have a question about the PS63 and is the answer not in the manual?
Questions and answers