Advertisement
Quick Links
Owner's Manual & Assembly Instructions
JD01a
728311220
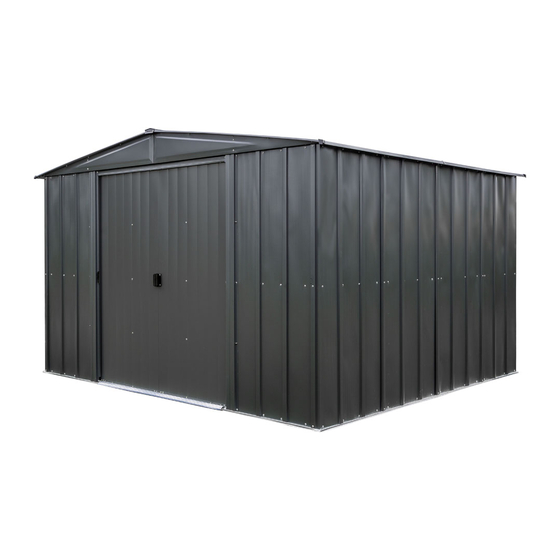
Storage Area: 92 Sq. Ft. 584 Cu. Ft.
8,5 m
2
BUILDING DIMENSIONS
*Approx.
Size
10' x 10'
121" x 114 1/2"
3,0 m x 3,0 m
307,3 cm x 290,8 cm
16,5 m
3
* Size rounded o to the nearest foot
Exterior Dimensions
Base
(Roof Edge to Roof Edge)
Size
Width
123 1/4"
313,1 cm 297,2 cm
Model No. RGB1010ONEU
CAUTION: SOME PARTS HAVE SHARP EDGES. CARE
MUST BE TAKEN WHEN HANDLING THE VARIOUS PIECES
TO AVOID A MISHAP. FOR SAFETY SAKE, PLEASE READ
SAFETY INFORMATION PROVIDED IN THIS MANUAL
BEFORE BEGINNING CONSTRUCTION. WEAR GLOVES
WHEN HANDLING METAL PARTS.
Interior Dimensions
Depth
Height
Width
117"
82 1/8"
118 1/4"
208,6 cm
300,4 cm
RGB1010FGEU
(Wall to Wall)
Depth
Height
111 3/4"
80 7/8"
55 1/2"
283,8 cm
205,4 cm
141,0 cm
Door
Opening
Width
Height
69 1/4"
175,9 cm
Advertisement

Subscribe to Our Youtube Channel
Related Manuals for SPACEMAKER RGB1010ONEU


Summary of Contents for SPACEMAKER RGB1010ONEU
- Page 1 Owner's Manual & Assembly Instructions JD01a Model No. RGB1010ONEU RGB1010FGEU 728311220 CAUTION: SOME PARTS HAVE SHARP EDGES. CARE Storage Area: 92 Sq. Ft. 584 Cu. Ft. MUST BE TAKEN WHEN HANDLING THE VARIOUS PIECES 8,5 m 16,5 m TO AVOID A MISHAP. FOR SAFETY SAKE, PLEASE READ SAFETY INFORMATION PROVIDED IN THIS MANUAL BEFORE BEGINNING CONSTRUCTION.
- Page 3 BEFORE YOU BEGIN..HS02b Owner's Manual Before beginning construction, check local building codes regarding footings, location and other requirements. Study and understand this owner's manual. Important information and helpful tips will make your construction easier and more enjoyable. Assembly Instructions: Instructions are supplied in this manual and contain all appropriate information for your building model.
- Page 4 PLAN AHEAD..Watch the Weather: Be sure the day you select to install your building is dry and calm. Do not attempt to assemble your building on a windy day. Be careful on wet or muddy ground. Teamwork: Whenever possible, two or more people should work together to assemble your building.
- Page 5 SAFETY FIRST..XA04 Safety precautions are important to follow throughout the construction of your building. •Care must be taken when handling various •Practice caution with the tools being used in pieces of your building since some contain the assembly of this building. Be familiar with sharp edges.
- Page 6 CARE & MAINTENANCE..XA05 Finish: For long lasting nish, periodically clean and wax the exterior surface. Touch-up scratches as soon as you notice them on your unit. Immediately clean the area with a wire brush; wash it and apply touch-up paint per manufacturer's recommendation. Roof: Keep roof clear of leaves and snow with long handled, soft-bristled broom.
- Page 7 Base DK07 The Base For Your Building OPTION 1: Wood Platform If you decide to build your own base, be sure to select the appropriate materials. These are the recommended materials for your base: 2 x 4's (38 mm x 89 mm) Pressure Treated Lumber 5/8"...
- Page 8 Anchoring XA07 Anchoring Down The Building It is important that the entire oor frame be anchored after the building is erected. Below are recommended ways of anchoring. Anchoring into Wood/Post: Use 1/4" (6 mm) Wood Screws. There are 1/4" (6 mm) dia.
-
Page 9: Table Of Contents
Hardware JD09 Remove from bag of screws and save for the last step 65900A #10Bx1/2" (13 mm) 65923 65004 65103 Black Screw (8) #8-32x3/8" (10 mm) #8Ax5/16" (8 mm) #8-32 Hex Nut (157) Bolt (157) Screw (376) (Packed with Screws) 65109 66646 #8-32 Acorn Nut (4) - Page 10 Parts List JD10 Assembly Part Part Quantity Check Key No. Number Description in Carton List 3719 Door Handle Brace 5986 Rear Wall Angle 11236 Right Gable 80173 Left Gable 6015 Side Roof Trim 10497 Horizontal Door Brace 6301 Vertical Door Brace 6403 Door Track Splice 6520...
- Page 11 Assembly by Key No. JD11 21 21 3 21 21...
- Page 12 8934 Ramp (1) Step 1 Parts Needed For 9367 Front Floor Frame (2) Floor Frame Assemblies 8936 Rear Floor Frame (2) S14 ctr 9299 Side Floor Frame (4) (15) 9367 The front oor frame is made up of 8934 three pieces. The side floor frames and the rear floor frame are made 9367 up of two pieces.
- Page 13 5986 Rear Wall Angle (2) Step 2 Parts Needed For 9917 Rear Wall Channel (2) Frame Assemblies 9923 Side Wall Channel (4) S15 ctr 9298 Side Wall Angle (4) Rear Wall Channel 9917 118 1/8" 300,0 cm 9917 The main frame pieces reinforce the walls.
- Page 14 Step 3 Parts Needed For 10518 Roof Beam (8) Roof Beam Assemblies S16 ctr (30) 10518 The roof beams join the two gables and support the roof panels. The main roof beam is made up of four pieces overlapped back to back at 10518 the center.
-
Page 15: Door Slide
Step 4 Parts Needed For 6403 Door Track Splice (1) Door Track Assembly 9366 Door Track (2) A17 ctr NOTE: Door Track Splice (painted part) 6403 The door track assembly supports the sliding doors and reinforces the front wall. It is made up of three pieces. Using the door track splice, (painted), join the door track (galvanized) pieces end-to-end as... -
Page 16: 8397 Corner Brace
Step 5 Front Floor Assembly (1) Parts Needed For Side Floor Assembly (2) Floor Frame Rear Floor Assembly (1) 8397 Corner Brace (4) JD16 RIGHT REAR (24) 9299 Assemble the four corners of the oor frame using two screws at STEP each corner as shown. -
Page 17: Washer
Step 6 Parts Needed For 6521 Wall Panel (2) 9375 Front Wall Panel (2) Corners 6520 Corner Panel (4) JD17 Narrow Side (38) 6520 Wide Side NOTE REAR The remainder of the building assembly requires many hours and more than one 6520 person. -
Page 18: 6481 Gusset
Door Track Assembly (1) Step 7 Rear Wall Angle Assembly (1) Parts Needed For Side Wall Angle Assemblies (2) Frames Rear Wall Channel Assembly (1) Side Wall Channel Assemblies (2) JD18 6481 Gusset (2) 5986 (54) Wall Angles Must Face The main frame pieces give rigidity to Inside 9917... - Page 19 Step 8 Parts Needed For 6521 Wall Panel (6) Wall Panels 11241 Gusset Strap (2) 67521 Edge Trim (1) JD19 STEP 6521 6521 (84) (15) 6521 6521 STEP Each wall panel has a crimped rib on one side. The crimped rib should go 6521 under the rib of the panel that follows it.
-
Page 20: Bolt
Step 9 Parts Needed For 9371 Door Jamb (2) Front Channel/Door Jamb 9365 Front Wall Channel (2) JD20 9365 (18) The door jambs reinforce the door STEP opening and provide an attractive trim. Follow these steps for both INSIDE OF door jambs. - Page 21 Step 10 Parts Needed For 11236 Right Gable (2) 80173 Left Gable (2) Gable Assemblies 5971 Roof Beam Bracket (4) JD21 The gables go on top of the front and rear walls to support the roof beams. NOTE The gables are packed nested together and might be mistaken as one piece.
- Page 22 Step 11 Parts Needed For Left Gable Assemblies (2) Right Gable Assemblies (2) Gables/Braces 6635 Gable Brace (2) JD22 (20) Lift and fasten a right and left gable, under angle at corner, to the door track and rear wall angle with screws. Hint: On the rear gable, use a bolt and nut at the overlapping rear wall angle.
- Page 23 Step 12 Parts Needed For Main Roof Beam (1) Roof Beams Single Roof Beam (2) JD23 (12) STEP Spread the two halves of the main roof beam and fasten the roof beam to the gable brace of the front gable. Single Roof Beam Assembly Fasten the other end of the main roof beam to the gable brace of the...
- Page 24 Step 13 Parts Needed For 6640 Right Roof Panel (1) Right Roof Panel JD24 STEP 6641 6640 Installing the roof panels is best done with a step ladder. Begin installing roof panels at the back right corner 6529 of the building. Each screw and bolt 6529 in the roof requires a washer.
- Page 25 Step 14 Parts Needed For 6641 Left Roof Panel (1) Roof Assembly 6529 Roof Panel (4) JD25 6641 6640 (40) 6529 6529 Install a left roof panel at the left rear corner of the roof. 6529 6529 Install 4 roof panels in the se- quence and positions shown.
- Page 26 Step 15 Parts Needed For 6869 Ridge Cap (2) 6641 Left Roof Panel (1) Ridge Caps & Panels 6640 Right Roof Panel (1) JD26 STEP Peak Cap (26) (44) 6869 Install 1 ridge cap on the com- pleted roof section using bolts and nuts.
- Page 27 Step 16 Parts Needed For 6015 Side Roof Trim (4) Roof Trim 66847 Vent Gable (4) JD27 (12) Attach the side roof trim to the STEP lower end of the roof panels on each side of the building using screws at each panel overlap.
- Page 28 3719 Door Handle Brace (2) Step 17 Parts Needed For 10472 Right and Left Doors (2) Door Assembly 10497 Horizontal Door Brace (4) 6301 Vertical Door Brace (2) JD28 (12) The steps on this page tell how to assemble the right door. You will per- form exactly the same procedures for 66045 the left door.
- Page 29 Step 18 Parts Needed For Right Door Assembly (1) Door Installation & Adjustment Left Door Assembly (1) A31ctr Horizontal Door Brace Gable Door Track Door Slide From inside the building, put the bottom of the right door assembly (on your left when you are inside the building) behind door jamb into the front frame track.
- Page 30 SOME FACTS ABOUT RUST XA35 SOME FACTS ABOUT RUST 1. Avoid nicking or scraping the coating surface, Rusting is a natural oxidizing process that occurs inside and out. when bare metal is exposed to moisture. Problem areas include screw holes, unfinished edges, or 2.
- Page 32 RGB1010FGEU RGB1010ONEU JD32a Anchoring Anchoring Anchor your building at this time. 728311220...
Need help?
Do you have a question about the RGB1010ONEU and is the answer not in the manual?
Questions and answers