
Related Manuals for DAPAudio WMS6T-B


Summary of Contents for DAPAudio WMS6T-B
- Page 1 USER MANUAL ENGLISH WMS6T-B Product code: D3842 Highlite International B.V. – Vestastraat 2 – 6468 EX – Kerkrade – the Netherlands...
-
Page 2: Table Of Contents
WMS6T-B Table of contents Introduction ................................3 Before Using the Product ..........................3 Intended Use ............................... 3 Text Conventions ..............................3 Symbols and Signal Words ..........................4 Symbols on the Information Label ........................4 Safety ..................................5 Warnings and Safety Instructions ........................5 Requirements for the User .......................... - Page 3 WMS6T-B Preface Thank you for purchasing this DAP product. The purpose of this user manual is to provide instructions for the correct and safe use of this product. Keep the user manual for future reference as it is an integral part of the product. The user manual shall be stored at an easily accessible location.
-
Page 4: Introduction
The manufacturer will not accept liability for any resulting damages caused by the non-observance of this manual. After unpacking, check the contents of the box. If any parts are missing or damaged, contact your Highlite International dealer. Your shipment includes: ● DAP WMS6T-B ● Mounting plate ● Mounting screw ●... -
Page 5: Symbols And Signal Words
WMS6T-B Symbols and Signal Words Safety notes and warnings are indicated throughout the user manual by safety signs. Always follow the instructions provided in this user manual. Indicates an imminently hazardous situation which, if not avoided, will result in DANGER death or serious injury. -
Page 6: Safety
WMS6T-B Safety Important Read and follow the instructions in this user manual before installing, operating or servicing this product. The manufacturer will not accept liability for any resulting damages caused by the non-observance of this manual. Warnings and Safety Instructions... -
Page 7: Requirements For The User
WMS6T-B Attention Do not expose the device to conditions that exceed the rated IP class conditions. This device is IP54 rated. IP (Ingress Protection) 54 class means that the device is dust-protected. Ingress of dust does not interfere with satisfactory operation of the device. Water splashed against the enclosure from any direction shall have no harmful effect. -
Page 8: Description Of The Device
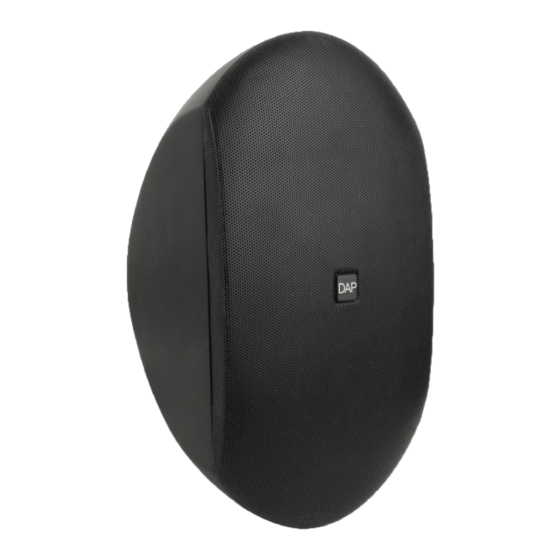
Description of the Device The DAP WMS6T-B is an IP-rated 100 V speaker for low-impedance audio installations. The device can be easily mounted to a wall, in a horizontal or vertical orientation. The DAP logo on the front is rotatable. The device can be used in shops, restaurants or clubs, as well as in sheltered outdoor locations. -
Page 9: Bottom View
WMS6T-B Bottom View Fig. 04 Mounting screw (M3 x 10 mm) 2 x adjustment screws (M6 x 45 mm) Ball-joint Mounting Plate Fig. 05 4 x mounting holes (Ø 5 mm) 4 x mounting hooks 4-pin terminal connector Product code: D3842... -
Page 10: Product Specifications
WMS6T-B Product Specifications Model: DAP WMS6T-B Physical: Dimensions: 215 x 240 x 385 mm (L x W x H) Weight: 3,9 kg Inputs: Passive input connector: 4-pin terminal Transformer: 100 V Output: Passive output connector: 4-pin terminal Audio Specifications: Speaker system:... -
Page 11: Dimensions
WMS6T-B Dimensions Fig. 06 Product code: D3842... -
Page 12: Installation And Setup
WMS6T-B Installation and Setup Safety Instructions for Installation WARNING Incorrect installation can cause serious injuries and damage of property. Installation Site Requirements ● The device can be used outdoors. ● The device can be mounted on a wall in a vertical or horizontal orientation. -
Page 13: Drilling Mounting Holes
WMS6T-B Drilling Mounting Holes 01) Hold the mounting plate (07) against the wall, as shown in Fig. 07, and mark the mounting locations. Fig. 07 Drill holes at the marked locations. See 4.3.1.1. Drilling into Wood or 4.3.1.2. Drilling into Concrete on page 12 for more information. -
Page 14: Connecting Devices
WMS6T-B Connecting Devices Connect all cables to the mounting plate (07). Make sure that the cable polarity is correct (+/-) (Fig. 11). Fig. 11 100 V Amplifier Mode To use the device with a 100 V amplifier, follow the steps below: Connect the COM output of the 70/100 V amplifier to one of the (-) connectors on the mounting plate (07). -
Page 15: Conventional Amplifier Mode
WMS6T-B Conventional Amplifier Mode To use the device with a conventional amplifier, follow the steps below: Connect the (-) output of the conventional amplifier to one of the (-) connectors on the mounting plate (07) of the first speaker. Connect the (+) output of the conventional amplifier to one of the (+) connectors on the mounting plate (07) of the first speaker. -
Page 16: Installing The Mounting Plate
WMS6T-B Installing the Mounting Plate Install the mounting plate (07) with the mounting hooks facing up (Fig. 14). Fig. 14 To install the mounting plate (07), follow the steps below: Hold the mounting plate (07), with the rubber gasket (08), against the wall, in such a way that all cables fit through the opening in the rubber gasket (08) (Fig. -
Page 17: Setting Line Transformer Taps
WMS6T-B Setting Line Transformer Taps The device has multiple selectable line transformer taps. To select line transformer taps, follow the steps below: 01) Pry up and remove the line transformer tap cover (09) to get access to the line transformer tap selector (10). -
Page 18: Installing The Speaker
WMS6T-B Installing the Speaker To mount the speaker, follow the steps below: Turn the mounting screw (11) counter-clockwise to remove it. Hang the speaker on the mounting plate (07) (Fig. 19). Notes: ● The 4 x mounting hooks (15) shall fit through the 4 x speaker mounting holes (05) on the mounting panel (04). -
Page 19: Adjusting The Angle
WMS6T-B Adjusting the Angle You can adjust the angle of the device with the adjustment screws (12). To adjust the angle, follow the steps below: 01) Fold the rubber ball-joint cover (03) to get access to the adjustment screws (12). -
Page 20: Adjusting The Logo
WMS6T-B Adjusting the Logo You can adjust the orientation of the DAP logo on the speaker grill so that it is always legible, regardless of the orientation of the device. Option 1 Use a tool to pry up the rotatable logo (02). -
Page 21: Connecting The Amplifier
WMS6T-B Connecting the Amplifier Attention Speaker load Before connecting the amplifier to the power supply, make sure that the total load of all connected speakers is below the maximum rating of the amplifier. If the total load is higher, it may cause damage to the amplifier and to the speakers. -
Page 22: Maintenance
WMS6T-B Maintenance Preventive Maintenance Attention Before use, examine the device visually for any defects. Make sure that: ● There are no deformations on the housing. ● The device is rigidly mounted to the wall. Basic Cleaning Instructions To clean the device, follow the steps below: Clean the device with a soft, lint-free cloth. -
Page 23: Deinstallation, Transportation And Storage
WMS6T-B Deinstallation, Transportation and Storage Instructions for Deinstallation WARNING Incorrect deinstallation can cause serious injuries and damage of property. ● Disconnect power supply before deinstallation. ● Always observe the national and site-specific regulations during deinstallation and derigging of the device. - Page 24 ©2022 DAP...
Need help?
Do you have a question about the WMS6T-B and is the answer not in the manual?
Questions and answers