Lattice Semiconductor MachXO2 Quick Start
Dual sensor interface board
Hide thumbs
Also See for MachXO2:
- Programming and configuration usage manual (58 pages) ,
- User manual (41 pages) ,
- Usage manual (11 pages)
Advertisement
This document provides a brief introduction and instructions to install and demonstrate the
MachXO2™ Dual Sensor Interface Board (DSIB) on Windows 7/Vista/XP/2000. Further infor-
mation, including the MachXO2 Dual Sensor Interface Board User' s Guide (EB69), is available
on the Lattice website at www.latticesemi.com/dualsensorbridge.
Check Kit Contents
The DSIB box includes the following items:
• MachXO2 Dual Sensor Interface Board
• QuickSTART Guide
Storage and Handling Tips:
Static electricity can shorten the lifespan of electronic components. Please observe these tips to
prevent damage that could occur from electro-static discharge:
• Use anti-static precautions such as operating on an anti-static mat and wearing an anti-static
wristband.
• Store the MachXO2 Dual Sensor Interface Board in the anti-static bag provided.
• Touch the metal USB housing to equalize voltage potential between you and the board.
Connect the DSIB, HDR-60 and NanoVesta Boards
The DSIB plugs into an HDR-60 Base board, which is required and is available separately. In
addition, at least one 9MT024 NanoVesta board is required. Two 9MT024 NanoVesta boards
are needed for dual sensor or 3D video support. Optionally, the AR0331 NanoVesta (Aptina) or
MN34041 NanoVesta (Panasonic) boards can be plugged in to the DSIB, but dual implementa-
tion of those boards is currently not supported.
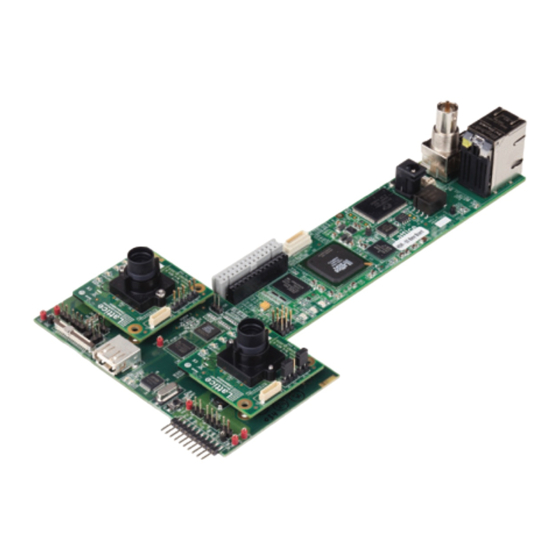
NanoVesta
Sensor #2
Connectors
This procedure is continued on the next page.
FTDI
LEDs
USB
ISSI SDRAM
MachXO2 PLD
MachXO2 Dual Sensor
Interface Board
TI IPNC
Connector
NanoVesta
Sensor #1
Connectors
Advertisement
Table of Contents

Subscribe to Our Youtube Channel
Related Manuals for Lattice Semiconductor MachXO2


Summary of Contents for Lattice Semiconductor MachXO2
- Page 1 This document provides a brief introduction and instructions to install and demonstrate the MachXO2™ Dual Sensor Interface Board (DSIB) on Windows 7/Vista/XP/2000. Further infor- mation, including the MachXO2 Dual Sensor Interface Board User’ s Guide (EB69), is available on the Lattice website at www.latticesemi.com/dualsensorbridge.
- Page 2 For further details on these options, see EB69, MachXO2 Dual Sensor Interface Board User’ s Guide. 3. Plug in the 12V power supply of the HDR-60 Base Board into the power connector.
- Page 3 HDR-60 Base Board. Done! Congratulations! You have successfully connected and demonstrated the MachXO2 Dual Sensor Interface Board. Please refer to the MachXO2 Dual Sensor Interface Board User’ s Guide available on the Lattice website at www.latticesemi.com/dualsensorbridge for the following: • Schematic details • Gerber PCB layout artwork...
- Page 4 DSIB to interface to a TI ISP base board. This requires a flat cable connec- tion and a TI IP network camera board. When the DSIB is used with the TI ISP base board, the DSIB is not plugged into the HDR-60 Base Board. For further information, see EB69, MachXO2 Dual Sensor Interface Board User’ s Guide. For details on the TI IP network camera, visit www.
- Page 5 Мы молодая и активно развивающаяся компания в области поставок электронных компонентов. Мы поставляем электронные компоненты отечественного и импортного производства напрямую от производителей и с крупнейших складов мира. Благодаря сотрудничеству с мировыми поставщиками мы осуществляем комплексные и плановые поставки широчайшего спектра электронных компонентов.
Need help?
Do you have a question about the MachXO2 and is the answer not in the manual?
Questions and answers