
Related Manuals for Datacolor 45


Summary of Contents for Datacolor 45
- Page 1 Datacolor 45 User Guide, 10.2013, Version. 1.0 Datacolor 45 User’s Guide Datacolor 45 (models 45G CT, 45G, 45S)
- Page 2 Datacolor 45 User’s Guide (October, 2013) All efforts have been made to ensure the accuracy of the information presented in this format. However, should any errors be detected, Datacolor appreciates your efforts to notify us of these oversights. Changes are periodically made to this information and are incorporated into forthcoming versions.
-
Page 3: Table Of Contents
Loading Standards from Datacolor 45 to Datacolor Tools __________________________ 33 Transferring Batches into Datacolor Tools from Datacolor 45 _______________________ 34 Measuring Standards/ Batches directly into Datacolor Tools Desktop________________ 36 Datacolor Tools set up (only for importing batches from Datacolor 45)________________ 36 Standalone operation____________________________________________________________ 37 Standard and Batches________________________________________________________ 37... - Page 4 Datacolor 45 User Guide, 10.2013, Version. 1.0 Measure new batch__________________________________________________________ 40 Measure new batch vs. stored Standard_________________________________________ 40 Search and find stored batches________________________________________________ 43 Results Standard, Batches: options_____________________________________________ 44 Results Standard, Batches: illuminants__________________________________________ 45 Data ______________________________________________________________________ 45 Delete Standards, Batches____________________________________________________ 45...
- Page 5 Datacolor 45 User Guide, 10.2013, Version. 1.0 Appendix_____________________________________________________________________ Datacolor Global Support____________________________________________________ 73 PC requirements for Datacolor Tools____________________________________________ 74 Instrument Specification______________________________________________________ 75 Index_________________________________________________________________________ 76...
-
Page 6: Datacolor 45
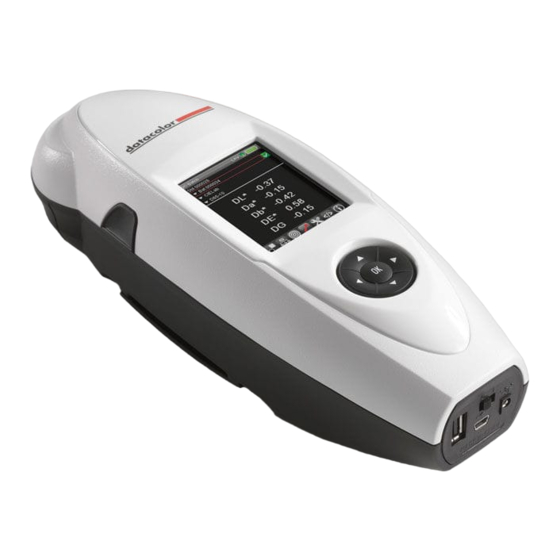
Datacolor 45 About the Datacolor 45 The Datacolor 45 is a member of the newest generation of Datacolor hand-held color measuring instruments, incorporating state-of-the-art CMOS integrated circuit technology in the instrument design. It is intended for use as a device for measuring, specifying and evaluating color in both laboratory and industrial settings. -
Page 7: Safety Warnings
CAUTION There are no user-serviceable parts for this equipment. For battery replacement: Unit must be returned to factory or an authorized Datacolor Service Center. Light Source Do not stare directly into the open port located in the bottom of the instrument when the measurement is in progress. -
Page 8: Feature Summary
Datacolor 45 User Guide, 10.2013, Version. 1.0 Feature Summary The Datacolor 45 employs state-of-the-art features including the spectrometer, light source, and optics. Below is a summary of those features: FEATURE DESCRIPTION PURPOSE/BENEFIT Measurement 45/0º geometry Provides accurate and repeatable Geometry... -
Page 9: Datacolor 45 Models
Datacolor 45 User Guide, 10.2013, Version. 1.0 Datacolor 45 models Datacolor 45 is available in different models 45G CT 11mm aperture 11mm aperture 11mm aperture metal stand metal stand metal stand Tile holder Tile holder Tile holder black trap black trap... -
Page 10: Accessories
Datacolor 45 User Guide, 10.2013, Version. 1.0 Accessories Models (Datacolor 45G CT, 45G,45 S) come with the following standard accessories: AC Adaptor with power cable Precision calibration/measurement stand USB cable Black Trap, White Tile (models DC45G CT, DC45G, 45S) and Gloss Tile (only model DC45G CT, DC45G) ... -
Page 11: Usb On The Go Technology
Datacolor 45 User Guide, 10.2013, Version. 1.0 Optional available in combination with high end calibrator: can holder, V-block Datacolor 45 with precision calibration/ V-block, can holder Measurement stand USB-On-The-Go technology USB-On-The-Go technology enables USB peripherals, such as, USB flash drive, USB HID keyboard profile for keyboard and barcode scanners. -
Page 12: Charging The Instrument
Datacolor 45 User Guide, 10.2013, Version. 1.0 Charging the Instrument: Please make sure that your Datacolor 45 instrument is fully charged before using. DC45 must be charged for 8 hours before use. Note !Instrument need to be switched to ON position before attaching the power connector. - Page 13 The computer will display a message saying that new hardware is found and the driver is being installed. The Datacolor 45 uses Serial over USB communication, so you will need to open the Device Manager in the Control panel. Open the Ports (COM & LPT) section:...
- Page 14 Datacolor 45 User Guide, 10.2013, Version. 1.0 You will see the Datacolor 45 listed with a Com Port address. Make note of that address and close the device manager. This step is only necessary for the first time an instrument is connected To the Tools software.
- Page 15 Enter the serial number of the instrument (labeled on the bottom of the Datacolor 45.) Click ADD to complete the driver process. If the Datacolor 45 does not appear in the NAME field, click on the drop-down menu and select it:...
- Page 16 (see box in image below.) ! NOTE: While connected, the Datacolor 45 acts as a dumb instrument and does not display or store measurement results. If you navigate away from the PC Access window on the instrument, the connection to the computer will be severed.
- Page 17 Datacolor 45 User Guide, 10.2013, Version. 1.0 To measure through the Tools software, select the Instrument tab in the top menu ribbon and then press CALIB: The calibration wizard will then walk you through the steps for calibrating. Choose the GLOSS option...
-
Page 18: Connecting The Instrument
Datacolor 45 User Guide, 10.2013, Version. 1.0 Main Menu (for standalone operation) Navigation Navigate using 5-way button (up, down, left, right and OK) OK selects highlighted function Left, right will navigate to the different menues Calibration Instrument calibration menu... - Page 19 Datacolor 45 User Guide, 10.2013, Version. 1.0 Model (Datacolor 45G CT, 45G, 45S): calibration with high end calibrator (black trap, white tile) optional for (Datacolor 45G CT gloss tile) gloss tile (only Datacolor 45G precision calibration, white tile CT, Datacolor 45G)
- Page 20 Datacolor 45 User Guide, 10.2013, Version. 1.0 Place the Instrument into the Calibration tray with the measuring aperture over the Black Trap hole (follow instructions on screen) 1.Black Trap Press „measurement“ button“ 2. White Tile Press „measurement“ button“ 3. Gloss Tile...
-
Page 21: Settings
Datacolor 45 User Guide, 10.2013, Version. 1.0 Settings Settings menu The Settings menu shows six options. Tap the desired option, or scroll up and down through the options using the up/down buttons, then press OK. The Active Option is highlighted in Red. -
Page 22: Calibration Intervall
Datacolor 45 User Guide, 10.2013, Version. 1.0 Calibration Interval Hit OK to activate calibration interval menu.Use up/down buttons to set calibration interval OK button to return to last menu. Change calibration intervall Sound Switch sound on/off Hit OK to switch between sound on/off (Red is Off. Green is On) for measurements. -
Page 23: Gloss Ladder
Hit „OK“ to select gloss ladder 45G (no gloss ladder) 45 G (RHOPOINT gloss ladder) 45G (BYK gloss ladder) Gloss ladders need to be created and loaded into the DC45. Please contact Datacolor Service for further information (see service hotlines page 70/71) -
Page 24: Language
Datacolor 45 User Guide, 10.2013, Version. 1.0 Language Select different languages, after selecting, the language will only be active after switching off/on DC45. Auto Standard Limit Define limit for Auto Standard When selected this option during a Batch measurement the application will look for the closest standard (closest checking dE in D65-10) from all the existing standards in the system and associates the measured batch to this standard. -
Page 25: Pc Access
Check the device manager on your PC to make sure your Bluetooth receiver is on and that you can see the Datacolor 45 connection (the Datacolor 45 Bluetooth radio is always on when the instrument is in the PC Access mode.) The display on the Datacolor 45Gwill show when connections are active, as in the diagrams above. - Page 26 If you have chosen the Pigment mode, the user name is USER and the password is CC3. The next window to open is the Driver’s measurement window. Press the ADD button to add the Datacolor 45 to the Driver list:...
- Page 27 Select CURRENT DATACOLOR INSTRUMENTS and Datacolor 45 from the drop down menus: Select the COM port that was noted earlier in the PORT menu of the Device Manager. Enter the serial number of the instrument (labeled on the bottom of the Datacolor 45.) Click ADD to complete the driver process.
- Page 28 Datacolor 45 User Guide, 10.2013, Version. 1.0 The Driver window will now prompt you to calibrate the instrument. If you wish to use the integrated Gloss Meter, Press the radio button next to GLOSS and click calibrate: You should now calibrate the instrument, following the instructions from the Calibration Wizard.
-
Page 29: Calibration
Datacolor 45 User Guide, 10.2013, Version. 1.0 Calibration black trap Calibration white tile... - Page 30 Datacolor 45 User Guide, 10.2013, Version. 1.0 Calibration gloss tile Calibration white tile...
-
Page 31: Bluetooth Tm Communication
Bluetooth™ will search to devices 4. Windows will detect the Datacolor 45 and shows following screen: in this case Datacolor 45 with serial 000xxx. Select unit and select “Next”. Bluetooth™ devices are typically working with pairing codes, three options are available,... - Page 32 The easiest one is to go to devices, go to properties of the connected device and see what com port is has: In this case: COM43 7. When setting up an new instrument in the Datacolor Instrument driver, select proper COM port for Datacolor 45 unit and save it Bluetooth™...
-
Page 33: Communication With Datacolor Tools Software
Consult the Datacolor Tools User Guide for detailed information about the operation of Tools Software. Once connected, the Datacolor 45 instrument shows up in the Tools explorer Window as a flash drive: Setting Up Datacolor Tools software for Portable Operation:... - Page 34 Datacolor 45 User Guide, 10.2013, Version. 1.0 In the EDIT HOME BAR screen, scroll down to INSTRUMENT SEND ALL STDS and hit the right arrow button to move this function over to the Active list: Click OK on the Add Button screen and function will move over to the Active list: This function now appear in the Home Bar, enabling you to send all of your standards to the instrument with one click .
-
Page 35: Loading Standards From Datacolor Tools To Datacolor 45
Datacolor 45 User Guide, 10.2013, Version. 1.0 Loading Standards from Datacolor Tools to Datacolor 45 To send a single standard from the Tools desktop to Datacolor 45, Select the standard in the Tools Explorer, right click and select Send Curr. Standard to the Device. -
Page 36: Loading Standards From Datacolor 45 To Datacolor Tools
Datacolor 45 User Guide, 10.2013, Version. 1.0 Loading Standards from Datacolor 45 to DatacolorTools Desktop When connecting the device to DC Tools (via USB or Bluetooth) the unit will be shown in DC Tools Explorer as flashdrive. Right mouse click on instrument name/serial number will give 4 different options to load data or delete data from the unit to DC Tools,... -
Page 37: Transferring Batches Into Datacolor Tools From Datacolor 45
Transferring Batches into Datacolor Tools from Datacolor 45 Instrument After measuring batches, reconnect Datacolor 45 to the DC Tools software. The instrument will again reappear in the Tools Explorer window as a Mass Storage Drive. To send all Batches to the Tools Desktop , right-click... - Page 38 Datacolor 45 can measure standards and batches directly into the Tools Desktop. In this mode, Datacolor 45 acts like a desktop instrument and does not store or display data. Measurements can be released either by using the “Measurement Main Window” directly or pushing directly the measurement button at the unit.
-
Page 39: Measuring Standards/ Batches Directly Into Datacolor Tools Desktop
Datacolor 45 User Guide, 10.2013, Version. 1.0 Datacolor Tools set up (only importing batches from Datacolor 45) If the Import QTX setting (shown below) is not checked then a new standard is automatically created on the desktop when retrieving only batches from Datacolor 45. -
Page 40: Standalone Operation
Datacolor 45 User Guide, 10.2013, Version. 1.0 Stand-Alone Operation Standards & Batches Standard menu Measure new Standard Select Standard menu with left and right navigation, press measurement button to measure new standard Depending on setting for “multiple measurement” 1,2,3..measurements have been done using measurement buttons. -
Page 41: Use Current Standard From Instrument
Datacolor 45 User Guide, 10.2013, Version. 1.0 depending on “naming” setting, auto name will be given or name has to be typed in Hit OK to save standard, with the keyboard (see page 47) Use current Standard from instrument Standard list... -
Page 42: Search And Find Standards
Datacolor 45 User Guide, 10.2013, Version. 1.0 Change active Standard Use Up and Down button to select standard and hit OK Search and Find Standards Select magnifier to activate keyboard Select magnifier to activate keyboard and type in Search routine (e.g. “dec”) -
Page 43: Measure New Batch
Datacolor 45 User Guide, 10.2013, Version. 1.0 Search routine filter „dec“ Search results „dec“ All Standards found with “dec” are listed on screen, select with OK Measure new Batch: Batch menu Measure new Batch vs. stored Standard If there is no batch available, the screen will display this message... - Page 44 Datacolor 45 User Guide, 10.2013, Version. 1.0 Select Batch menu with left and right navigation, press measurement button to measure new batch, batch will be compared with current Standard in Standard menu Depending on setting for “multiple measurement” 1,2,3..measurements have been done using measurement buttons.
- Page 45 Datacolor 45 User Guide, 10.2013, Version. 1.0 Depending on “naming” setting, auto name will be given or name has to be typed in with keyboard (see page 47) Standards and Batch results will be shown on screen (depending on the screen form selection, see page 47)
-
Page 46: Search And Find Stored Batches
Datacolor 45 User Guide, 10.2013, Version. 1.0 Search and find stored Batches Use up and down buttons to find stored batches, press ok to change current batches Select magnifier to activate keyboard Search batches starting from a name using magnifier and filter (e.g. “batch”) Search routine filter „batch“... -
Page 47: Results Standard, Batches: Options
Datacolor 45 User Guide, 10.2013, Version. 1.0 Results Standard/Batch options STD/BAT results can be displayed differently. Use up and down, press OK to select different options (14) Different option for STD/BAT results Use up and down buttons for selected other option, press OK to save selection. -
Page 48: Results Standard, Batches: Illuminants
Datacolor 45 User Guide, 10.2013, Version. 1.0 Results Standard/Batch, illuminants: STD/BAT illuminants can be displayed differently. Use up and down, press OK to select different options Different option for STD/BAT illuminants Use up and down buttons for selected different illuminant (22 are available), press OK to save selection. - Page 49 Export is sending the data for a standard and its batches to a .csv text file. The data is saved in the root folder of the device. If Datacolor 45 is set to PC Access mode , the data file is available in Win Explorer.
-
Page 50: Options
Datacolor 45 User Guide, 10.2013, Version. 1.0 Options Options menu Naming Standards Naming Standard Press OK to select Naming options menu Naming Options Select “Date Stamp”, “Numeric” or “Manual” and press OK to save. If selecting “Manual” names can be given after the measurement by using the integrated keyboard. -
Page 51: Naming Batches
Datacolor 45 User Guide, 10.2013, Version. 1.0 Naming Batches Naming Batches Naming Options Select “Date Stamp”, “Numeric” or “Manual” and press OK to save. If selecting “Manual” names can be given after the measurement by using the integrated keyboard. -
Page 52: Multiple, Average Measurements
Datacolor 45 User Guide, 10.2013, Version. 1.0 Aperture Mode Select aperture mode Multiple / Average Measurements Define multiple measurements Select numbers of measurements and press OK to save setting. -
Page 53: Auto Standard
Datacolor 45 User Guide, 10.2013, Version. 1.0 Auto Standard Press OK to activate or deactivate. Auto Standard deactivated Auto Standard activated When selected this option during a Batch measurement the application will look for the closest standard (closest checking DE in D65-10) from all the existing standards in the system and associates the measured batch to this standard. -
Page 54: Gloss Measurements
Datacolor 45 User Guide, 10.2013, Version. 1.0 Gloss measurements Press OK to activate or deactivate. Gloss activated Gloss deactivated Tolerances Tolerance menu Press OK to activate or deactivate use of Tolerances. No Tolerance is active Work with Tolerance... -
Page 55: Selecting Tolerances
Datacolor 45 User Guide, 10.2013, Version. 1.0 Selecting Tolerances Use up and down buttons to define tolerances, press OK to select tolerance. deactivate “use tolerance” activate “use tolerance” activ activ Select stored tolerance with up and down button, press OK to safe setting. -
Page 56: Edit Tolerances
Datacolor 45 User Guide, 10.2013, Version. 1.0 Edit Tolerances Go to tolerance menu, select “ + “ in the sub menu to modify tolerance Select color difference formula select illuminant Use OK to activate single dE values (e.g. dL*), use up and down button to modify tolerance, max./min. - Page 57 Datacolor 45 User Guide, 10.2013, Version. 1.0 to save tolerance, select , give name for tolerance (e.g. model 1) and press “OK”, tolerance is saved and shown in the stored tolerances.
-
Page 58: Define Gloss Tolerance
Datacolor 45 User Guide, 10.2013, Version. 1.0 Define Gloss Tolerance to define a gloss tolerance select “gloss” Define “min”, “max” for the gloss tolerance: Select to save tolerance „gloss1“ is shown in tolerance list, select press “OK”... -
Page 59: Searching For Tolerances
Datacolor 45 User Guide, 10.2013, Version. 1.0 Searching for Tolerances Use magnifier glass and type in search routine e.g. “cie” All results starting with “cie” are shown on screen... -
Page 60: Work With Tolerances
Datacolor 45 User Guide, 10.2013, Version. 1.0 ..this symbol Work with Tolerances is showing If use of tolerance is in QC Batch that no tolerance is used not active… … ..this symbol is If use of tolerance is showing in QC Batch that batch active…... - Page 61 Datacolor 45 User Guide, 10.2013, Version. 1.0 A tolerance is not related to a Standard. In QC batch the tolerance which should be used can be selected. Tolerance „gloss“ is Tolerance „model1“ is active active...
- Page 62 Datacolor 45 User Guide, 10.2013, Version. 1.0 Tolerance „CIElabDE1.0“ is active Min./Max. for tolerances can be seen in “QC Standard”, select tolerance e.g. “gloss1”...
-
Page 63: Delete Tolerance
Datacolor 45 User Guide, 10.2013, Version. 1.0 Delete Tolerances Select to delete tolerance, press OK to delete... -
Page 64: System Info
Datacolor 45 User Guide, 10.2013, Version. 1.0 System Info System info System info onboard software version Serial Number Battery Status Connect DC45 with USB cable to computer. Expose SD card, press OK“,... -
Page 65: Update Firmware
Datacolor 45 User Guide, 10.2013, Version. 1.0 Select “expose SD Card”, “Yes”, will connect unit to computer as “removable disk”, content from SD card is visible, e.g. gloss ladders can be added To finish process, select “hide SC card”, unit will restart. -
Page 66: Restart System
Datacolor 45 User Guide, 10.2013, Version. 1.0 Restart system Restart system “Restart System”, “Yes” will reboot DC45. General information for all sub menus: Back Search/Find menu is active (for scroll up/down) -
Page 67: Cable Installation And Power Switch
BE SURE TO TURN OFF THE POWER BEFORE WORKING WITH ANY CABLES. The Datacolor 45 requires the use of two cables, a power cable for recharging the instrument’s batteries, and a USB cable, to connect the instrument to the computer. -
Page 68: Power Supply
As part of this installation process, a port number is assigned to the USB port or Bluetooth connection. The default selection is the next available com port. Depending on the application you are running, you may need to know this port assignment to configure the Datacolor applications program(s) to recognize the USB port. - Page 69 Datacolor 45 User Guide, 10.2013, Version. 1.0 The Start menu displays. Select Control Panel 3. When the Control Panel window displays, double-click on System.
- Page 70 Datacolor 45 User Guide, 10.2013, Version. 1.0 The Systems Properties dialog box displays: 4. Select Device Manager.
- Page 71 Datacolor 45 User Guide, 10.2013, Version. 1.0 The Device Manager window displays. 5. Go to the Ports heading. Click on the plus (+) to display the port selections. 6. Click USB Serial Port. The USB Serial Port (COM4) Properties dialog box displays.
- Page 72 Each Datacolor 45 instrument has a unique set of Calibration data resident in the firmware. A back-up copy of this unique Calibration Data is provided on a USB Flash Drive included in the Datacolor 45 package. Keep this Memory stick in a safe place in case the calibration data on the instrument is lost.
-
Page 73: Maintenance
The certificate of performance supplied with this instrument is valid for 1 year when used in an environment suitable for this type of instruments and when it’s handled and used with care. As the environmental conditions have an effect on the measurements, Datacolor strongly recommends to have this Instrument regularly (preferably once a year) serviced by an authorized service engineer. - Page 74 Datacolor 45 User Guide, 10.2013, Version. 1.0 NEVER immerse the tiles in water. Tiles that have scratches, chips, abrasions or cracks must be replaced. Signs of wear on the tile surface will affect the accuracy of the calibration.
- Page 75 This product comes with a complete user guide which helps you to get started measuring colors. However you can easily maximize its use by expanding your knowledge about color, see the Datacolor Support pages for more information on Application Support and training courses.
- Page 76 Datacolor 45 User Guide, 10.2013, Version. 1.0 North & South America: NSASupport@datacolor.com PC requirements for DC Tools (version 2.06 build 10 or higher)
- Page 77 Datacolor 45 User Guide, 10.2013, Version. 1.0 Instrument Specifications Specifications are subject to change without notice. ITEM DESCRIPTION Instrument Type Dual beam 45/0 with pan-chromatic LED array. Measuring Geometry 45º/illumination, 0 º viewing Illumination Source Pan-Chromatic LED Array approximating D65 above 400nm...
- Page 78 Datacolor 45 User Guide, 10.2013, Version. 1.0 Index Absolute Operating Environment, 3 Maintenance, 70 Accessories, 7 Measurement Geometry, 5, 75 Aperture Configuration 75 Auto Standard, 50 Limit 21 Performance Repeatability, 75 Black Trap, 7,16 Reproducibility, 75 cleaning, 71 Photometric Bluetooth, 28...
- Page 79 Datacolor 45 User Guide, 10.2013, Version. 1.0...
Need help?
Do you have a question about the 45 and is the answer not in the manual?
Questions and answers