Advertisement
DATAC
COLOR 45
Thank you
u for purchas
Quick Sta
rt Guide has b
Please ref
fer to the Use
er Guide CD fo
Introdu
uction
The Datac
color 45 Porta
1. Stand
d‐Alone
The instru
ument can be
e used as a sta
program.
In this config
guration, you
obtain co
lor difference
e information
2. Conne
ected to Data
acolor Tools
The instru
ument can be
e connected t
modes:
a)
) PC Access
Datacolor
instrumen
b
) Tethered M
Mode – In thi
measure s
immediate
ely available f
the instrum
ment.
This docu
ment will pro
ovide basic inf
mode. A
complete Use
Datacolor
r 45 Quick St
Quick Star
rt Instructi
ing a Datacol
or 45 series P
been provide
ed to get you
or more in‐de
able Spectrop
photometer c
and‐alone dev
can calibrate
.
o the Dataco
Mode – In th
is mode the i
Tools and rec
ceive standar
t is used to ga
ather data wh
s mode, the D
amples (stan
dards or batc
for analysis. T
formation on
er Guide in PD
DF form is co
tart Guide v1
1.0 – 003‐40
ions
Portable Spec
ctrophotomet
quickly famili
iarized with t
epth informat
tion.
can be used in
n the followin
vice without
any connecti
e the instrume
ent and make
lor Tools prog
gram and can
instrument ca
an send stand
rd and toleran
nce data from
hich will even
ntually be upl
Datacolor Too
ols program u
ches) directly
from the sof
The Datacolor
r Tools progra
n getting start
ted with the D
ntained on th
he CD accomp
00063
ter (45G CT, 4
45G, or 45S).
the Datacolor
r 45 instrume
ng configurati
ions:
on to the Dat
tacolor Tools
e measureme
ents of sample
n be used in t
hese 2 basic
dard and batc
ch data to
m Datacolor T
Tools. The
loaded to the
e software.
uses the instr
rument to
ftware with th
he data
am controls t
he operation
Datacolor 45
in stand‐alon
panying this Q
Quick Start G
This
nt.
es to
of
ne
uide.
1
Advertisement
Table of Contents

Related Manuals for Datacolor 45


Summary of Contents for Datacolor 45
- Page 1 DATAC COLOR 45 Quick Star rt Instructi ions Thank you u for purchas ing a Datacol or 45 series P Portable Spec ctrophotomet ter (45G CT, 4 45G, or 45S). This Quick Sta rt Guide has b been provide ed to get you quickly famili iarized with t the Datacolor r 45 instrume nt. Please ref fer to the Use er Guide CD fo or more in‐de epth informat tion. Introdu uction The Datac color 45 Porta able Spectrop photometer c can be used in...
- Page 2 Charging the Instrument Please make sure that the Datacolor 45 instrument is fully charged before using. The instrument does not charge through the USB connection, so it is necessary to use the AC Adaptor to charge the instrument. Each AC Adaptor comes with a collection of plugs for connecting to power supplies in different regions. Select the appropriate plug for your region and place it into the charger head by snapping the appropriate plug in place. Make sure that the plug is secure before plugging into your Power Outlet. ! NOTE: The Power Switch at the back of the instrument must be in the ON position to accept a charge. The instrument will not charge when turned OFF. Datacolor 45 Quick Start Guide v1.0 – 003‐400063 ...
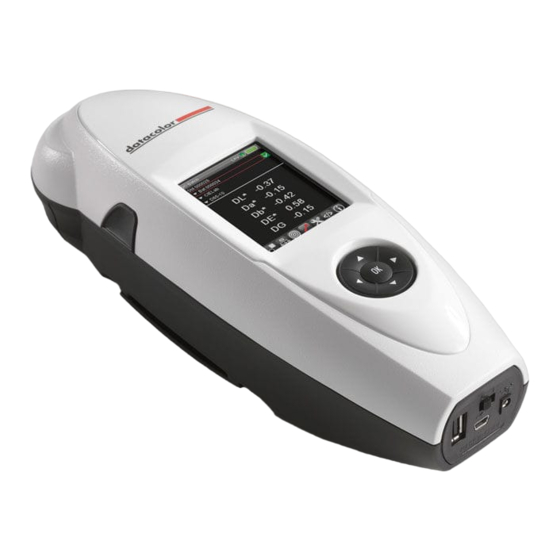
- Page 3 This is the main QC screen. The top section is the where you can select standards, output displays and the illuminant/observer. The middle section is where the output is displayed. In this start‐up screen, the absolute CIEL*a*b* data for all models and gloss value for the 45G CT or 45G for the standard is displayed. The instrument will have one standard named “Demo Standard” stored. This display will change depending on whether you are in standard mode or batch mode. In standard mode, you will see absolute data and in batch mode you will see delta or difference data. The bottom section contains the “live bar” which contains a horizontal list of icons which control and start various program options. You can traverse the live bar by using the left and right arrows on the instrument. Standard Mode and Batch Mode To simplify measurement the instrument has 2 basic modes for measurement. These are standard mode and batch mode. Standard Mode – The target icon represents standard mode. When this mode is selected on the live bar, all measurements taken will be considered to be standards. Batch Mode – The dart icon represents batch mode. When this mode is selected on the live bar, all measurements taken will be considered batches to the current standard. Datacolor 45 Quick Start Guide v1.0 – 003‐400063 ...
- Page 4 Instrument Calibration The instrument must be calibrated before taking measurements. Calibration involves measuring a black trap, a white tile and for gloss units, a black tile. Each instrument also comes with calibration stand. Select the calibration option by selecting the calibration icon in the live bar. The calibration screen is displayed. Notice that the calibration indicator in the title bar is red indicating that the instrument is not calibrated. The last calibration time is shown as well as the time for the next calibration. To begin the calibration, either place the instrument on the black trap on the tray or position the instrument and black trap on the stand. Press either of the measurement buttons on the instrument to take the measurement. After the black trap is measured, the program will ask for the white tile to be measured. To measure the white tile, either place the instrument on the white tile on the tray or position the instrument and white tile on the stand. Press either of the measurement buttons on the instrument to take the measurement. Datacolor 45 Quick Start Guide v1.0 – 003‐400063 ...
- Page 5 If the gloss option is included (45G CT or 45G), the program will ask for the gloss tile to be measured. If the gloss option is not included (45S), this screen will not display. To measure the gloss tile, position the instrument and gloss tile on the stand. Press either of the measurement buttons on the instrument to take the measurement. If calibration is successful, the screen shown here will be displayed. Notice that the calibration indicator in the title bar is now green indicating that the instrument is calibrated. The last calibration date/time is the current date/time. The next calibration date/time is now shown. This is based on a calibration interval of 8 hours. Datacolor 45 Quick Start Guide v1.0 – 003‐400063 ...
- Page 6 The screen will display the data for the current standard. If this is a new instrument, the current standard will be named “Demo Standard”. The data displayed is the absolute L*a*b* data for the standard. To measure a new standard, place the instrument on the standard and press either of the instrument measurement buttons. After the measurement is taken, the display will update with the new standard’s absolute L*a*b* data. The name of the new standard is “Std 2013‐06‐19 10‐39‐10” which is an auto name based on the current date and time. The standard naming method can be selected in the Options screen. If you want to measure another standard, place the instrument on the standard and press the measurement button. As long as you remain in standard mode, each press of the measurement button will measure and create a new standard. If you want to measure a batch to the current standard, you must select the batch icon in the live bar. Datacolor 45 Quick Start Guide v1.0 – 003‐400063 ...
- Page 7 After selecting the batch icon, the batch measurement screen will display. To measure a batch to the current standard, place the instrument on the batch sample and press the measurement button. After the batch has been measured, the output screen will be displayed. This display screen shows the absolute colorimetric data for the standard and batch and also the delta or color difference data between the standard and the batch. If the unit has the gloss options, the gloss data will also be shown. The batch name is “Bat 2013‐06‐19 10‐40‐59” which is an auto name based on the current date and time. The batch naming method can be selected in the Options screen. To measure a second batch, place the instrument on the batch sample and press the measurement button. As long as you remain in batch mode, each press of the measurement button will measure and create a new batch. For more complete information, and for operation with Datacolor Tools, please refer to the Datacolor 45 User Guide CD included with this package, or refer to our website at www.datacolor.com Datacolor 45 Quick Start Guide v1.0 – 003‐400063 ...
Need help?
Do you have a question about the 45 and is the answer not in the manual?
Questions and answers