Table of Contents
Advertisement
Advertisement
Table of Contents

Related Manuals for PaloAlto Networks ION 9200


Summary of Contents for PaloAlto Networks ION 9200
- Page 1 ION 9200 Hardware Reference docs.paloaltonetworks.com...
- Page 2 Alto Networks. A list of our trademarks can be found at www.paloaltonetworks.com/company/ trademarks.html. All other marks mentioned herein may be trademarks of their respective companies. Last Revised September 2, 2022 ION 9200 Hardware Reference 2022 Palo Alto Networks, Inc. ©...
-
Page 3: Table Of Contents
ION 9200 Hardware Specifications..................12 ION 9200 Front Panel......................14 ION 9200 Back Panel......................15 ION 9200 Compliance Statements..................16 Install the ION 9200..................21 Install the ION 9200 Using Four-Post Rack Mount Kit...........22 ION 9200 Hardware Reference 2022 Palo Alto Networks, Inc. ©... - Page 4 Table of Contents ION 9200 Hardware Reference 2022 Palo Alto Networks, Inc. ©...
-
Page 5: Before You Begin
Before You Begin Learn about the product safety and compliance before you begin: > Product Safety Warnings > Tamper Proof Statement > Third-Party Component Support... -
Page 6: Product Safety Warnings
Mettez au rebut les batteries usagées conformément aux instructions. • I/O ports are intended for intra-building connections only and not intended for OSP (Outside Plant) connections or any network connections subject to external voltage surge events. ION 9200 Hardware Reference 2022 Palo Alto Networks, Inc. ©... - Page 7 French Translation: (Tous les appareils Palo Alto Networks avec au moins deux sources d’alimentation) Débranchez tous les cordons d’alimentation (c.a. ou c.c.) des entrées d’alimentation et mettez le matériel hors tension. ION 9200 Hardware Reference 2022 Palo Alto Networks, Inc. ©...
-
Page 8: Tamper Proof Statement
• The integrity of the tamper-proof tape used to seal the box or crate is not compromised. • The integrity of the warranty label on the firewall or appliance is not compromised. ION 9200 Hardware Reference 2022 Palo Alto Networks, Inc. -
Page 9: Third-Party Component Support
Before You Begin Third-Party Component Support Before you consider installing third-party hardware, read the Palo Alto Networks Third-Party Component Support statement. ION 9200 Hardware Reference 2022 Palo Alto Networks, Inc. ©... - Page 10 Before You Begin ION 9200 Hardware Reference 2022 Palo Alto Networks, Inc. ©...
-
Page 11: Ion 9200 Overview
ION 9200 Overview Prisma SD-WAN ION 9200 is a next generation software-defined device that can be deployed in a data center. With the introduction of ION 9200, accelerate your SASE deployment to a DC by leveraging WAN connectivity without installing additional hardware to enable rapid deployments. -
Page 12: Ion 9200 Hardware Specifications
ION 9200 Overview ION 9200 Hardware Specifications Learn the hardware specifications of the ION 9200 device. Feature ION 9200 Description Multigigabit, device for remote office, data center or large campus. Ports Console Port 1 x RJ-45, UART/ Micro USB Type B Console... - Page 13 Operating humidity (non- 5-90% condensing) Storage humidity (non- 5-95% condensing) Physical Dimensions (DxWxH) 361.44mm x 434.90mm x 43.20mm (14.22” x 17.12” x 1.70”) Weight (lbs) 15.5 Mount options Four-post Rack ION 9200 Hardware Reference 2022 Palo Alto Networks, Inc. ©...
-
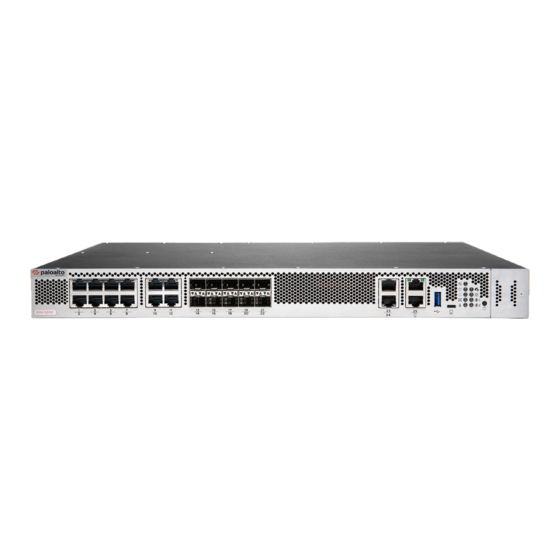
Page 14: Ion 9200 Front Panel
ION 9200 Overview ION 9200 Front Panel The following table describes the front panel components of the ION 9200. Item Component Description ByPass Ports Ports 1 - 8 are ByPass ports (4 pairs). PoE ports Ports 9 - 12 are PoE ports. -
Page 15: Ion 9200 Back Panel
ION 9200 Overview ION 9200 Back Panel The following table describes the back panel components of the ION 9200. Item Component Description Fan Exhausts Provides ventilation and cooling for the device. The fans are not field replaceable. Ground stud Use the single post ground stud to connect the firewall to earth ground (ground cable not included). -
Page 16: Ion 9200 Compliance Statements
ION 9200 Overview ION 9200 Compliance Statements The following compliance statements apply to this ION device: • VCCI—This section provides the compliance statement for the Voluntary Control Council for Interference by Information Technology Equipment (VCCI), which governs radio frequency emissions in Japan. - Page 17 • Korean Communications Commission (KCC) Class A Statement—This equipment is an electromagnetic compatible device for business purposes (Class A). The provider or user should be aware that the equipment is intended for use outside the home. ION 9200 Hardware Reference 2022 Palo Alto Networks, Inc. ©...
- Page 18 ION 9200 Overview • Taiwan Declaration of the Presence Condition of the Restricted Substances Marking. ION 9200 Hardware Reference 2022 Palo Alto Networks, Inc. ©...
- Page 19 ION 9200 Overview ION 9200 Hardware Reference 2022 Palo Alto Networks, Inc. ©...
- Page 20 ION 9200 Overview ION 9200 Hardware Reference 2022 Palo Alto Networks, Inc. ©...
-
Page 21: Install The Ion 9200
Install the ION 9200 Learn to install the ION 9200. > Install the ION 9200 Using Four-Post Rack Mount Kit... -
Page 22: Install The Ion 9200 Using Four-Post Rack Mount Kit
Install the ION 9200 Install the ION 9200 Using Four-Post Rack Mount Kit The following procedure describes how to install the ION 9200 in a 19” four-post equipment rack using the four-post rack kit. STEP 1 | Attach one rack-mount bracket to each side of the ION 9200 in the front-mount position using four #6-32 x 5/16”... - Page 23 Install the ION 9200 1/2”) for your rack and torque to 25 in-lbs. Use cage nuts to secure the screws if the rack has square holes. ION 9200 Hardware Reference 2022 Palo Alto Networks, Inc. ©...
- Page 24 Install the ION 9200 STEP 4 | Slide one back rack-mount bracket into each of the two previously installed side rack-mount rails and secure the brackets to the back rack-posts using the appropriate screws for your rack (#10-32 x 3/4” or #12-24 x 1/2”) and torque to 25 in-lbs.
Need help?
Do you have a question about the ION 9200 and is the answer not in the manual?
Questions and answers