Advertisement
Available languages
Available languages
Quick Links
Your safety, and the safety of others, is very important. To help you make informed decisions about safety, we have provided
installation and operating instructions and other information on labels and in this guide. This information alerts you to potential
hazards that could hurt you or others. It is not possible to warn you about all potential hazards associated with this product, you
must use your own good judgment.
CARELESS INSTALLATION AND OPERATION CAN RESULT IN SERIOUS INJURY OR EQUIPMENT
DAMAGE. READ AND UNDERSTAND ALL SAFETY PRECAUTIONS AND OPERATING INSTRUCTIONS
BEFORE INSTALLING AND OPERATING THIS PRODUCT.
This guide identifies potential hazards and has important safety messages that help you and others avoid personal injury or
death. WARNING and CAUTION are signal words that identify the level of hazard. These signal words mean:
WARNING signals a hazard that could cause serious injury or death, if you do not follow recommendations.
CAUTION signals a hazard that may cause minor to moderate injury, if you do not follow recommendations.
This guide uses NOTICE to call attention to important mechanical information, and Note: to emphasize general information
worthy of special attention.
Failure to observe these instructions could lead to severe injury or death.
Always verify area is clear of fuel lines, fuel tank, brake lines , electrical wires, etc when drilling.
Never short battery terminals with metal objects.
Always use extreme caution when drilling, cutting and trimming during fitting.
Always remove jewelry and wear eye protection.
Never lean over battery while making connections.
Never route electrical cables:
Across any sharp edges.
o
Through or near moving parts.
o
Near parts that become hot.
o
Always insulate and protect all exposed wiring and electrical terminals.
Always take time to fully read and understand the Installation Instructions and Operator's Guide included with this product.
Always inspect the quick connect polarity on the cable from the battery AND the cable from the winch.
Never operate this WARN product with damaged or missing parts.
Never install a winch with a capacity over 10,000 lbs (4536 kg)
Never exceed 10,000 lbs (4536 kg) pulling force.
Failure to observe these instructions could lead to minor or moderate injury.
Always use proper posture / lifting technique or get lifting assistance while handling and installing product.
Always use appropriate and adequate care in lifting components into place.
Always insure components will remain secure during installation and operation.
Always refer to the Installation Instructions and Operator's Guide, supplied in the winch kit, for
all wiring schematics and specific details on how to wire this WARN product to your vehicle.
Warn Industries
INSTALLATION INSTRUCTIONS
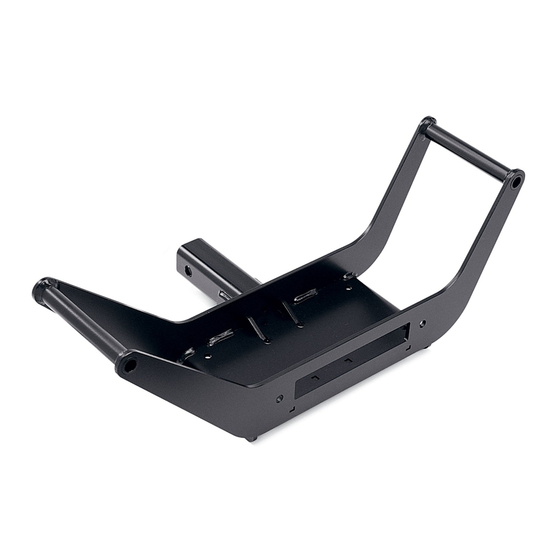
For Mounting a Warn Winch on
Multi-Mount Kit No. 89990
WARNING
INJURY HAZARD
Caution
Impact Hazard
Notice
Equipment Damage
PAGE 1
89786 Rev. A0
Advertisement

Related Manuals for Warn 89990


Summary of Contents for Warn 89990
- Page 1 This information alerts you to potential hazards that could hurt you or others. It is not possible to warn you about all potential hazards associated with this product, you must use your own good judgment.
- Page 2 NOTE: This unit is to be used only on vehicles equipped with a Warn Front Receiver or a class 3 receiver trailer hitch. 1. First, remove the cover as shown in Figure 1 below. FIGURE 1 REMOVE BOLT AND COVER ...
- Page 3 4. Next separate the control pack and its cover and set them back on the winch as shown in Figure 5. Do not pull or tug on the wires leading from the control pack to the control NOTICE pack cover. Warn Industries PAGE 3 89786 Rev. A0...
- Page 4 The small black wire attached to the motor ground (-) terminal must be reattached to the motor ground (-) terminal when installing the quick-connect ground cable. NOTICE ground cable on the quick-connect is solid black and shorter than the positive cable. Warn Industries PAGE 4 89786 Rev. A0...
- Page 5 8. Install the fairlead on the front of the winch mounting plate as seen below in Figure 8. FIGURE 8 9. Install the winch to the mounting plate using the instructions and fasteners provided with the winch. Warn Industries PAGE 5 89786 Rev. A0...
- Page 6 For winch use at the rear of vehicle, longer quick- connect cables are available from Warn dealers. For 20 foot kit, order part number 32963. For 24 foot kit, order part number 32966. Choose a location on the bumper or grille to mount the quick-connect plug as shown in Figure 9.
-
Page 7: Instructions D'installation
Dommage à l’équipement Toujours consulter le Guide d’installation et de spécification, fourni avec le kit de treuil, pour tous les schémas de câblage et les détails spécifiques sur la manière de câbler ce produit WARN sur votre véhicule. Warn Industries PAGE 7 89786 Rev. - Page 8 REMARQUE : Cet élément doit être utilisé exclusivement sur des véhicules équipés d’un récepteur avant Warn ou d’un récepteur d’attelage de classe 3. 1. En premier lieu, retirez le couvercle comme l'illustre la Figure 1 ci-dessous. FIGURE 1 RETIREZ LE...
- Page 9 4. Ensuite, séparez le coffret de commande et son couvercle et reposez-le sur le treuil comme l'illustre la Figure 5. Ne pas tirer sur les câbles qui relient le coffret de commande à son AVIS couvercle. Warn Industries PAGE 9 89786 Rev. A0...
- Page 10 (-) du moteur après avoir installé le câble de masse de la connexion rapide. Le câble de terre de la connexion rapide est d'un noir uni et plus court que le câble AVIS positif. Warn Industries PAGE 10 89786 Rev. A0...
- Page 11 BOULON 7/16 x 1 po RONDELLE D’ARRÊT 7/16 ÉCROU 7/16 po PLAQUE MULTI-MOUNT 9. Installez le treuil sur la plaque de montage en suivant les consignes et les fixations fournies avec le treuil. Warn Industries PAGE 11 89786 Rev. A0...
- Page 12 Pour utiliser le treuil à l’arrière du véhicule, les concessionnaires Warn vendent des câbles de connexion rapide plus longs. Pour le kit de 6 mètres, commandez la pièce n° 32963. Pour le kit de 7,3 mètres, commandez la pièce n°...
-
Page 13: Instrucciones De Instalación
Compruebe siempre la polaridad de la conexión rápida del cable de la batería Y el cable del cabrestante. No utilice nunca este producto de WARN si faltan piezas o están dañadas. Nunca instale un torno con una capacidad de más de 10.000 libras (4536 kg) ... - Page 14 NOTA: esta unidad solo debe usarse con vehículos equipados con un receptor frontal de Warn o un enganche de receptor para remolque de clase 3. 1. En primer lugar, retire la cubierta tal y como muestra la Figura 1. FIGURA 1...
- Page 15 4. A continuación separe el paquete de control y su cubierta y colóquelos de nuevo en el cabrestante como se muestra en la Figura 5. No arrastre ni tire de los cables que salen AVISO del paquete de control a la cubierta del paquete de control. Warn Industries PAGE 15 89786 Rev. A0...
- Page 16 (-) del motor al instalar el cable de masa de conexión rápida. El cable de masa del conector rápido es negro sólido y es AVISO más corto que el cable positivo. Warn Industries PAGE 16 89786 Rev. A0...
- Page 17 PERNO DE 7/16 x 1 PULG. ARANDELA DE PRESIÓN DE 7/16 TUERCA DE 7/16 SOPORTE DE MONTAJE MÚLTIPLE 9. Monte el cabrestante en la placa de montaje ayudándose de las instrucciones y los aseguradores que incluye el cabrestante. Warn Industries PAGE 17 89786 Rev. A0...
- Page 18 Para utilizar el cabrestante en la parte trasera del vehículo, los distribuidores de Warn tienen a su disposición cables de conexión rápida más largos. Para el juego de 6,1 metros (20 pies) solicite el número de referencia 32963.
Need help?
Do you have a question about the 89990 and is the answer not in the manual?
Questions and answers