Hytronik DUAL sense HIM38/RF Quick Start Manual
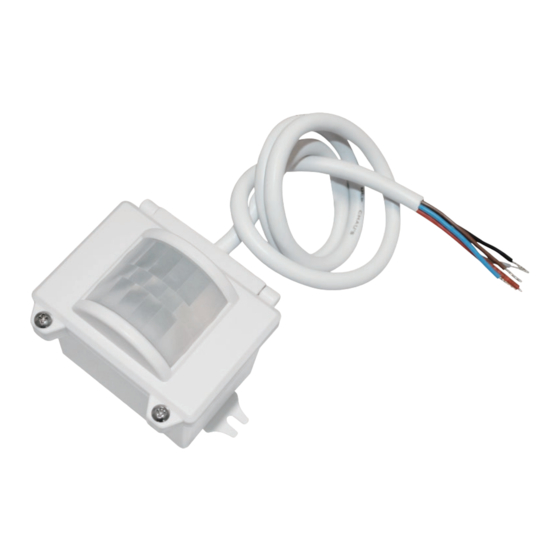
Ip65 high bay dual sense sensor
Hide thumbs
Also See for DUAL sense HIM38/RF:
- Installation manual (3 pages) ,
- Installation and instruction manual (3 pages) ,
- Installation and instruction manual (2 pages)
Advertisement
IP65 High Bay Dual Sense Sensor
HIM38/RF
HIM39/RF
HF and PIR, 1-10V Dimming / Independent DALI Control with RF Wireless
Technical Data
Input Characteristics
Model No.
Mains voltage
Stand-by power
Load ratings:
400VA@120V;800VA@220-277V
Capacitive
Resistive
800W@120V;1600W@220-277V
HIM39/RF
HC034RF (IP20)
400VA (capacitive); 1200W (resistive)
Warming-up
Safety and EMC
EMC standard (EMC)
Safety standard (LVD)
Radio Equipment (RED)
Certi cation
Mechanical Structures and Installations
For more details, please refer to user manual.
A. Ceiling mount
Subject to change without notice.
HIM38/RF HIM39/RF
120~277VAC 50/60Hz
<1.5W
max. 20 devices, max. 40mA
30s
EN55015, EN61000
EN60669, AS/NZS60669
EN300440, EN300328,
EN301489
Semko, CB, CE , EMC, RED, RCM
LED indicator
Infrared receiver
PIR
Sensor module
Installation rack
TM
Sensor & RF Data
Model No.
Sensor principle
High Frequency (microwave), PIR
Operation frequency
Transmission power
Sensor mode
4 modes: PIR, HF, PIR+HF, PIR/HF
Detection range
Detection angle
RF frequency
RF transmission distance
Environment
Operation temperature
IP rating
RED
Daylight sensor
Rotary switch for programing
Cable entry
Edition: 26 Feb. 2020
HIM38/RF HIM39/RF
5.8GHz +/- 75MHz (HF)
<0.2mW (HF)
Max. ( O x H) 18m x 15m
360
O
868MHz (FSK mode, default)
30m indoor, 50m outdoor
O
O
Ta: -20
C ~ +50
C
IP65
IP65
4.1
66.6
81.5
Ver. A0
Page 1/9
Advertisement
Table of Contents

Subscribe to Our Youtube Channel
Related Manuals for Hytronik DUAL sense HIM38/RF


Summary of Contents for Hytronik DUAL sense HIM38/RF
- Page 1 IP65 High Bay Dual Sense Sensor HIM38/RF HIM39/RF HF and PIR, 1-10V Dimming / Independent DALI Control with RF Wireless Technical Data Sensor & RF Data Input Characteristics Model No. Model No. HIM38/RF HIM39/RF HIM38/RF HIM39/RF Sensor principle High Frequency (microwave), PIR Mains voltage 120~277VAC 50/60Hz Stand-by power...
- Page 2 59.6 B. Screw to the Luminaire by conduit 0.825” Daylight sensor LED indicator Rotary switch for programing Infrared receiver 66.6 89.9 Sensor module Cable entry C. Attach to the shade by clamp Daylight sensor Rotary switch for RF grouping 28.5 LED indicator 66.6 Infrared receiver...
-
Page 3: Functions And Features
Tri-level Control (Corridor Function) Hytronik builds this function inside the motion sensor to achieve tri-level control, for some areas which require a light change notice before switch-off. The sensor offers 3 levels of light: 100%-->dimmed light (natural light is insuf cient) -->off; and 2 periods of selectable waiting time: motion hold-time and stand-by period;... -
Page 4: Typical Applications
Intelligent Photocell (daylight detection prior to motion detection) The built-in photocell will also automatically turn off the light when the ambient natural light exceeds the programmed lux level for more than 5min, regardless of whether motion is detected or not. This feature can be disabled if it is required that the xture stays at dimmed level during absence. - Page 5 Night Daytime Wiring Diagram Brown Brown Blue Blue Grey LED driver LED driver Black Black 1-10V+ DALI+ 1-10V DALI HIM38/RF HIM39/RF Wiring Diagram L’ 1-10V 1-10V LED Driver HC034RF Subject to change without notice. Edition: 26 Feb. 2020 Ver. A0 Page 5/9...
-
Page 6: Detection Pattern
Detection Pattern End user can choose the suitable PIR lens in real application to ful ll various requirements. Three options are offered for selection: PIR detection: L x W x H:18 x 5 x 15m (max.) PIR detection: L x W x H:5 x 18 x 15m (max.) PIR detection: H x D:15 x 18m (max.) HF detection: H x D:15 x 14m (max.) HF detection: H x D:15 x 14m (max. - Page 7 Settings (Remote Control HRC-11) Permanent ON/OFF function Press button “ON/OFF” to select permanent ON or permanent OFF mode. * Press button “AUTO”, “RESET” to quit this mode. The mode will change to AUTO Mode after power failure. Reset Settings Press button “RESET”, all settings go back to default settings: Detection range:100%, hold time:1min, stand-by time:5min, stand-by dimming level:20%, daylight sensor:lux disable, RX 100% Shift Button...
-
Page 8: Subject To Change Without Notice
Hold-time Press buttons in zone “hold-time” to set the hold-time at 2s / 30s / 1min / 5min / 10min / 15min / 20min / 30min. Note: 1. To set hold-time at 30s / 5min / 15min / 30min, press “Shift” button rst. 2. - Page 9 Additional Information / Documents 1. Regarding precautions for microwave sensor installation and operation, please kindly refer to www.hytronik.com/download ->knowledge ->Microwave Sensors - Precautions for Product Installation and Operation 2. Regarding precautions for PIR sensor installation and operation, please kindly refer to www.hytronik.com/download ->knowledge ->PIR Sensors - Precautions for Product Installation and Operation...
Need help?
Do you have a question about the DUAL sense HIM38/RF and is the answer not in the manual?
Questions and answers