Table of Contents
Advertisement
Quick Links
Advertisement
Table of Contents

Related Manuals for Sartorius Stedim Biotech MD8 airscan


Summary of Contents for Sartorius Stedim Biotech MD8 airscan
- Page 1 Operating Instructions Air Sampler MD8 airscan 85030-511-25 Ver. 05|2011...
- Page 2 Read these operating instructions carefully before switching the instrument on!
-
Page 3: Table Of Contents
9.3 How to remove a filter unit the equipment supplied: without the adapter 9.4 Incubation and evaluation 5 Specifications of collected microorganisms 5.1 Specifications of the MD8 airscan 9.5 Dissolving the gelatin filter 5.2 Specifications of Gelatin prior to evaluation of collected Filter Units microorganisms 5.2.1 Specifications of the gelatin filters 10... - Page 4 Dear new user Congratulations on your choice of the MD8 airscan for your microbiological air sampling! This latest model in a series of practice-proven air samplers is manufactured for quality by high standard German electrical and precision engineering. We are sure that it will provide you with trouble-free service for many years.
-
Page 5: Introduction
1. Introduction The MD8 airscan is an air sampler which works according to the filtration principle. It draws a defined volume of air through a gelatin filter or equivalent. The microorganisms and viruses contained in the sampled air are retained by the filter, where they are available for processing by microbiological or virological methods. -
Page 6: Safety Precautions
2. Safety precautions 1. The MD 8 airscan is a modern air sampling instrument for the collection of airborne microorganisms or viruses. It is only intended for use with 80 mm diameter membrane filter discs of pore size 0.8 μm or larger. Use of smaller diameter or smaller pore size filters will result in damage to the pump. -
Page 7: Eec - Declaration Of Conformity
3. EEC – Declaration of Conformity We hereby declare that the 230 V version of the MD8 airscan (order number 16746) conforms, in its design and construction, to the requirements of the following standards: EN 50081-1 EN 55011 Cl. B... -
Page 8: Unpacking And Checking The Equipment Supplied
4. Unpacking and checking the equipment supplied: Sartorius Stedim Biotech products are very carefully packed, but despite this, damage could possibly occur during transport, so please check the equipment supplied for such damage while unpacking it. Check the equipment supplied against the following list, to... -
Page 9: Specifications
5. Specifications 5.1. Specifications of the MD8 airscan Order numbers: 16746 230 V/50 Hz version 16747 115 V/60 Hz version Each version can be switched from 50 to 60 Hz and back Air throughput: Can be set between 2.0 m /h to 8.0 m... -
Page 10: Specifications Of Gelatin Filter Units
5.2. Specifications of Gelatin Filter Units Filter holder: For 80 mm diameter membrane filters Filtration area: 38.5 cm Material: Cyrolite (recyclable plastic) Max. temperature: 85°C Dimensions: 93 x16 mm 5.2.1 Specifications of the Gelatin Filters Material: Gelatin Nominal pore size: 3 μm Filter diameter: 80 mm... -
Page 11: Description Of The Md8 Airscan
6. Description of the MD8 airscan The air inlet opening for attachment of a filter holder projects out of the plastic housing (Fig.1) at the front of the MD8 airscan. Fig.1 | 11... - Page 12 The air outlet connector (exhaust) is at the rear (Fig. 2), together with the combination of power plug socket and green on/off switch. The two fuses (3.15 AT for 230 V and 6.3 AT for 115 V) are also situated in this switch. An optional remote control interface is on the left of the on/off switch.
- Page 13 The operating elements are on the top of the instrument (Fig. 3), with the LCD on the left of the carrying handle and the membrane-covered keypad on the right. The use of these is described in section 7. Fig. 3 | 13...
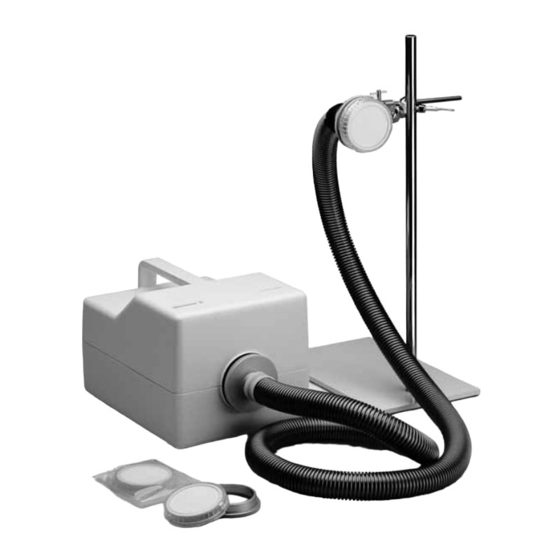
- Page 14 The filter holder supplied, or an adapter for gelatin filter units, can be screwed directly onto the air inlet connector of the sampler (Fig. 4). Fig. 4 The filter holder or the gelatin filter unit adapter can be held at a distance from the air sampler and positioned as required (e.g.
- Page 15 Connnecting the hose to the MD8 airscan: Press the connecting piece 17658 (hose/MD8 airscan) against the sampled air inlet of the MD8 airscan and turn it clockwise (Fig. 5). Fig. 5 | 15...
- Page 16 Fit one end of the hose (e.g., 17085) onto the hose barb of the connecting piece 17658, and the other end onto the second connecting piece (17659) of the connecting set 17657 (Fig. 6). Fig. 6 16 |...
- Page 17 Connect the adapter for gelatin filter units (17801, Fig. 7), or the filter holder (17655) containing a gelatin membrane filter, onto the second connecting piece (17659) by turning it clockwise. Fig. 7 Use the clamp 17037 and clamp holder 16976 to fix the connector on the stand 16970. | 17...
- Page 18 Fix a gelatin filter unit to the adapter. Fig. 8 In principle, sampling can now be started. 18 |...
-
Page 19: User Interface - Description Of The Keypad
7. User interface – Description of the keypad Aside from the power on/off switch, the MD8 airscan is operated entirely using the membrane-covered keypad that has 6 keys and is located on top of the unit. Interactive prompts and messages are shown on an LCD with 2 + 16 characters (Fig. 9). -
Page 20: Switching The Air Sampler On
7.1. Switching the air sampler on The power switch located on the rear panel of the MD8 airscan is used to switch it on. The switch lights up green when power is on and the instrument runs a self-test during which the memory chips of the system are checked. - Page 21 Flow chart 1: Self test MD8 airscan Power on Sartorius MD8 self test Self test not ok Error self test ok Sartorius MD8 Ready to start ⇒ <START> KEYS… Test running Change parameter Calibration menu Change Sample time Change language –...
-
Page 22: Checking And Changing The Parameters For The Sampling Procedure
7.2. Checking and changing the parameters for the sampling procedure When the instrument is in the initial starting mode, as indicated by the message “sartorius MD8 ready to start”, you can access the menu for displaying and checking or changing parameter settings by pressing the parameter key “⇒”. When “⇒”... - Page 23 The filter class is not a value. The filter type used must be set here, from the choice of “gelatin 3 μm”, “cellulose 0.8 μm” or “cellulose 8 μm”. Pressing the ⇑ or ⇓ key moves from one to the next of these. This setting influences the internal control parameters of the MD8 airscan. | 23...
- Page 24 Other filter types than those listed can be used, but you must then check the regulatory behaviour and the air throughput of the MD8 airscan by tests/recalibration. When a displayed parameter is changed with the ⇑ or ⇓ key, the new setting flashes to show it has not been stored.
-
Page 25: Starting And Ending An Air Sampling Procedure
7.3 Starting and ending an air sampling procedure A measurement can be started when the message “sartorius MD8 ready to start” is shown in the display. The parameters which were used in the previous sampling procedure are those which are stored, so if you wish to perform a new air sampling with the same parameters, you can start sampling immediately by simply pressing the Start key (see flow chart 3). -
Page 26: Display Functions During Air Sampling
7.4. Display functions during air sampling Throughout air sampling, the current air flow rate and the remaining time are continuously updated on the display (“airflow #.# m /h timer ## min”). Moreover, you can also press the ⇒ key to check the nominal settings during air sampling.You simply use this key to recall each parameter the same way as when checking or changing the individual parameters, one after the other. - Page 27 Flow chart 3: Measuring/Sampling Main menu You can press the stop-key at any time to return to the Main menu. < Start-Taste > The current air flow and remaining Airflow: x.x time for sampling are displayed < Parameter-key ⇒ > The current values are displayed Stop-key but you cannot change them.
-
Page 28: Error Messages During Air Sampling
7.5. Error messages during air sampling The MD8 airscan detects 4 different kinds of errors that will cause it to abort an air sampling procedure in progress (see flow chart 3). 1. The operating temperature of the instrument has reached a critical level (approx. -
Page 29: Calibration Of The Md8 Airscan
8. Calibration of the MD8 airscan As already described above, you can call up the calibration menu with a two-key combination when the MD8 airscan is in the initial starting position, i.e. the message “sartorius MD8 ready to start” is displayed. -
Page 30: Calibration Procedure
3. The MD8 airscan now continues to run uncontrolled, i.e. the setpoint of the motor does not change, so that the air flow rate remains constant. The display shows “nominal 3.0 m real ##.## m... -
Page 31: Resetting Of Default Values
By now pressing ENTER, you confirm this and all data will be overwritten to the default settings. A self-test is then re- started. If you press any other key, instead of ENTER, the MD8 airscan will enter its standard operating mode without altering the data. -
Page 32: How To Use Gelatin Filter Units For Air Sampling
9. How to use Gelatin Filter Units for air sampling Gelatin filter units consist of 80 mm diameter gelatin filters which are fitted between the top and base parts of a disposable plastic holder. They are individually packed in single or triple bags and presterilized by gamma irradiation. - Page 33 MD8 airscan (Fig. 12) inlet or to a hose connector. While doing this, avoid contamination of the filter, or damage to it, by not allowing the open filter face to contact anything.
- Page 34 Fig. 12 The adapter (order no. 17801) can be locked onto the air sampler inlet or the hose connector, by turning it clockwise, either before or after the filter unit is attached (Fig. 12). 34 |...
-
Page 35: How To Remove A Filter Unit With The Adapter
9.2 How to remove a filter unit with the adapter After sampling, detach the adapter holding the filter unit by turning it counterclockwise (Fig. 13). Hold the adapter and base of the filter unit firmly and with the filter face up, then detach the top part of the filter unit by turning it counterclockwise (Fig. - Page 36 Fig.14 Fig.15 36 |...
- Page 37 Fig.16 Fig.17 | 37...
- Page 38 Fig.18 38 |...
-
Page 39: How To Remove A Filter Unit Without The Adapter
9.3 How to remove a filter unit without the adapter You can remove the complete disposable from the adapter by holding the edge of the bottom part of the disposable. The adapter has a bevelled edge to make it easier for you to grasp the disposable. - Page 40 Fig.19 40 |...
- Page 41 Choose the time, temperature and type of culture medium according to your microbiological application, for instance, Standard, Caso or Plate Count Agar are suitable for determining the colony count; Sabouraud, Malt Extract or Wort Agar for detecting yeasts and molds; and Blood Agar for detecting pathogenic microbes causing hemolysis. You can obtain the number of colony forming units per cubic meter of air by relating the colony count obtained to the volume of air sampled (cfu/m We recommend that you plate the gelatin filter on a suitable agar immediately after...
-
Page 42: Dissolving The Gelatin Filter Prior To Evaluation Of Collected Microorganisms
9.5 Dissolving the gelatin filter prior to evaluation of collected microorganisms Gelatin filters can be dissolved in 100 ml of sterile liquid, such as physiological saline or 0.1% peptone water, warmed to 40°C. Dissolution should be finished within about 15 minutes. Stirring the liquid using a sterile magnetic stirrer accelerates dissolution of the filter. -
Page 43: How To Use 80 Mm Gelatin Filters In The Aluminium Filter Holder And The Filter Stack
10. How to use 80 mm gelatin filters in the aluminium filter holder and the filter stack 10.1 Preparation and sterilization of the filter holder The filter holder supplied consists of a top and a bottom part (Fig. 20). The top part fits on the bottom part by turning it clockwise all the way to the stop. - Page 44 For microbiological work, sterilize the filter holder or assembled stack in a drying oven at 180°C for up to 2 hours. Autoclaving is not possible, since the aluminium material would corrode on account of the moist heat. 44 |...
-
Page 45: Placing Gelatin Filters In The Filter Holder
10.2 Placing gelatin filters in the filter holder Turn the top part counterclockwise to detach it from the bottom part (do this under sterile conditions for microbiological work), place the filter to be used on the filter support of the bottom part, centering it properly (Fig. -
Page 46: Removing Gelatin Filters From The Filter Holder After Sampling
10.3 Removing gelatin filters from the filter holder after sampling Detach the filter holder containing the exposed filter from the air inlet of the sampler (Fig. 22) or the connection on the hose and protect it from contamination until the gelatin filter is removed for plating on agar and incubation (see sections 9.4. -
Page 47: Using The Aluminium Filter Stack
10.4 Using the aluminium filter stack An aluminium filter stack (accessory order no. 17656, Fig. 23) consists of 10 filter holders fitted together in a stack, in which used and unused holders can be separated. Fig. 23 | 47... - Page 48 Before first use, clean all parts with hot water, adding a little gentle laboratory detergent if necessary, then rinse with hot water followed by distilled water. Dry the parts with hot air and assemble the filter holder. To assemble the stack, place the holders in numerical order and insert the top of the first holder in the intermediate adapter that accepts holders on either side (Fig.
- Page 49 Fig. 25 The spring-loaded spherical retainers in each holder permit easy attachment and detachment . Note: Should the spring-loaded spherical retainers be somewhat stiff at any time, they can be loosened by using a special alkaline detergent in an ultrasonic bath (details on request). For microbiological work, sterilize in a drying oven at 180°C for up to 2 hours.
- Page 50 Fit the filter holder on the MD8 airscan or the connecting piece 17659 (see section 6). After sampling, remove the holder used, fit it on the other side of the intermediate adapter (Fig.
-
Page 51: Accessories And Consumables
Remote control for MD8 airscan for use with PC (dialog system software) Further accessories like the calibration unit 16756 on request. Details on further accessories, e.g. for installation of the filter holder remote from the MD8 airscan in isolators, and for calibration of the MD8 airscan, on request. | 51... - Page 52 17655 17656 17657 17657 17657 17208 52 |...
- Page 53 17085 17088 17662 16970 16970 16970 | 53...
- Page 54 17801 17016 17030 17033 5185307T9--SS--A 54 |...
-
Page 55: Consumables
11.2 Consumables 17528-080-ACD Gelatin filter units (pack of 10, each sterile and individually packed in a polyethlyene bag) 17528-080-BZD Gelatin filter units (pack of 10, each sterile and individually packed in three successive polyethlyene bags) 17528-080-VPD Gelatin filter units (pack of 10, each sterile and individually packed in three polyethlyene bags, but label on innermost bag) 12602-080-ALK Gelatin disc filters, 80 mm diameter (pack of 50, presterilized) -
Page 56: Guarantee
12. Guarantee The guarantee conditions can differ somewhat in various countries. Should no guarantee card be included with the instrument, please contact the Sartorius Stedim Biotech subsiduary in your country at the address given on the back of this publication. - Page 57 Sartorius Stedim Biotech GmbH Sartorius Stedim Italy S.p.A. August-Spindler-Strasse 11 Via dell’Antella, 76/A 50012 Antella-Bagno a Ripoli (FI) 37079 Goettingen Phone +49.551.308.0 Phone +39.055.63.40.41 Fax +49.551.308.3289 Fax +39.055.63.40.526 www.sartorius-stedim.com Sartorius Stedim Japan K.K. KY Building, 8–11 Sartorius Stedim Kita Shinagawa 1-chome North America Inc.
Need help?
Do you have a question about the MD8 airscan and is the answer not in the manual?
Questions and answers